(no subject)
A walk through to making these 2 graphics
Requested by kumikouk
Done in PS CS2, but should translate fairly easily as it's mostly brushwork.

Click thumbnails for full size images.
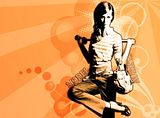
Alright, I started on a new canvas and used this gradient from crumblingwallks

I had a basic idea for what I wanted to graphic to be so after searching for some pictures and finding this one from here http://www.pink-pistol.net/scans/thumbnails.php?album=258
I added it to my canvas and did any necessary resizing. I wanted to make the image black and white so I added a black and white gradient map. Make sure whe you do this that you check the box to lock the gradient map with the previous layer so the effect is only applied to the picture and not the entire image. Next I added a brightness/contrast adjustment layer. Again make sure that is locked with your picture layer so the effect is only applied to the picture.
My setting were brightness -23 and contrast +36, but play around with the settings to get something to suit your picture. After going though the list of blend modes, I decided on Hard Light and I also added a 3px stroke around the picture.

Next I added some brushes on new layers underneath the picture.
This one from http://king-manga-man.deviantart.com/gallery/ in white with the blend mode set to Softlight 44%.

And some of the brushes from This set.
The ones on the right were done in white and the other were done in black. The white ones are set to Softlight 100% and the black ones are Softlight 51%

Finally I added some text using Times New Roman. I wanted the text to curve along her body so after adding the text, I rotated it and placed it in approximate position to where I wanted it.
To get it to curve, I used the warped text tool. With your text tool selected, click on that little T that has an arced line beneath it.

I want my words to curve down like the pciture so I select Lower Arc.
For the word Model, my settings were like this

And for Fashion. On this word, I wanted it to go from smaller to bigger so I player with the horizontal distortion along with the bend

And that's it :)

-------

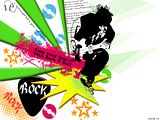
Okay, for this one, I started out with a white canvas. I had found this custom PS shape that I wanted to use so I added that first and then built around it
Shaped used from: http://www.deviantart.com/deviation/41413714/
Next I pretty much just started going through my brushes and started slapping on the ones that worked together. I used bright colors to make a contrast between the black shape.
I used this starburst again from http://king-manga-man.deviantart.com/gallery/
The color I used is #54dd1d

I added a couple of layer styles to make it pop a bit more (Layer>>layer style) I did a drop shadow and bevel/emboss, both using the default settings.

Next I added This Brush in #e00056. I knew that I wanted to add some text on top of this so I went ahead and did this next. I used Smash at 24pt and added a drop shadow as well.

Next I added this brush in #f4fe00

Brush from http://www.deviantart.com/view/20631147/
I used some layer styles on this one also. I did a drop shadow, stroke, and bevel/emboss again to make it pop more.

Next I added some of the brushes from This Set in more bright, pretty colors :)
Oh! and the halftone brushes are from Here

I this brush from Brush from http://www.deviantart.com/view/20631147/


Finally I added some more text using Rage Italic and another little brush from the Rock and Roll set.
All done :)

Requested by kumikouk
Done in PS CS2, but should translate fairly easily as it's mostly brushwork.


Click thumbnails for full size images.
Alright, I started on a new canvas and used this gradient from crumblingwallks

I had a basic idea for what I wanted to graphic to be so after searching for some pictures and finding this one from here http://www.pink-pistol.net/scans/thumbnails.php?album=258
I added it to my canvas and did any necessary resizing. I wanted to make the image black and white so I added a black and white gradient map. Make sure whe you do this that you check the box to lock the gradient map with the previous layer so the effect is only applied to the picture and not the entire image. Next I added a brightness/contrast adjustment layer. Again make sure that is locked with your picture layer so the effect is only applied to the picture.
My setting were brightness -23 and contrast +36, but play around with the settings to get something to suit your picture. After going though the list of blend modes, I decided on Hard Light and I also added a 3px stroke around the picture.

Next I added some brushes on new layers underneath the picture.
This one from http://king-manga-man.deviantart.com/gallery/ in white with the blend mode set to Softlight 44%.

And some of the brushes from This set.
The ones on the right were done in white and the other were done in black. The white ones are set to Softlight 100% and the black ones are Softlight 51%

Finally I added some text using Times New Roman. I wanted the text to curve along her body so after adding the text, I rotated it and placed it in approximate position to where I wanted it.
To get it to curve, I used the warped text tool. With your text tool selected, click on that little T that has an arced line beneath it.

I want my words to curve down like the pciture so I select Lower Arc.
For the word Model, my settings were like this

And for Fashion. On this word, I wanted it to go from smaller to bigger so I player with the horizontal distortion along with the bend

And that's it :)

-------

Okay, for this one, I started out with a white canvas. I had found this custom PS shape that I wanted to use so I added that first and then built around it
Shaped used from: http://www.deviantart.com/deviation/41413714/
Next I pretty much just started going through my brushes and started slapping on the ones that worked together. I used bright colors to make a contrast between the black shape.
I used this starburst again from http://king-manga-man.deviantart.com/gallery/
The color I used is #54dd1d

I added a couple of layer styles to make it pop a bit more (Layer>>layer style) I did a drop shadow and bevel/emboss, both using the default settings.

Next I added This Brush in #e00056. I knew that I wanted to add some text on top of this so I went ahead and did this next. I used Smash at 24pt and added a drop shadow as well.

Next I added this brush in #f4fe00

Brush from http://www.deviantart.com/view/20631147/
I used some layer styles on this one also. I did a drop shadow, stroke, and bevel/emboss again to make it pop more.

Next I added some of the brushes from This Set in more bright, pretty colors :)
Oh! and the halftone brushes are from Here

I this brush from Brush from http://www.deviantart.com/view/20631147/


Finally I added some more text using Rage Italic and another little brush from the Rock and Roll set.
All done :)
