Jimmercubed's Guide for Gold, Part 1: Location, Location, Location
For those of you a bit late to the party, I offered and was taken up on writing a guide for those attempting to break into the Gold difficulty setting for the multiplayer. This is part 1 of that attempt.
The primary difference between Silver and Gold that I've seen is that on silver you can get away with being a mobile horde of facestomping, and on Gold that just doesn't work. On Gold, the wiser plan is to take and hold one area and then slay the bad guys as they funnel into your carefully constructed trap of death. For that purpose, I did some quick napkin drawing on my dry-erase grid earlier today and will present the results, with some tips, below. For those of you who are looking at attempting Gold for the first few times, I suggest sticking to the three maps I'm about to outline below + Firebase White, on Cerberus. I didn't do White 'cause, well, it's all over YouTube. Also, 'cause I think I'll vomit if I have to play FB White one more damn time, much less sketch it out in detail. I've ordered this post in a progression of the maps that I feel you should try. First, get good at Firebase White. After that, go White --> Giant --> Ghost --> TheOneWithTheSatellites --> Reactor.
Important to note for any of these map strategies to work: When a new round begins, you must be in your positions. If you aren't, the spawn locations for the enemies will get fucked, and you may find enemies spawning in your stronghold. As soon as you see/hear the One Enemy Remaining message, or even begin to feel the flow slacking off, you should immediately begin searching for more ammo and then heading back to your positions if you were forced to move from it. It's very important that you be in position when the new wave begins.
Standard disclaimer: While it's on grid paper to help it look Super Official, all of these were drawn as best as I could from memory. There's a few places where the scale is just wildly off (the Reactor map is pretty lulzworthy, but should still work for our intentions). Pretty sure I remembered to label where Extraction was to give everyone a point to try and calibrate yourselves from.
Ego disclaimer: I read a quote a long time ago that talked about how no matter how good you are at something, no matter how amazing you are at that thing you're good at, someone out there is better. Probably several someones. If you're here to argue with me about the finer points of what I'm presenting... This guide isn't here for you. This isn't THE ROUTE TO ULTIMATE MIN MAXING POWER. It's step 1 of how to beat gold.
FIREBASE GIANT
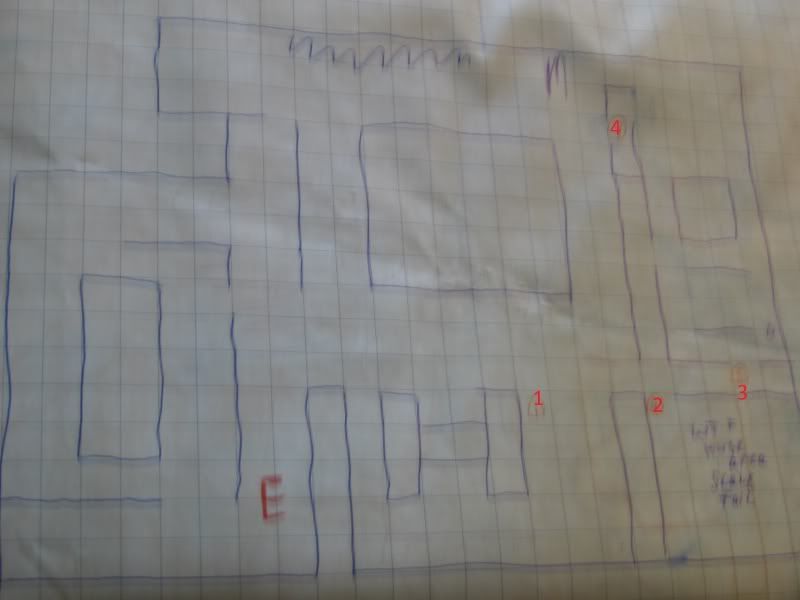
Apologies for the somewhat blurry image on this one; the camera refused to take anything clearer. What's happening in this picture is that the majority of the enemies will spawn on the left-hand side of the map in the large, tan building. They then filter along what, in the above picture, is the "bottom" of the map towards players 1, 2, and 3. To prevent enemies from spawning inside the structure you're using, dubbed 'Temple' by my party, and to cover the top approach, player 4 should be positioned adjacent that ladder.
Occasionally, they'll break from that spawn pattern and send a larger pack towards Player 4. It's very, very important that player 4 have voice, so he can call out when he needs help. Instead of the whole team going to help Player 4, someone should be dubbed the 'Floater', who floats between Player 4 and the other team as necessary.
It's very important that whoever occupies the Player 1 position be able to deal very reliable, heavy damage. In my group, we use a Salarian Infiltrator with the Valiant, but I've seen Turian Soldiers with maxed accuracy builds + Revenants do the same thing. Whatever build is used, it must be high damage, 'cause they spawn ridiculously quickly for that person. Player 1 should be ready to fall back slowly, utilizing the cover that's scattered behind him. Players 2 and 3 should be providing fire support from the rear and keeping overflow from Position 4 from flanking Position 1.
Positions 2, 3, and 4 should be proficient in at least mid, if not far, range.
FIREBASE GHOST
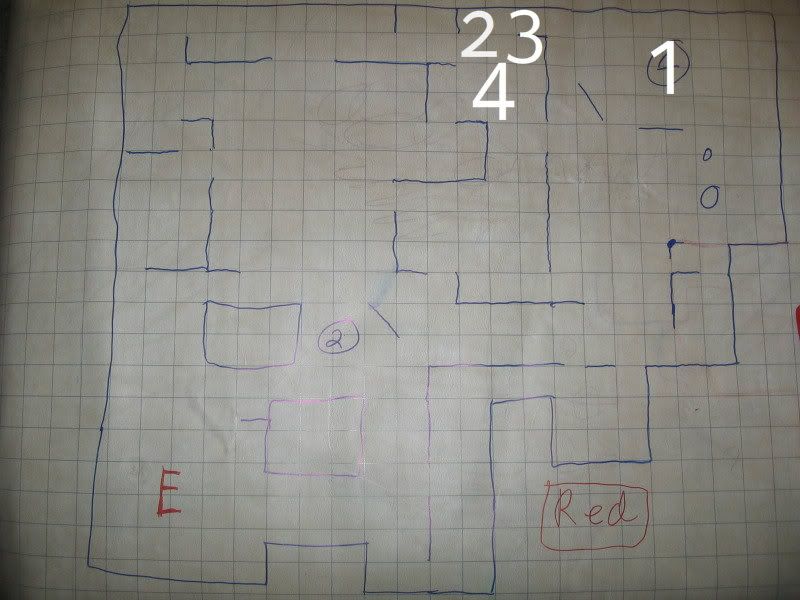
I've seen two different strongholds used on this map, but I'm going to present the one that I've seen have the highest success rate. Position 1 remains outside, taking cover where indicated and then blasting the enemies that take that ridiculously long approach to him. Position 1 benefits greatly from being a sniper or some other build that excels at high damage, long range.
For positions 2, 3, 4, they will remain inside that small trailer, taking cover and waiting for the enemies to filter into them. It benefits to have one long range, high damage character in this situation as well, 'cause there's a few line of sight gaps that can be abused as the enemies approach. The other two characters, however, I strongly urge to have more close-range-friendly loadouts. Asari adepts with stasis bubble spec'd to remain in place after cast are absolute powerhouses in this location. Dropping the stasis bubble on either of the three main entrances into that little trailer effectively locks that entrance against most enemies. Also, engineers with the flamethrower upgrade for their turrets are particularly welcome here.
In this build, it's important for Position 1 to have voice, so that in the rare chance that they get overwhelmed, they can call for help. The vast majority of enemies will be filtering through Positions 2,3, and 4, so Position 1's load should be relatively light. Once Position 1 gets a feel for how and when to expect his enemies, he can pitch in and help out positions 2,3, and 4.
Remember that I mentioned I've seen two approaches for this map? The other involves the hard-to-see, shittily-drawn blue 2 that's closer to extraction. Three people hole up there, firing down that ramp into the "north" of the map, as I've drawn it. The other person takes cover looking eastwards and covers the alleyway approach, calling out help as needed. This approach, while not ideal, is usually only used when you have random players who refuse to conform to the other stronghold. If you can't make them move, you'll have to move to them, so, /lesigh, that's one of the plans you can use.
FIREBASE WHATSHISFACEWITHTHESATELLITES
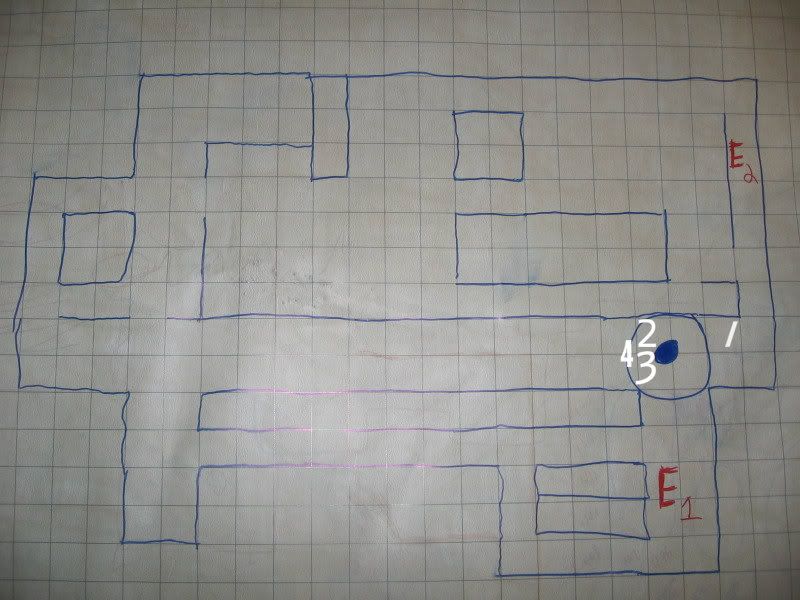
Ninja!Edit: For some reason, the edits I've made to the picture aren't appearing, soooo... Here's a link to the page with the actual Player points on it:
http://s120.photobucket.com/albums/o167/jimmercubed/?action=view¤t=Satellite.jpg
As you may have gathered by this point, my primary build is a salarian infiltrator with a sniper rifle. As such, this is one of my favorite maps. :D The lines of sight are so incredibly long that you can blast away at pretty much anything as it approaches. In the Stronghold outline that I have depicted here, Player 1 needs to be a strong, but not necessarily super duper awesome badass, player. He covers the right hand side of the map where fewer enemies spawn, while players 2,3, and 4 cover the left hand side of the map, where the majority of enemies invade from. Usually, I've seen players 2/3/4 take potshots out of the windows until the enemies actually make it to the tunnel mouth, then defend that location. With three players defending such a narrow, confined area, it's a huge deathtrap.
With left and right covered, that leaves the potential for them to use the "southern" entrance to the central circle. While it's technically possibleish, I've never seen it be a problem. The flow of the enemies just doesn't really take them that way very often, but it's still worth having 2/3/4 glance behind them every now and again. As always, communication will make this much, much, much easier.
FIREBASE REACTOR
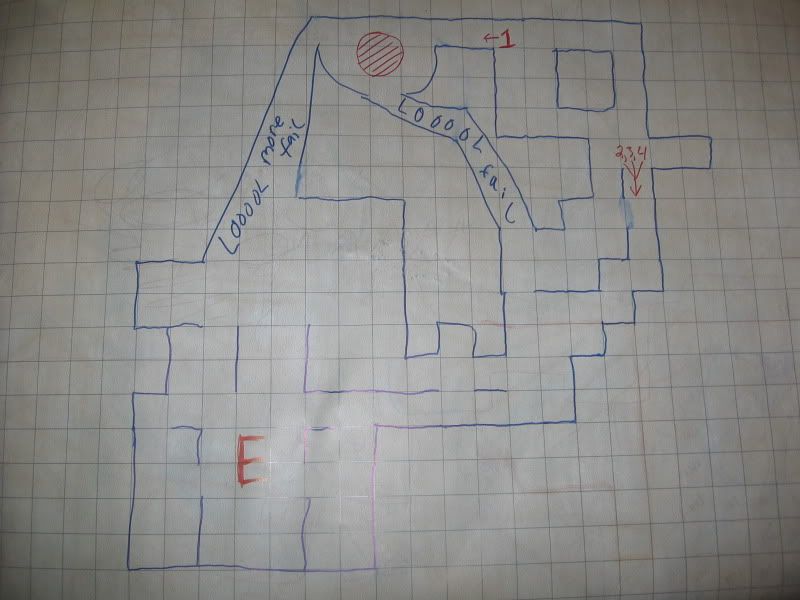
Haha, first off, lemme apologize right off the bat. This map ended up all kinds of crazy and weird and fucked up. Bear with me.
The first tip that I have for playing this map is, dear god, turn the brightness on your TV up. I enjoyed this map phenomenally more once I could see WTF WAS HAPPENING. >.<
The icon that looks like a blue red waffle is supposed to be the reactor for which the map is named. Continuing past that, you should come to an area that has the large blue mechanical/computer pieces, and after that point, the map is accurateish. My stronghold plan calls for Player 1 to cover the Reactor approach, while players 2/3/4 cover the other side. I strongly suggest they post up at the area that provides them with both a long forward line of sight as well as what will be a down-and-to-the-right line of sight on the area with the ramps. The vast majority of enemies will be attacking from the 2/3/4 side, with 1 dealing with the trickle. As I've mentioned repeatedly, voice will make everything phenomenally easier so that Player 1 can call when he needs reinforcements. He won't need them often, but occasionally. Uh, I do feel it worth mentioning...
...They will occasionally have you Defend This Location in the Reactor. That's three entrances in a semicircle around you. It's probably one of the hardest missions in the entire game. The only real survival tips that I have for you there is just be ready with the missiles and the medigel, lol, 'cause you'll need 'em.
RANDOM TIPS
-Anytime past wave 5 when you can get two or more bosses (Primes, Atlases, Banshees) in one rocket shot, take it.
-When shooting rockets, always aim at the feet of the target, so you'll hit the ground. Easy to hit the ground, hard to hit warping banshees. :P
-When you're the last one alive, be free with the rockets. Rocket what you have to to ensure your survival.
-Using the stronghold approach outlined above, and you get the Eliminate High Priority Targets missions, don't go out to them. Let the targets funnel into you, then roflpwn them.
-When new to Gold, always make sure at least one party member is an infiltrator. Preferably one spec'd into duration rather than damage. With a smart infiltrator, Hack 4 Points missions are easy. Players 1, 2, and 3 hold down the stronghold, Player 4 (the infiltrator) ninja's out there and hacks the points. Autowin, long as the infiltrator is good enough.
-If an infiltrator is on a Hack 4 Points location actively hacking, please, please, please, do not go stand over them. Enemies home in on visible players. As you're standing over the infiltrator "guarding" him, you're summoning more enemies to him. When he finishes hacking that point, he'll be without cooldowns, facing the enemies you brought with you.
-Until you feel proficient enough at gold to no longer need the l2gold guide, put Armor Piercing on all your weapons. (except, maybe, submachine guns. I guess I can see an argument there.)
-Never go down and immediately medigel back up. Unless your team is about to lose RIGHT NOW, always mash A for the max duration before medigeling.
-In my opinion, the game's enjoyment level increases exponentially whenever you can communicate with the other players; I view having a microphone as almost mandatory for higher level play. That said, it is the internet. There are assholes abound, so the argument "I just don't feel like putting up with douches" carries a lot of weight.
CLOSING STATEMENTS
I'm a huge whore for feedback. Let me know what y'all thought of this, if you liked the guide at all, or if the whole thing was terrible. If you did like it, do you want another guide on locations/strongholds or do you want to hear my thoughts on classes, and what to bring where? I'm at y'all's disposal.
The primary difference between Silver and Gold that I've seen is that on silver you can get away with being a mobile horde of facestomping, and on Gold that just doesn't work. On Gold, the wiser plan is to take and hold one area and then slay the bad guys as they funnel into your carefully constructed trap of death. For that purpose, I did some quick napkin drawing on my dry-erase grid earlier today and will present the results, with some tips, below. For those of you who are looking at attempting Gold for the first few times, I suggest sticking to the three maps I'm about to outline below + Firebase White, on Cerberus. I didn't do White 'cause, well, it's all over YouTube. Also, 'cause I think I'll vomit if I have to play FB White one more damn time, much less sketch it out in detail. I've ordered this post in a progression of the maps that I feel you should try. First, get good at Firebase White. After that, go White --> Giant --> Ghost --> TheOneWithTheSatellites --> Reactor.
Important to note for any of these map strategies to work: When a new round begins, you must be in your positions. If you aren't, the spawn locations for the enemies will get fucked, and you may find enemies spawning in your stronghold. As soon as you see/hear the One Enemy Remaining message, or even begin to feel the flow slacking off, you should immediately begin searching for more ammo and then heading back to your positions if you were forced to move from it. It's very important that you be in position when the new wave begins.
Standard disclaimer: While it's on grid paper to help it look Super Official, all of these were drawn as best as I could from memory. There's a few places where the scale is just wildly off (the Reactor map is pretty lulzworthy, but should still work for our intentions). Pretty sure I remembered to label where Extraction was to give everyone a point to try and calibrate yourselves from.
Ego disclaimer: I read a quote a long time ago that talked about how no matter how good you are at something, no matter how amazing you are at that thing you're good at, someone out there is better. Probably several someones. If you're here to argue with me about the finer points of what I'm presenting... This guide isn't here for you. This isn't THE ROUTE TO ULTIMATE MIN MAXING POWER. It's step 1 of how to beat gold.
FIREBASE GIANT

Apologies for the somewhat blurry image on this one; the camera refused to take anything clearer. What's happening in this picture is that the majority of the enemies will spawn on the left-hand side of the map in the large, tan building. They then filter along what, in the above picture, is the "bottom" of the map towards players 1, 2, and 3. To prevent enemies from spawning inside the structure you're using, dubbed 'Temple' by my party, and to cover the top approach, player 4 should be positioned adjacent that ladder.
Occasionally, they'll break from that spawn pattern and send a larger pack towards Player 4. It's very, very important that player 4 have voice, so he can call out when he needs help. Instead of the whole team going to help Player 4, someone should be dubbed the 'Floater', who floats between Player 4 and the other team as necessary.
It's very important that whoever occupies the Player 1 position be able to deal very reliable, heavy damage. In my group, we use a Salarian Infiltrator with the Valiant, but I've seen Turian Soldiers with maxed accuracy builds + Revenants do the same thing. Whatever build is used, it must be high damage, 'cause they spawn ridiculously quickly for that person. Player 1 should be ready to fall back slowly, utilizing the cover that's scattered behind him. Players 2 and 3 should be providing fire support from the rear and keeping overflow from Position 4 from flanking Position 1.
Positions 2, 3, and 4 should be proficient in at least mid, if not far, range.
FIREBASE GHOST

I've seen two different strongholds used on this map, but I'm going to present the one that I've seen have the highest success rate. Position 1 remains outside, taking cover where indicated and then blasting the enemies that take that ridiculously long approach to him. Position 1 benefits greatly from being a sniper or some other build that excels at high damage, long range.
For positions 2, 3, 4, they will remain inside that small trailer, taking cover and waiting for the enemies to filter into them. It benefits to have one long range, high damage character in this situation as well, 'cause there's a few line of sight gaps that can be abused as the enemies approach. The other two characters, however, I strongly urge to have more close-range-friendly loadouts. Asari adepts with stasis bubble spec'd to remain in place after cast are absolute powerhouses in this location. Dropping the stasis bubble on either of the three main entrances into that little trailer effectively locks that entrance against most enemies. Also, engineers with the flamethrower upgrade for their turrets are particularly welcome here.
In this build, it's important for Position 1 to have voice, so that in the rare chance that they get overwhelmed, they can call for help. The vast majority of enemies will be filtering through Positions 2,3, and 4, so Position 1's load should be relatively light. Once Position 1 gets a feel for how and when to expect his enemies, he can pitch in and help out positions 2,3, and 4.
Remember that I mentioned I've seen two approaches for this map? The other involves the hard-to-see, shittily-drawn blue 2 that's closer to extraction. Three people hole up there, firing down that ramp into the "north" of the map, as I've drawn it. The other person takes cover looking eastwards and covers the alleyway approach, calling out help as needed. This approach, while not ideal, is usually only used when you have random players who refuse to conform to the other stronghold. If you can't make them move, you'll have to move to them, so, /lesigh, that's one of the plans you can use.
FIREBASE WHATSHISFACEWITHTHESATELLITES

Ninja!Edit: For some reason, the edits I've made to the picture aren't appearing, soooo... Here's a link to the page with the actual Player points on it:
http://s120.photobucket.com/albums/o167/jimmercubed/?action=view¤t=Satellite.jpg
As you may have gathered by this point, my primary build is a salarian infiltrator with a sniper rifle. As such, this is one of my favorite maps. :D The lines of sight are so incredibly long that you can blast away at pretty much anything as it approaches. In the Stronghold outline that I have depicted here, Player 1 needs to be a strong, but not necessarily super duper awesome badass, player. He covers the right hand side of the map where fewer enemies spawn, while players 2,3, and 4 cover the left hand side of the map, where the majority of enemies invade from. Usually, I've seen players 2/3/4 take potshots out of the windows until the enemies actually make it to the tunnel mouth, then defend that location. With three players defending such a narrow, confined area, it's a huge deathtrap.
With left and right covered, that leaves the potential for them to use the "southern" entrance to the central circle. While it's technically possibleish, I've never seen it be a problem. The flow of the enemies just doesn't really take them that way very often, but it's still worth having 2/3/4 glance behind them every now and again. As always, communication will make this much, much, much easier.
FIREBASE REACTOR

Haha, first off, lemme apologize right off the bat. This map ended up all kinds of crazy and weird and fucked up. Bear with me.
The first tip that I have for playing this map is, dear god, turn the brightness on your TV up. I enjoyed this map phenomenally more once I could see WTF WAS HAPPENING. >.<
The icon that looks like a blue red waffle is supposed to be the reactor for which the map is named. Continuing past that, you should come to an area that has the large blue mechanical/computer pieces, and after that point, the map is accurateish. My stronghold plan calls for Player 1 to cover the Reactor approach, while players 2/3/4 cover the other side. I strongly suggest they post up at the area that provides them with both a long forward line of sight as well as what will be a down-and-to-the-right line of sight on the area with the ramps. The vast majority of enemies will be attacking from the 2/3/4 side, with 1 dealing with the trickle. As I've mentioned repeatedly, voice will make everything phenomenally easier so that Player 1 can call when he needs reinforcements. He won't need them often, but occasionally. Uh, I do feel it worth mentioning...
...They will occasionally have you Defend This Location in the Reactor. That's three entrances in a semicircle around you. It's probably one of the hardest missions in the entire game. The only real survival tips that I have for you there is just be ready with the missiles and the medigel, lol, 'cause you'll need 'em.
RANDOM TIPS
-Anytime past wave 5 when you can get two or more bosses (Primes, Atlases, Banshees) in one rocket shot, take it.
-When shooting rockets, always aim at the feet of the target, so you'll hit the ground. Easy to hit the ground, hard to hit warping banshees. :P
-When you're the last one alive, be free with the rockets. Rocket what you have to to ensure your survival.
-Using the stronghold approach outlined above, and you get the Eliminate High Priority Targets missions, don't go out to them. Let the targets funnel into you, then roflpwn them.
-When new to Gold, always make sure at least one party member is an infiltrator. Preferably one spec'd into duration rather than damage. With a smart infiltrator, Hack 4 Points missions are easy. Players 1, 2, and 3 hold down the stronghold, Player 4 (the infiltrator) ninja's out there and hacks the points. Autowin, long as the infiltrator is good enough.
-If an infiltrator is on a Hack 4 Points location actively hacking, please, please, please, do not go stand over them. Enemies home in on visible players. As you're standing over the infiltrator "guarding" him, you're summoning more enemies to him. When he finishes hacking that point, he'll be without cooldowns, facing the enemies you brought with you.
-Until you feel proficient enough at gold to no longer need the l2gold guide, put Armor Piercing on all your weapons. (except, maybe, submachine guns. I guess I can see an argument there.)
-Never go down and immediately medigel back up. Unless your team is about to lose RIGHT NOW, always mash A for the max duration before medigeling.
-In my opinion, the game's enjoyment level increases exponentially whenever you can communicate with the other players; I view having a microphone as almost mandatory for higher level play. That said, it is the internet. There are assholes abound, so the argument "I just don't feel like putting up with douches" carries a lot of weight.
CLOSING STATEMENTS
I'm a huge whore for feedback. Let me know what y'all thought of this, if you liked the guide at all, or if the whole thing was terrible. If you did like it, do you want another guide on locations/strongholds or do you want to hear my thoughts on classes, and what to bring where? I'm at y'all's disposal.