Cameron Tutorial
Hi guys!
moony_star ask me for a tutorial for an icon.
I hope you understand it because you know I´m not English, and my Photoshop is in Spanish, but I´ll do my best to explain you.
We´ll be going from this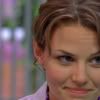
to this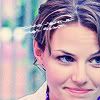
2.Duplicate it and set to Screen, then go into Image>Adjustments>Hue/Saturation and set Saturation to +15

3.New layer, fill it with #011C33 and set to Exclusion 100%

>>
4.New Layer. Fill it with #F3AAFA and set to Soft Light 100%

>>
5.Duplicate your base, bring it to the top and set to Soft Light (100%)

6.New Layer. Fill it with #76D5F8 and set to Color Burn (100%)

>>
7.Duplicate your base again, bring it to the top and set to Screen (100%)

8.New Layer. Fill it with #FEE7AE and set to Darken (47%)

>>
9.Merge all layers and sharpen your new base.
Maybe it looks over-sharpened now, so go to Edit>Fade Sharpen and adjust the settings.

Now you can add some tiny text or brushes
And you´re done!
You know this always depends on your image. The trick is to experiment ;)
I'd love to see what you guys come up with!
Enjoy!
---------
-Feel free to friend this journal
-Do you want to be an affiliate? Click here
moony_star ask me for a tutorial for an icon.
I hope you understand it because you know I´m not English, and my Photoshop is in Spanish, but I´ll do my best to explain you.
We´ll be going from this
to this
2.Duplicate it and set to Screen, then go into Image>Adjustments>Hue/Saturation and set Saturation to +15
3.New layer, fill it with #011C33 and set to Exclusion 100%
>>
4.New Layer. Fill it with #F3AAFA and set to Soft Light 100%
>>
5.Duplicate your base, bring it to the top and set to Soft Light (100%)
6.New Layer. Fill it with #76D5F8 and set to Color Burn (100%)
>>
7.Duplicate your base again, bring it to the top and set to Screen (100%)
8.New Layer. Fill it with #FEE7AE and set to Darken (47%)
>>
9.Merge all layers and sharpen your new base.
Maybe it looks over-sharpened now, so go to Edit>Fade Sharpen and adjust the settings.
Now you can add some tiny text or brushes
And you´re done!
You know this always depends on your image. The trick is to experiment ;)
I'd love to see what you guys come up with!
Enjoy!
---------
-Feel free to friend this journal
-Do you want to be an affiliate? Click here