Tutorial #2.
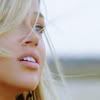
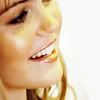
As for the good results of my last tutorial I bring you another one! Wooohooo! :D This time we will be turning this 
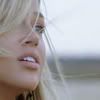
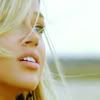
into this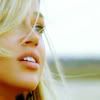
. For PS CS2 involving Selective colors, Color Balance and Curves so I think it's probably not translatable, but you can always try, trying it's funny.
1. Choose your image. Mine will be this beautiful Tyra cap of Friday Night Lights. I capped it my own.
2. Play with the image. I resized it, then cropped until I liked it.
3. To make your base lighter duplicate (Ctrl + J) the image the times you need (I needed 3 times) and set them all to Screen 100%. Merge them all (Ctrl + E).
>>
4. Add a new Hue/Saturation layer (Layer -> New adjustment layer -> Hue/Saturation) Up the "master" saturation to +30.
>>
5. New curves layer (Layer -> New adjustment layer -> Curves).
RGB. First point. Input: 84 Output:103
>>
6. New Color Balance layer (Layer -> New adjustment layer -> Color balance). Put this layer to soft light 40%.
Midtones: +17 0 -22
Shadows: -14 0 -22
Highlights: -9 0 -20
>>
7. Duplicate de Color Balance layer, and set it to normal 100%.
>>
8. Another curves layer (Layer -> New adjustment layer -> Curves).
BLUE. First point. Input: 75 Output: 73
Second point. Input: 184 Output: 202
>>
9. Duplicate (ctrl + J) the base layer, and drag it to the top. Add Gaussian Blur (Filter -> blur -> Gaussian blur) radius 1,0. Set it to soft light 100%.
>>
10. New selective color layer (Layer -> New adjustment layer -> Selective colors). This serves to emphasize the colors on Tyra's face.
REDS:
C: -15
M: 0
Y: +37
B: +15
>>
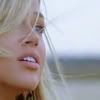
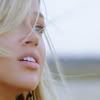
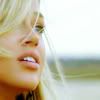
Another examples made with the same technique, though with slight variations:
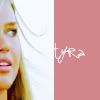
Remember! Don't copy exactly, just play with your image and see what you can get, be creative, have FUN with it! And please let me know what you think, comments are love! Thank you!
1. Elige tu imagen. La mía será esta bella captura de Tyra en Friday Night Lights. La captura la hice yo misma.
2. Juega con tu imagen. Yo la he redimensionado y la he colocado como me gustaba.
3. Para hacer que tu base sea más clara, duplica (ctrl + J) la base las veces que necesites (yo he necesitado hacerlo 3 veces) y ponlas todas en Trama 100%. Únelas todas mediante Ctrl + E.
>>
4. Nueva capa de Tono/Saturación (Capa -> Nueva capa de ajuste -> Tono/Saturación) Aumenta la saturación "maestra" (¿es maestra en el PS en castellano? No estoy segura XD) a +30.
>>
5. Nueva capa de Curvas (Capa -> Nueva capa de ajuste -> Curvas).
RGB. Primer punto. Input: 84 Output: 103.
>>
6. Nueva capa de Balance de color (Capa -> Nueva capa de ajuste -> Balance de color). Poned esta capa en Luz Suave 40%
Medios tonos: +17 0 -22
Sombras: -14 0 -22
Brillos: -9 0 -20
>>
7. Duplicar la capa de Balance de color y ponerla en Normal 100%.
>>
8. Otra nueva capa de Curvas (Capa -> Nueva capa de ajuste -> Curvas).
AZUL: Pirmer punto: Input: 75 Output: 73
Segundo punto: Input 184 Output: 202
>>
9. Duplicar (ctrl + J) la base, y subirla arriba del todo. Desenfocar la capa mediante el desenfoque gaussiano, radio 1,0, y ponerla en Luz Suave 100%.
>>
10. Nueva capa de Color selectivo (capa -> Nueva capa de ajuste -> Color selectivo). Esta capa nos servirá para enfatizar los colores en la cara de Tyra.
ROJOS:
C: -15
M: 0
Y: +37
B: +15
>>
Otros ejemplos hechos con la misma técnica, aunque con pequeñas variaciones:
Y por favor, no lo copieis exactamente, jugad con vuestra imagen y mirad lo que podeis conseguir, sed creativos y pasadlo BIEN probándolo.Los comments siempre se agradecen, y dejadme saber lo que pensais, gracias!!!


Complacient.

Marea - Venas con humo y palabras

Sofa.
into this
. For PS CS2 involving Selective colors, Color Balance and Curves so I think it's probably not translatable, but you can always try, trying it's funny.
1. Choose your image. Mine will be this beautiful Tyra cap of Friday Night Lights. I capped it my own.
2. Play with the image. I resized it, then cropped until I liked it.
3. To make your base lighter duplicate (Ctrl + J) the image the times you need (I needed 3 times) and set them all to Screen 100%. Merge them all (Ctrl + E).
>>
4. Add a new Hue/Saturation layer (Layer -> New adjustment layer -> Hue/Saturation) Up the "master" saturation to +30.
>>
5. New curves layer (Layer -> New adjustment layer -> Curves).
RGB. First point. Input: 84 Output:103
>>
6. New Color Balance layer (Layer -> New adjustment layer -> Color balance). Put this layer to soft light 40%.
Midtones: +17 0 -22
Shadows: -14 0 -22
Highlights: -9 0 -20
>>
7. Duplicate de Color Balance layer, and set it to normal 100%.
>>
8. Another curves layer (Layer -> New adjustment layer -> Curves).
BLUE. First point. Input: 75 Output: 73
Second point. Input: 184 Output: 202
>>
9. Duplicate (ctrl + J) the base layer, and drag it to the top. Add Gaussian Blur (Filter -> blur -> Gaussian blur) radius 1,0. Set it to soft light 100%.
>>
10. New selective color layer (Layer -> New adjustment layer -> Selective colors). This serves to emphasize the colors on Tyra's face.
REDS:
C: -15
M: 0
Y: +37
B: +15
>>
Another examples made with the same technique, though with slight variations:
Remember! Don't copy exactly, just play with your image and see what you can get, be creative, have FUN with it! And please let me know what you think, comments are love! Thank you!
1. Elige tu imagen. La mía será esta bella captura de Tyra en Friday Night Lights. La captura la hice yo misma.
2. Juega con tu imagen. Yo la he redimensionado y la he colocado como me gustaba.
3. Para hacer que tu base sea más clara, duplica (ctrl + J) la base las veces que necesites (yo he necesitado hacerlo 3 veces) y ponlas todas en Trama 100%. Únelas todas mediante Ctrl + E.
>>
4. Nueva capa de Tono/Saturación (Capa -> Nueva capa de ajuste -> Tono/Saturación) Aumenta la saturación "maestra" (¿es maestra en el PS en castellano? No estoy segura XD) a +30.
>>
5. Nueva capa de Curvas (Capa -> Nueva capa de ajuste -> Curvas).
RGB. Primer punto. Input: 84 Output: 103.
>>
6. Nueva capa de Balance de color (Capa -> Nueva capa de ajuste -> Balance de color). Poned esta capa en Luz Suave 40%
Medios tonos: +17 0 -22
Sombras: -14 0 -22
Brillos: -9 0 -20
>>
7. Duplicar la capa de Balance de color y ponerla en Normal 100%.
>>
8. Otra nueva capa de Curvas (Capa -> Nueva capa de ajuste -> Curvas).
AZUL: Pirmer punto: Input: 75 Output: 73
Segundo punto: Input 184 Output: 202
>>
9. Duplicar (ctrl + J) la base, y subirla arriba del todo. Desenfocar la capa mediante el desenfoque gaussiano, radio 1,0, y ponerla en Luz Suave 100%.
>>
10. Nueva capa de Color selectivo (capa -> Nueva capa de ajuste -> Color selectivo). Esta capa nos servirá para enfatizar los colores en la cara de Tyra.
ROJOS:
C: -15
M: 0
Y: +37
B: +15
>>
Otros ejemplos hechos con la misma técnica, aunque con pequeñas variaciones:
Y por favor, no lo copieis exactamente, jugad con vuestra imagen y mirad lo que podeis conseguir, sed creativos y pasadlo BIEN probándolo.Los comments siempre se agradecen, y dejadme saber lo que pensais, gracias!!!
Complacient.
Marea - Venas con humo y palabras
Sofa.