PS: basic blur animation & curves coloring
Here's a quick slap-dash tutorial for curves coloring, as well as blurred background animation. You can get a much cleaner effect by using the "tween" setting, but I was feeling lazy ;)
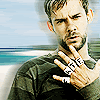
Go from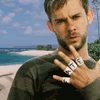
to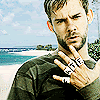
Go ahead and crop your base out. I'm using a promotional image of Charlie from Lost.
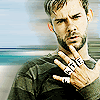
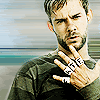
Sharpen twice, and use the blur tool at whatever setting you like to even out areas that get TOO sharp. I also used the Smudge tool to get rid of the T printed on the sand, because it looked kind of lame there by itself. After that's done, duplicate your base twice. Set the first duplicate to Screen 61%, and the desturate the second (Shift + Ctrl + U) and set to Soft Light 100%. Flatten the image.
Now we're going to play with curves. Go to Image ---> Adjustments ---> Curves to open your curves menu. I typically just play around with them until I get an effect I like, but for the purpose of this tutorial, I'll write out the exact settings I used for the effect on this image. First of all: click on the line in the grid first. If you don't, inputting numbers by hand won't really work. Curves basically adjusts the amount of a certain color that appears in the image... you can make it less/more red, green, or blue by playing with Curves. Click the drop-down menu for these options.
Anyway. Here are the settings I used for this image - RGB: Input 110, Output 129; Red: Input 83, Ouput 95; Green: Input 76, Ouput 97; Blue: Input 91, Output 104. Remember to click on the line first, or it'll go at an angle instead of curving.
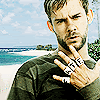
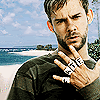
Now it's more green/yellow/blue and less red :)
Now for setting up your animation. Duplicate your base and use the Motion Blur filter, set to 20, on the duplicate. Use the eraser tool to erase the blurred area covering Charlie. Repeat this step twice, setting the two other layers to Motion Blur 40 and Motion Blur 95. You should now have four layers... your base, and three layers with varying levels of background bluriness and Charlie erased out. DON'T FLATTEN.
Now move your icon to ImageReady, either by clicking the button on the toolbar or going to File ---> Edit in ImageReady. If your animation bar isn't visible (see picture below), go to Window ---> Animation. There should be a black arrow on the right-hand side of the animation bar. Click it, and select "Make Frames from Layers." You should now have four frames, one for each layer. But there's no Charlie on the last three! That's easy to fix... just select a blurred frame, then click the little eye next to the base frame containing Charlie on your layer menu so that he shows up in each frame.
Select Frame 3, hit the black arrow, and select "Copy Frame." Then select Frame 4, hit the black arrow again, and select "Paste Frame." On the menu that pops up, choose "Paste After Selection." Repeat this for Frame 2. You should now have 6 frames in the following order: 1-2-3-4-3-2 (see below).
Make sure the lower left-hand corner says "Forever" and not "Once." That's how many times your animation will loop, and you want it to loop forever, not just once. Click the little arrow at the bottom of each frame to change the time before transition. Set the base frame to one second, and all other frames to 0.1 second, or whatever time you think looks good.
You can get a much cleaner effect by using the "Tween" option between frames, but it adds a lot of extra frames, and I'm feeling lazy, so I'm not going to go into it ;)

Save your animation as an OPTIMIZED .GIF by going to File ---> Save Optimized As... And that's it, you're done :)
Go from
to
Go ahead and crop your base out. I'm using a promotional image of Charlie from Lost.
Sharpen twice, and use the blur tool at whatever setting you like to even out areas that get TOO sharp. I also used the Smudge tool to get rid of the T printed on the sand, because it looked kind of lame there by itself. After that's done, duplicate your base twice. Set the first duplicate to Screen 61%, and the desturate the second (Shift + Ctrl + U) and set to Soft Light 100%. Flatten the image.
Now we're going to play with curves. Go to Image ---> Adjustments ---> Curves to open your curves menu. I typically just play around with them until I get an effect I like, but for the purpose of this tutorial, I'll write out the exact settings I used for the effect on this image. First of all: click on the line in the grid first. If you don't, inputting numbers by hand won't really work. Curves basically adjusts the amount of a certain color that appears in the image... you can make it less/more red, green, or blue by playing with Curves. Click the drop-down menu for these options.
Anyway. Here are the settings I used for this image - RGB: Input 110, Output 129; Red: Input 83, Ouput 95; Green: Input 76, Ouput 97; Blue: Input 91, Output 104. Remember to click on the line first, or it'll go at an angle instead of curving.
Now it's more green/yellow/blue and less red :)
Now for setting up your animation. Duplicate your base and use the Motion Blur filter, set to 20, on the duplicate. Use the eraser tool to erase the blurred area covering Charlie. Repeat this step twice, setting the two other layers to Motion Blur 40 and Motion Blur 95. You should now have four layers... your base, and three layers with varying levels of background bluriness and Charlie erased out. DON'T FLATTEN.
Now move your icon to ImageReady, either by clicking the button on the toolbar or going to File ---> Edit in ImageReady. If your animation bar isn't visible (see picture below), go to Window ---> Animation. There should be a black arrow on the right-hand side of the animation bar. Click it, and select "Make Frames from Layers." You should now have four frames, one for each layer. But there's no Charlie on the last three! That's easy to fix... just select a blurred frame, then click the little eye next to the base frame containing Charlie on your layer menu so that he shows up in each frame.
Select Frame 3, hit the black arrow, and select "Copy Frame." Then select Frame 4, hit the black arrow again, and select "Paste Frame." On the menu that pops up, choose "Paste After Selection." Repeat this for Frame 2. You should now have 6 frames in the following order: 1-2-3-4-3-2 (see below).
Make sure the lower left-hand corner says "Forever" and not "Once." That's how many times your animation will loop, and you want it to loop forever, not just once. Click the little arrow at the bottom of each frame to change the time before transition. Set the base frame to one second, and all other frames to 0.1 second, or whatever time you think looks good.
You can get a much cleaner effect by using the "Tween" option between frames, but it adds a lot of extra frames, and I'm feeling lazy, so I'm not going to go into it ;)
Save your animation as an OPTIMIZED .GIF by going to File ---> Save Optimized As... And that's it, you're done :)