008/009 Tutorial | Ashley Olsen/Ashlee Simpson
What better way to break in my new icon journal than with tutorials! Two of them, the first one requested by babyxcakes from MKA icons in this post. And the second one is of a userinfo banner (though the sample has been resized to icon size, and in the step-by-step examples they've been resized to 200x200) requested by abrightsky.
• I use PSP8. However, it is translateable.
• Image Heavy-ish.
• Beginner Friendly (or so I like to hope).
• Any questions? Please ask!
• JOIN to keep up with updates.
• Request for tutorials can be made HERE.

TO
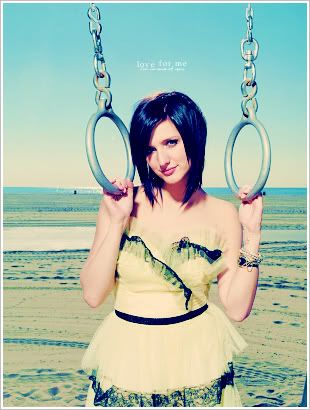
..01 Grab your base, mine is of Ashley Olsen. My base was already light, so I didn't have to do any adjustments (screen layers/soft light layers, etc). If yours isn't light, then do what you gotta do.
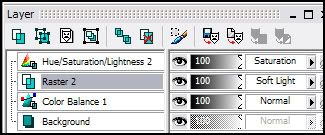
..02 New adjustment layer. Layers >> New Adjustment Layer >> Color Balance. Put in the following settings (Preserve Luminance Checked):
Midtones: -5, 6, 10
Shadows: 26, -4, 35
Highlights: 1, 17, -5

I know, it doesn't look like much. But trust me, without it, the icon would look wierd with the next two coming steps.
..03 Flood fill with #8DE3FF. Set to Soft Light.

>>
..04 New adjustment layer. Layers >> New Adjustment Layer >> Hue & Saturation. Put in the following settings:
Saturation: +64
Set this adjustment layer to Saturation.
And of course, layers!
And that's all! Easy-peasy, right? Here are some variations of this tutorial.


EDITED: Okay, so it came to my attention that some people had different outcomes with this tutorial. From what I can tell, it has to do with prior versions of PSP8 and how they handle the Hue/Saturation option. Though, I could be wrong. So, I've uploaded the .psp file of this tutorial, as well as a Script. Hopefully earlier versions will be able to open both. For those that open the .psp file, can you let me know if you get the same outcome? If you don't know how to run a script, here's how you do it. Download the script and save it somewhere. Then in PSP while having your base open, go to File >> Scripts >> Run >> *go to where your script is saved*. That should be all. It may ask you to hit okay at the make of each new layer, just hit OKAY. Let me know if this produces the same out come. Hopefully it does, it nothing then unfortunately I'm out of ideas. You're free to upload each step and I can see if I can translate it to produce a better outcome.
PSP FILE | SCRIPT

TO
- - - - - - - - - - - - - - - - - - - - - - - - - - - - - - - - - - - - - - - - - - - - - - - - - - - - - - - - - - - - - - - - - - - - - - - - - - - - - - - - - - - - - - - - - -
..01 Grab your picture, mine is of Ashlee Simpson.

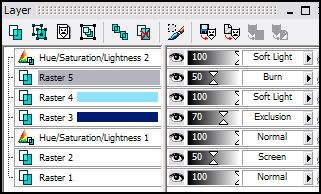
..02 Duplicate your base and set it to Screen - 50%.

..03 New adjustment layer. Layers >> New Adjustment Layer >> Hue & Saturation. Put in the following settings:
Saturation: +36

..04 Flood fill with #001B70. Set to Exclusion - 70%.

..05 Flood fill with #8FE1FF. Set to Soft Light.

..06 Duplicate your base, bring it to the top and set it to Burn - 50%.

..07 New adjustment layer. Layers >> New Adjustment Layer >> Hue & Saturation. Put in the following settings:
Saturation: +50
Set this adjustmentlayer to Soft Light.

Here are the layers ...
That's all, since this was a userinfo banner I added text and borders.
• I use PSP8. However, it is translateable.
• Image Heavy-ish.
• Beginner Friendly (or so I like to hope).
• Any questions? Please ask!
• JOIN to keep up with updates.
• Request for tutorials can be made HERE.
TO
..01 Grab your base, mine is of Ashley Olsen. My base was already light, so I didn't have to do any adjustments (screen layers/soft light layers, etc). If yours isn't light, then do what you gotta do.
..02 New adjustment layer. Layers >> New Adjustment Layer >> Color Balance. Put in the following settings (Preserve Luminance Checked):
Midtones: -5, 6, 10
Shadows: 26, -4, 35
Highlights: 1, 17, -5
I know, it doesn't look like much. But trust me, without it, the icon would look wierd with the next two coming steps.
..03 Flood fill with #8DE3FF. Set to Soft Light.
>>
..04 New adjustment layer. Layers >> New Adjustment Layer >> Hue & Saturation. Put in the following settings:
Saturation: +64
Set this adjustment layer to Saturation.
And of course, layers!
And that's all! Easy-peasy, right? Here are some variations of this tutorial.
EDITED: Okay, so it came to my attention that some people had different outcomes with this tutorial. From what I can tell, it has to do with prior versions of PSP8 and how they handle the Hue/Saturation option. Though, I could be wrong. So, I've uploaded the .psp file of this tutorial, as well as a Script. Hopefully earlier versions will be able to open both. For those that open the .psp file, can you let me know if you get the same outcome? If you don't know how to run a script, here's how you do it. Download the script and save it somewhere. Then in PSP while having your base open, go to File >> Scripts >> Run >> *go to where your script is saved*. That should be all. It may ask you to hit okay at the make of each new layer, just hit OKAY. Let me know if this produces the same out come. Hopefully it does, it nothing then unfortunately I'm out of ideas. You're free to upload each step and I can see if I can translate it to produce a better outcome.
PSP FILE | SCRIPT
TO
- - - - - - - - - - - - - - - - - - - - - - - - - - - - - - - - - - - - - - - - - - - - - - - - - - - - - - - - - - - - - - - - - - - - - - - - - - - - - - - - - - - - - - - - - -
..01 Grab your picture, mine is of Ashlee Simpson.
..02 Duplicate your base and set it to Screen - 50%.
..03 New adjustment layer. Layers >> New Adjustment Layer >> Hue & Saturation. Put in the following settings:
Saturation: +36
..04 Flood fill with #001B70. Set to Exclusion - 70%.
..05 Flood fill with #8FE1FF. Set to Soft Light.
..06 Duplicate your base, bring it to the top and set it to Burn - 50%.
..07 New adjustment layer. Layers >> New Adjustment Layer >> Hue & Saturation. Put in the following settings:
Saturation: +50
Set this adjustmentlayer to Soft Light.
Here are the layers ...
That's all, since this was a userinfo banner I added text and borders.