007 Tutorial: Jennifer LoveHewitt
New tutorial. The first step won't apply to every picture of course, but everything after the color balance layer can.
• I use PSP8. However, it is translateable.
• Not Image Heavy.
• Beginner Friendly (or so I like to hope).

TO
..01 Grab a base, mine's of my girl crush Jennifer Love Hewitt. 'Tis a very blue base, no? Let's fix that. Adjust >> Color Balance >> Color Balance. Put in the following settings.
Shadows: 0, -10, 10
Midtones: 40, 20, -60
Highlights: 11, -5, -25
Preserve Luminance Checked

>>
..02 Much better. Duplicate your base, set it to Screen - 50%.

..03 New Layer. Flood fill with #001B70 - Exclusion - 70%

>>
..04 New layer. Flood fill with #F7F1DD - Soft Light - 100%.

>>
..05 Copy Merged. Paste as New Layer. (CTRL+SHIFT+C. CTRL+L) Set to Burn - 100% (You can also achieve this by just merging the layers, duplicating it and setting it to Burn.)

..06 You know me, never enough contrast. Layers >> New Adjustment Layer >> Brightness/Contrast >> Contrast +5

..07 Paste this where you please, set to Screen - 100%.

>>
..08 Add your text. I added 'jlh' in Pea Sara in Grey (8pt).

..09 Since I like to think I'm cute and clever, I grabbed a heart brush at a small size and dotted the j with it in Red.
And there you have it! Simple, no?

And for those that are curious how this turns out minus the color balancing.

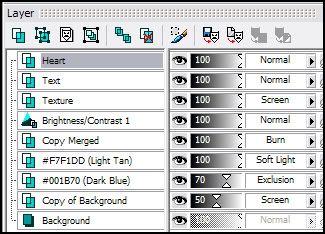
And finally, for those that need it. My layers.

• Show me what you end up with please!
• Any questions, ask!
• I use PSP8. However, it is translateable.
• Not Image Heavy.
• Beginner Friendly (or so I like to hope).

TO

..01 Grab a base, mine's of my girl crush Jennifer Love Hewitt. 'Tis a very blue base, no? Let's fix that. Adjust >> Color Balance >> Color Balance. Put in the following settings.
Shadows: 0, -10, 10
Midtones: 40, 20, -60
Highlights: 11, -5, -25
Preserve Luminance Checked

>>

..02 Much better. Duplicate your base, set it to Screen - 50%.

..03 New Layer. Flood fill with #001B70 - Exclusion - 70%

>>

..04 New layer. Flood fill with #F7F1DD - Soft Light - 100%.

>>

..05 Copy Merged. Paste as New Layer. (CTRL+SHIFT+C. CTRL+L) Set to Burn - 100% (You can also achieve this by just merging the layers, duplicating it and setting it to Burn.)

..06 You know me, never enough contrast. Layers >> New Adjustment Layer >> Brightness/Contrast >> Contrast +5

..07 Paste this where you please, set to Screen - 100%.

>>

..08 Add your text. I added 'jlh' in Pea Sara in Grey (8pt).

..09 Since I like to think I'm cute and clever, I grabbed a heart brush at a small size and dotted the j with it in Red.
And there you have it! Simple, no?

And for those that are curious how this turns out minus the color balancing.

And finally, for those that need it. My layers.

• Show me what you end up with please!
• Any questions, ask!