PS7 Colouring Tutorial
How to acheive this colouring: 
in 7 simple steps. Made in Photoshop 7, but easily translatable.
1. Crop your base. I usually work with 200x200 to start with, then resize later just because I like a larger workspace, but 100x100 is fine too.
2. Layer >> Duplicate Set to screen. On the icon at the top of the page, I only needed to dup it once, but if the cap you are working with is particularly dark, then duplicate a couple more times. This effect looks better if you start out with a light base.
3. Layer >> New Layer Fill the new layer with a dark blue colour:
. Set to exclusion @ 60-80%, depending on what looks best.
4. Another New Layer Fill with a light blue:
and set to Soft Light @100%.
5. Okay, now merge your layers (Layer >> Merge Visible) and duplicate once again.
6. Set your top layer to Colour Burn.
7. That's the basic effect, but to get sharper looking colours, play around with Saturation, Lightness/Contrast and Variations.
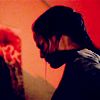
Other examples using this technique:

If you have any questions, please feel free to ask. Also, I'd love to see what you make while following this tutorial :)
in 7 simple steps. Made in Photoshop 7, but easily translatable.
1. Crop your base. I usually work with 200x200 to start with, then resize later just because I like a larger workspace, but 100x100 is fine too.
2. Layer >> Duplicate Set to screen. On the icon at the top of the page, I only needed to dup it once, but if the cap you are working with is particularly dark, then duplicate a couple more times. This effect looks better if you start out with a light base.
3. Layer >> New Layer Fill the new layer with a dark blue colour:
. Set to exclusion @ 60-80%, depending on what looks best.
4. Another New Layer Fill with a light blue:
and set to Soft Light @100%.
5. Okay, now merge your layers (Layer >> Merge Visible) and duplicate once again.
6. Set your top layer to Colour Burn.
7. That's the basic effect, but to get sharper looking colours, play around with Saturation, Lightness/Contrast and Variations.
Other examples using this technique:
If you have any questions, please feel free to ask. Also, I'd love to see what you make while following this tutorial :)