Lara Header Tutorial
Today we'll make this:
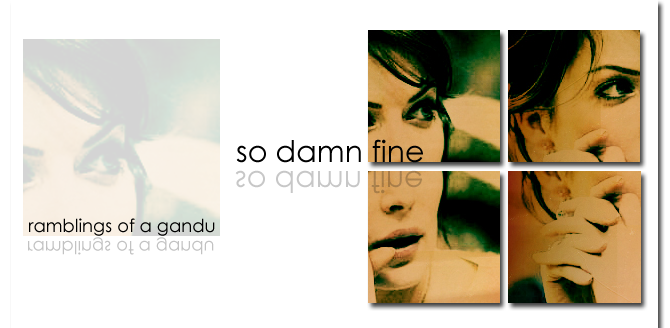
A while ago (a loong time ago, actually :) ) teh_gandu requested a layout. I made the header for it and she asked for a tutorial for it. Here it is :)
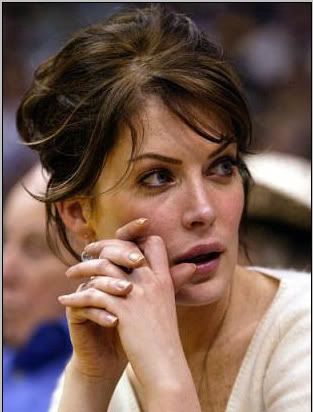
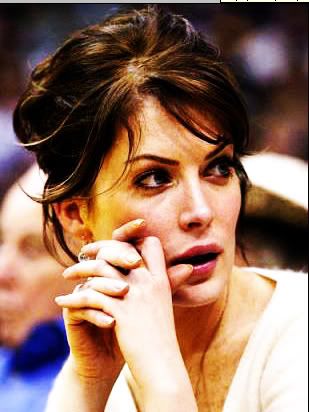
We start with this picture of the wonderful Lara.
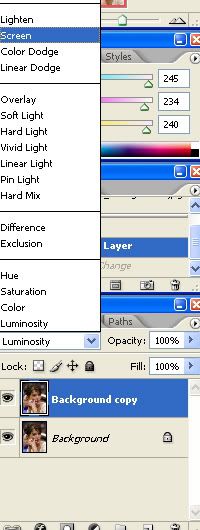
Duplicate the background layer and set it to Screen, Opacity 100%.
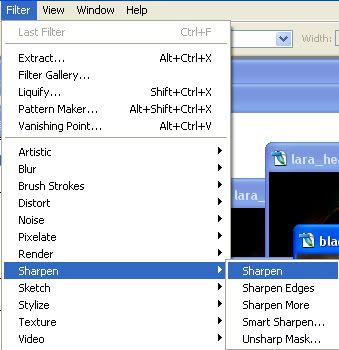
Filter->Sharpen->Sharpen.
Duplicate the background layer, drag it to the top and set it to Overlay, Opacity 100%.

This is what we have at this point. Don't worry, we'll fix it :)
Duplicate the background layer, set it to Screen and type Ctrl+U. (Image->Adjustments->Hue/Saturation) This brings up the Hue/Saturation dialog box. Drag the Saturation cursor completely to the left.
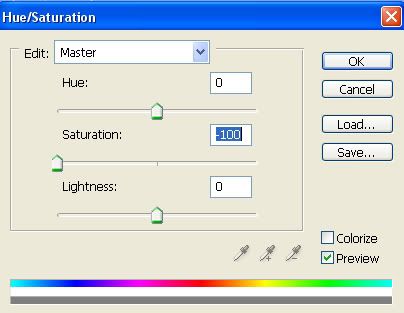
Notice that this is an effect applied to the current layer, not all layers, as you have with the Hue/Saturation Adjustment layer.
Now drag this layer to the top. This is how our layers look.
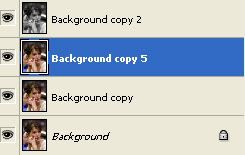
Duplicate this layer twice. The copies will have the blending mode set to Normal, and you have to change both to Screen.
This is how our image looks like:
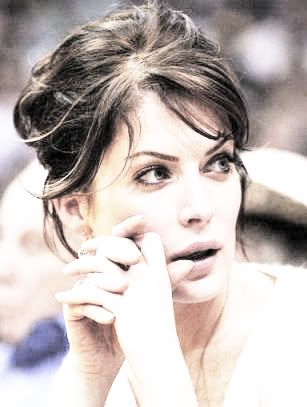
Now, because the image is too washed out and black and white, we'll duplicate the background layer, set it to Soft light, opacity 100% and drag it to the top. This is what we have:
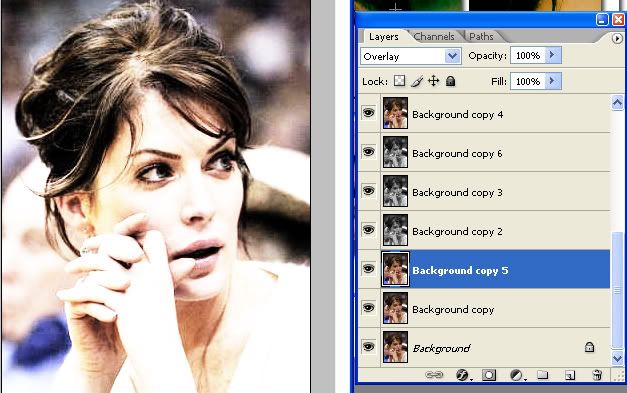
The next part is the coloring. We're gonna use some flood fill layers and two textures.
Make a new layer (Ctrl+Shift+N) and set the color to #acb72f. Fill the layer with this color and set the layer to Color Burn, opacity 7%. (Set it to a lower value and play around with it as you add more layers)
Fill another new layer with #cafdb2 and set it to Color Burn, 38%.
Another new layer, filled with #b2fdfa and set to Color Burn 100%. Duplicate this layer and set it to Color Burn, 100%.
This is what we have:
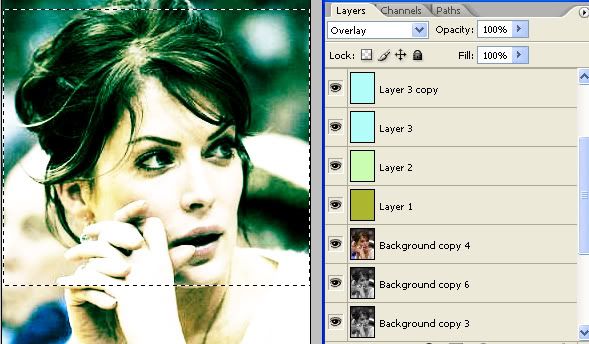
Now we add two textures. I used two bigger textures, but unfortunately, because of some virus problems, I lost the folder in which I had them. I believe they are made by inxsomniax. I have uploaded the textures, here and here.
Open the first texture, Ctrl+A to select the entire image and Ctrl+C to copy it. Now go to our Image and hit Ctrl+Shift+N to create a new layer. Ctrl+V and paste your texture in our image. Set the layer to Multiply, opacity 88%.
Repeat this with the second texture and set it to Multiply 100%.
We have this:
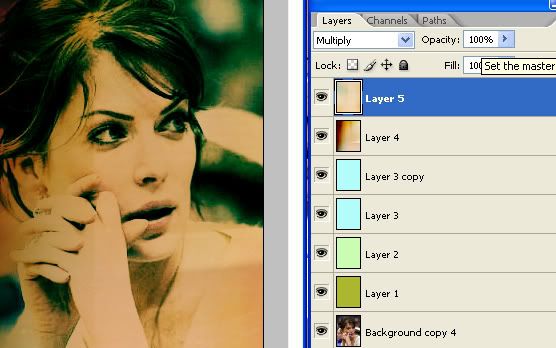
Now add a Brightness/Contrast adjustment layer and set the Brightness to -2, Contrast to +9:
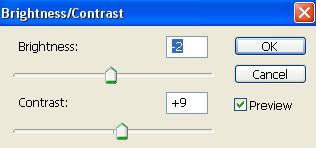
This concludes our image coloring part :)
Ctrl+Shift+E to merge the layers and save the image as you wish.
Now open a new document, around 600x400px, white background.
Copy the image of Lara (Ctrl+A and then Ctrl+C).
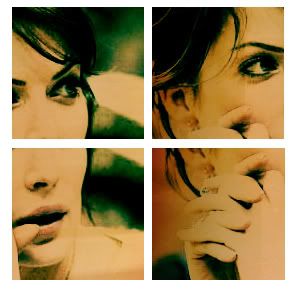
Go to the blank image and create four new layers (Ctrl+Shift+N) and paste the Lara image in each of them.(Ctrl+V)
Click on the little eye icon to make topmost three layers invisible. Select the visible layer and select a square region of it. (Hold the Shift key pressed when you select to make sure it's square).
When you decided about your region, hit Ctrl+Shift+I. You will see the selection changed. Now hit delete and you will see you have only your square left. Click Ctrl+Shift+I again to return to the square selection.
Make this layer invisible and the next one visible, but make sure you don't deselect the square. Now you have the original picture, with the little selection square. Move the square around until you're satisfied with its position and invert the selection (Ctrl+Shift+I). Press Delete.
Repeat this for the other two layers.
Now make all the layers visible and arrange them as you want.
To add the shadow, go to the effect and select Drop Shadow. Click ok to keep the default options. (If you've changed it and you have other settings, here's what I used)
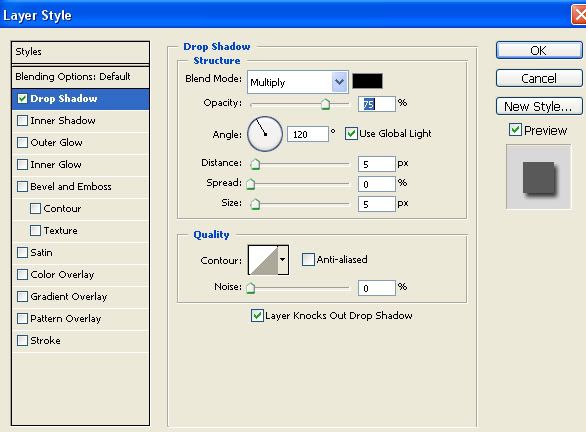
Repeat this for the other three images.
Now to make the bigger, faded out pic. Click on one of the layers, click Ctrl+A and Ctrl+C. Make a new layer and press Ctrl+V. Press Ctrl+T to transform the image. This will add a border around your image and you can resize it. After you're satisfied with the size, press Enter to apply the change and set the layer's opacity to 10%.
The last step is creating the text. I chose Century Gothic, size 30pt.
Now the trick to make the reflection is copy the text layer and go to Edit-> Transform->Flip Horizontal and vertical.
These are my layers:
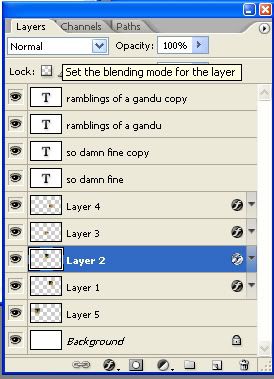
And voila! It's done :)
If you have any questions, ask away :)
Hope this was useful for you :)

A while ago (a loong time ago, actually :) ) teh_gandu requested a layout. I made the header for it and she asked for a tutorial for it. Here it is :)
We start with this picture of the wonderful Lara.

Duplicate the background layer and set it to Screen, Opacity 100%.

Filter->Sharpen->Sharpen.

Duplicate the background layer, drag it to the top and set it to Overlay, Opacity 100%.

This is what we have at this point. Don't worry, we'll fix it :)

Duplicate the background layer, set it to Screen and type Ctrl+U. (Image->Adjustments->Hue/Saturation) This brings up the Hue/Saturation dialog box. Drag the Saturation cursor completely to the left.

Notice that this is an effect applied to the current layer, not all layers, as you have with the Hue/Saturation Adjustment layer.
Now drag this layer to the top. This is how our layers look.

Duplicate this layer twice. The copies will have the blending mode set to Normal, and you have to change both to Screen.
This is how our image looks like:

Now, because the image is too washed out and black and white, we'll duplicate the background layer, set it to Soft light, opacity 100% and drag it to the top. This is what we have:

The next part is the coloring. We're gonna use some flood fill layers and two textures.
Make a new layer (Ctrl+Shift+N) and set the color to #acb72f. Fill the layer with this color and set the layer to Color Burn, opacity 7%. (Set it to a lower value and play around with it as you add more layers)
Fill another new layer with #cafdb2 and set it to Color Burn, 38%.
Another new layer, filled with #b2fdfa and set to Color Burn 100%. Duplicate this layer and set it to Color Burn, 100%.
This is what we have:

Now we add two textures. I used two bigger textures, but unfortunately, because of some virus problems, I lost the folder in which I had them. I believe they are made by inxsomniax. I have uploaded the textures, here and here.
Open the first texture, Ctrl+A to select the entire image and Ctrl+C to copy it. Now go to our Image and hit Ctrl+Shift+N to create a new layer. Ctrl+V and paste your texture in our image. Set the layer to Multiply, opacity 88%.
Repeat this with the second texture and set it to Multiply 100%.
We have this:

Now add a Brightness/Contrast adjustment layer and set the Brightness to -2, Contrast to +9:

This concludes our image coloring part :)
Ctrl+Shift+E to merge the layers and save the image as you wish.
Now open a new document, around 600x400px, white background.
Copy the image of Lara (Ctrl+A and then Ctrl+C).
Go to the blank image and create four new layers (Ctrl+Shift+N) and paste the Lara image in each of them.(Ctrl+V)
Click on the little eye icon to make topmost three layers invisible. Select the visible layer and select a square region of it. (Hold the Shift key pressed when you select to make sure it's square).
When you decided about your region, hit Ctrl+Shift+I. You will see the selection changed. Now hit delete and you will see you have only your square left. Click Ctrl+Shift+I again to return to the square selection.
Make this layer invisible and the next one visible, but make sure you don't deselect the square. Now you have the original picture, with the little selection square. Move the square around until you're satisfied with its position and invert the selection (Ctrl+Shift+I). Press Delete.
Repeat this for the other two layers.
Now make all the layers visible and arrange them as you want.

To add the shadow, go to the effect and select Drop Shadow. Click ok to keep the default options. (If you've changed it and you have other settings, here's what I used)

Repeat this for the other three images.
Now to make the bigger, faded out pic. Click on one of the layers, click Ctrl+A and Ctrl+C. Make a new layer and press Ctrl+V. Press Ctrl+T to transform the image. This will add a border around your image and you can resize it. After you're satisfied with the size, press Enter to apply the change and set the layer's opacity to 10%.
The last step is creating the text. I chose Century Gothic, size 30pt.
Now the trick to make the reflection is copy the text layer and go to Edit-> Transform->Flip Horizontal and vertical.
These are my layers:

And voila! It's done :)
If you have any questions, ask away :)
Hope this was useful for you :)