How to Make Cloth Slippers (2/2)
Part 2 of the cloth slipper tutorial from Usaccha at Yume Hiroi Harappa
How to Make Nuno Zouri Cloth Slippers - Illustrated Diagram (2)
Original page in Japanese
☆ Finally, we can begin to weave the cloth slippers. Please try it according to the following diagrams. Although the weaving strips for the sole are wide, they’ll be easy to weave if you squish them lengthwise.
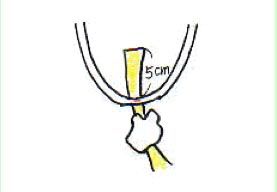
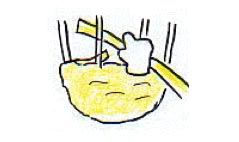
① Place the sole’s weaving strip behind the middle point of the rope (where you made the mark). Leave about 5cm sticking out above the rope.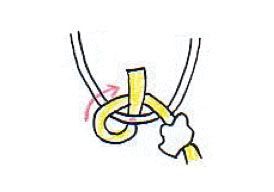
② Wrap the cloth around the rope as shown.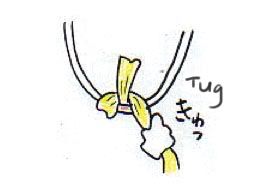
③ Tug the cloth tight.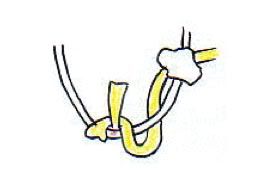
④ Then wind the cloth around the right hand rope once from underneath.
⑤ Pass in front, and carry the cloth around to the back of the left hand rope.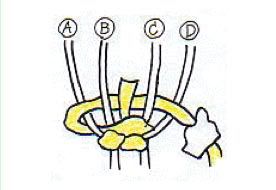
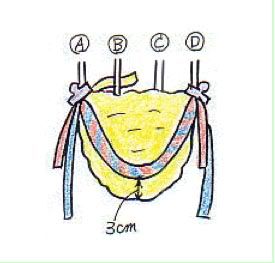
⑥ Now we’ll se the middle 2 ropes as well. (I’ve labeled them A, B, C, and D to make it easier) Wind the cloth in front of A, behind B and C, then in front of D.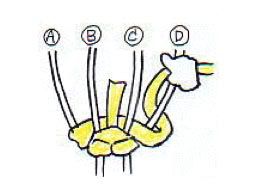
⑦ Then wrap the cloth underneath the D rope once.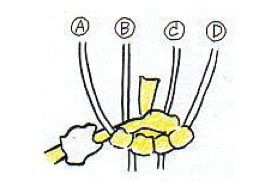
⑧ Pass the cloth over the front of B and C, then behind A.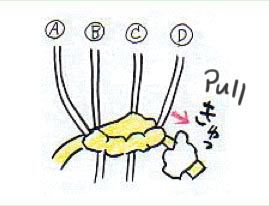
⑨ Now the toe is done. From the back, pull the start of the weaving cloth (5cm) down.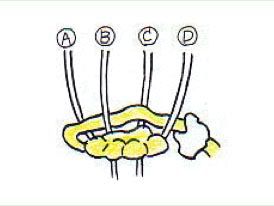
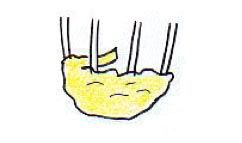
⑩ From here on we’ll start weaving the slipper. Weave the cloth in front of A, behind B, in front of C, then behind D.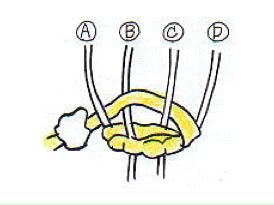
⑪ Then, from the right side, weave the cloth in front of D, behind C, in front of B, and behind A. For the rest, repeat ⑩ and ⑪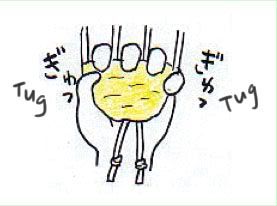
※ Every now and then, insert your fingers between the ropes and tug the fabric down to set the shape.
※ If you pull the A, B, C, D ropes too close together, you’ll end up with a narrow slipper so watch out!
When you need to add in a new strip of weaving fabric...
As in the illustration, when there is about 3cm left of weaving cloth, leave the end poking out the back side of the ropes. Add in the next strip so that it slightly overlaps the previous piece. (Here too, begin weaving from the back.)
◆Attaching the Strap and Thong◆
When you’ve woven about 15cm, attach the strap. There are many ways of attaching the strap, but here is a simple method even beginners can do. Attach the strap, then attach the thong at the end, and your cloth slipper is done.
① Once you’ve woven about 15cm of the sole, attach the strap. Check the length, and secure the strap with clips.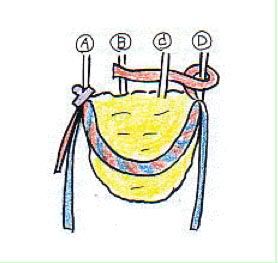
② Wrap the shorter strip of cloth from the right side around the D rope, behind C, and in front of B.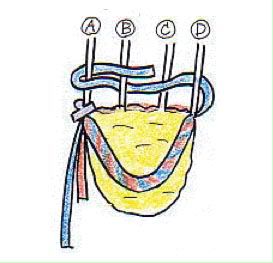
③ With the longer strip, weave behind D, in front of C, behind B, etc as far as you can.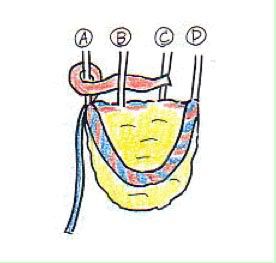
④ As before, wrap the shorter strip from the left around the A rope, behind B, and in front of C.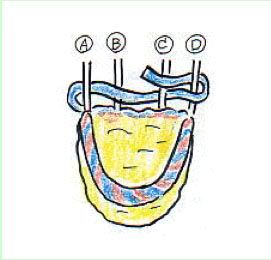
⑤ Next, continue normal slipper weaving with the long strip behind A, in front of B, behind C, etc, as far as possible.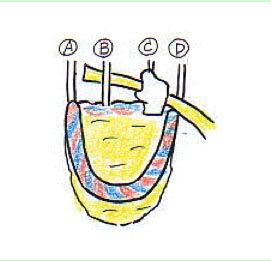
⑥ Once you’ve finished weaving the strap, continue on weaving with the sole cloth.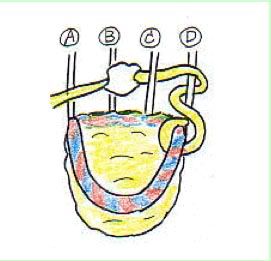
⑦ When you reach the right side, circle the place where the strap joins the sole, then around the D rope. Continue weaving behind D, and in front of B.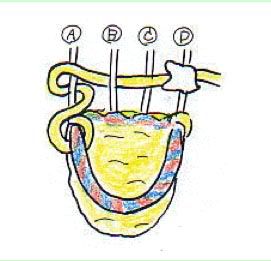
⑧ When you get to the left side, circle the place where the strap joins the sole, then around the A rope. Continue weaving behind B, and in front of C.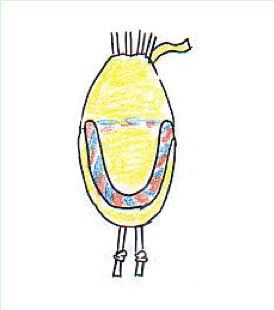
⑨ As you weave, make the heel part gradually narrower. When it gets difficult to weave, you can remove the rope from your feet and the clip from where the ropes intersect.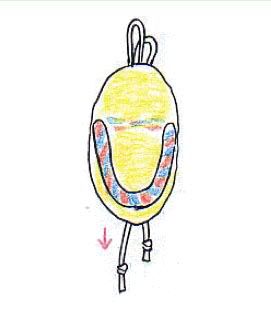
⑩ Once you’ve woven 24cm of slipper, pull one of the 2 ropes handing out of the toe portion. If you push down on the slipper with the palm of your free hand as you pull, the rope will slide easier.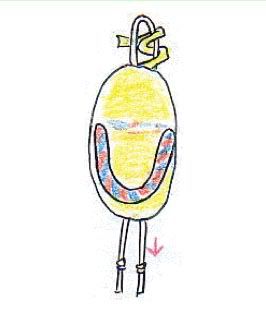
⑪ Wrap the sole weaving cloth twice around the loop formed by the remaining rope. Then, as in ⑩, pull the rope at the toe.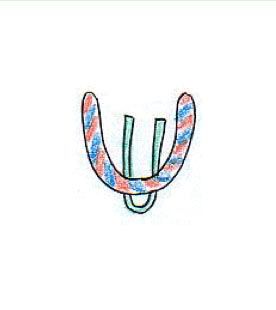
⑫ Place the thong at the center of the strap as illustrated. (You can fold the thong so it’s about 1cm wide.)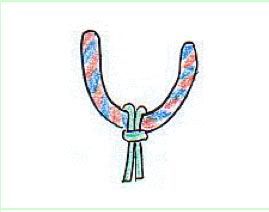
⑬ As shown, pass the thong ends through the loop and pull down to attach.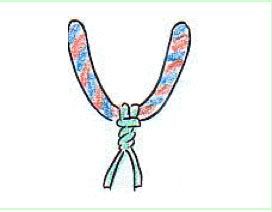
⑭ Twist the thong as illustrated. (Twist it about 1cm, and later you can put the slipper on and adjust the length.)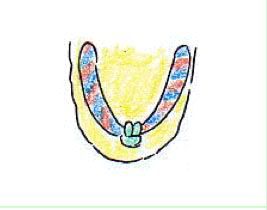
⑮ Spread apart the stitches with the bamboo spatula or wooden chopstick, and pass the thong through to the back. Pass one end through 3cm from the toe edge of the slipper, and the other end through 4cm from the edge.
Side view illustration. The thong will come loose easily if both end are passed through at the same place, so pass them through 1cm apart. Now you can try the slipper on and adjust the thong length.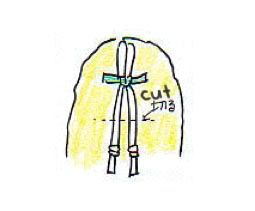
⑯ Fold back the 2 ropes and firmly knot the thong cloth over them. Leave about 3cm of rope and trim the rest. Weave the ends back into the stitching of the sole.
⑰ The underside of the slipper will look like this. Make it neat by clipping the cloth that sticks out.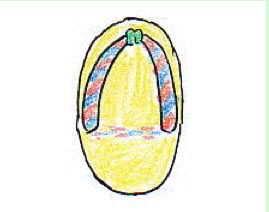
Finished!
Back to "How to Make Cloth Slippers - Illustrated Diagram (1)"
To Field of Dreams HOME
How to Make Nuno Zouri Cloth Slippers - Illustrated Diagram (2)
Original page in Japanese
☆ Finally, we can begin to weave the cloth slippers. Please try it according to the following diagrams. Although the weaving strips for the sole are wide, they’ll be easy to weave if you squish them lengthwise.
① Place the sole’s weaving strip behind the middle point of the rope (where you made the mark). Leave about 5cm sticking out above the rope.

② Wrap the cloth around the rope as shown.

③ Tug the cloth tight.

④ Then wind the cloth around the right hand rope once from underneath.

⑤ Pass in front, and carry the cloth around to the back of the left hand rope.

⑥ Now we’ll se the middle 2 ropes as well. (I’ve labeled them A, B, C, and D to make it easier) Wind the cloth in front of A, behind B and C, then in front of D.

⑦ Then wrap the cloth underneath the D rope once.

⑧ Pass the cloth over the front of B and C, then behind A.

⑨ Now the toe is done. From the back, pull the start of the weaving cloth (5cm) down.

⑩ From here on we’ll start weaving the slipper. Weave the cloth in front of A, behind B, in front of C, then behind D.

⑪ Then, from the right side, weave the cloth in front of D, behind C, in front of B, and behind A. For the rest, repeat ⑩ and ⑪

※ Every now and then, insert your fingers between the ropes and tug the fabric down to set the shape.
※ If you pull the A, B, C, D ropes too close together, you’ll end up with a narrow slipper so watch out!


When you need to add in a new strip of weaving fabric...
As in the illustration, when there is about 3cm left of weaving cloth, leave the end poking out the back side of the ropes. Add in the next strip so that it slightly overlaps the previous piece. (Here too, begin weaving from the back.)
◆Attaching the Strap and Thong◆
When you’ve woven about 15cm, attach the strap. There are many ways of attaching the strap, but here is a simple method even beginners can do. Attach the strap, then attach the thong at the end, and your cloth slipper is done.

① Once you’ve woven about 15cm of the sole, attach the strap. Check the length, and secure the strap with clips.

② Wrap the shorter strip of cloth from the right side around the D rope, behind C, and in front of B.

③ With the longer strip, weave behind D, in front of C, behind B, etc as far as you can.

④ As before, wrap the shorter strip from the left around the A rope, behind B, and in front of C.

⑤ Next, continue normal slipper weaving with the long strip behind A, in front of B, behind C, etc, as far as possible.

⑥ Once you’ve finished weaving the strap, continue on weaving with the sole cloth.

⑦ When you reach the right side, circle the place where the strap joins the sole, then around the D rope. Continue weaving behind D, and in front of B.

⑧ When you get to the left side, circle the place where the strap joins the sole, then around the A rope. Continue weaving behind B, and in front of C.

⑨ As you weave, make the heel part gradually narrower. When it gets difficult to weave, you can remove the rope from your feet and the clip from where the ropes intersect.

⑩ Once you’ve woven 24cm of slipper, pull one of the 2 ropes handing out of the toe portion. If you push down on the slipper with the palm of your free hand as you pull, the rope will slide easier.

⑪ Wrap the sole weaving cloth twice around the loop formed by the remaining rope. Then, as in ⑩, pull the rope at the toe.

⑫ Place the thong at the center of the strap as illustrated. (You can fold the thong so it’s about 1cm wide.)

⑬ As shown, pass the thong ends through the loop and pull down to attach.

⑭ Twist the thong as illustrated. (Twist it about 1cm, and later you can put the slipper on and adjust the length.)

⑮ Spread apart the stitches with the bamboo spatula or wooden chopstick, and pass the thong through to the back. Pass one end through 3cm from the toe edge of the slipper, and the other end through 4cm from the edge.

Side view illustration. The thong will come loose easily if both end are passed through at the same place, so pass them through 1cm apart. Now you can try the slipper on and adjust the thong length.

⑯ Fold back the 2 ropes and firmly knot the thong cloth over them. Leave about 3cm of rope and trim the rest. Weave the ends back into the stitching of the sole.

⑰ The underside of the slipper will look like this. Make it neat by clipping the cloth that sticks out.

Finished!
Back to "How to Make Cloth Slippers - Illustrated Diagram (1)"
To Field of Dreams HOME