Tut 03
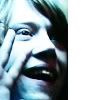
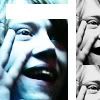
going from this to 
Requested by lost_xcentric =)
Step 01

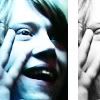
Step 02
Duplicate the image and set it to screen 100%

Step 03
Dupblicate you base and set it to soft light 100%

As you see, the image has a beautifull color from itself. See This tutorial for a coloring
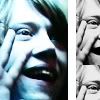
Step 04
Move your base a bit to the left. Select all, copy merged & put it all in a new file. (or merge all the layers, but don't get it flattend)
Step 05
Duplicate your base, desurate it (Image, adjustments, desurate) and put it to the right. I also cropped it a little and duplicate it twice.
or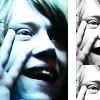
Step 06
We're going to make the black and white part a bit darker. Image, Adjustments, Brightness/Contrast.
I used Brightness -20 and Contrast 0.
Step 07
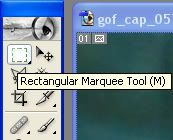
New layer. Use the select tool / Rectangular Marquee Tool ( here ) to select a stroke somewhere in the icon.
Fill it with white.
Step 08
Blur the stroke. Filter, Blur, Gaussian Blur. Radius 1,7

Step 09
Use a tiny text brush to fill up the blurred stroke. I used this one:

And done!
Requested by lost_xcentric =)
Step 01
Step 02
Duplicate the image and set it to screen 100%
Step 03
Dupblicate you base and set it to soft light 100%
As you see, the image has a beautifull color from itself. See This tutorial for a coloring
Step 04
Move your base a bit to the left. Select all, copy merged & put it all in a new file. (or merge all the layers, but don't get it flattend)
Step 05
Duplicate your base, desurate it (Image, adjustments, desurate) and put it to the right. I also cropped it a little and duplicate it twice.
or
Step 06
We're going to make the black and white part a bit darker. Image, Adjustments, Brightness/Contrast.
I used Brightness -20 and Contrast 0.
Step 07
New layer. Use the select tool / Rectangular Marquee Tool ( here ) to select a stroke somewhere in the icon.
Fill it with white.
Step 08
Blur the stroke. Filter, Blur, Gaussian Blur. Radius 1,7
Step 09
Use a tiny text brush to fill up the blurred stroke. I used this one:
And done!