GIMP Tutorial #4...finally!!
I know, it's been awhile (a LONG while) since I've posted a tutorial. This tutorial is for GIMP but should be translatable. This is one requested by weazel05. Sorry it took so long!! I couldn't get the pic EXACTLY the same, but it was close.
Today, we'll be going from:
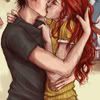
to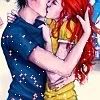
The art in this icon is by the very awesome reallycorking.
1. Crop your base to 100 x 100 and stuff.

2. Layers > Colors > Hue + Saturation > Saturation +35
3. Layers > Colors > Color Balance: Midtones > -100, -11, 75
4. Color Fill Layer with the color ffdfe5 and set it to Soft Light, Opacity 100%
5. Layers > Colors > Levels:
Value: (Input Levels) 0, 0.67, 203 (Output Levels) 0, 255
Red: (Input Levels) 0, 1, 255 (Output Levels) 0, 220
Blue: (Input Levels) 0, 1, 255 (Output Levels) 15, 255
6. Color Fill Layer with the color 6fe0e0 and set to Burn, Opacity 20%
7. Color Fill Layer with the color 001234 and set to Screen, Opacity 100%
8. Color Fill Layer with the color 001234 again and set to Subtract, Opacity 75%
9. Duplicate your base (which should be colored with the saturation, levels, etc. already) and bring it to the top. Set it to overlay 100%. (If your base is not the layer that is colored, just take the most recently colored layer (NOT color fill layers) and that's the one you'll bring to the top.
10. Now, add this texture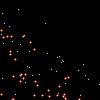
by fanatik and set it to Screen, 100% Opacity.
11. Duplicate that Screened layer and then go to Layer > Transform > Flip horizontally. That will give you the effect of the lights on both sides of the icon.
You should have this!

Hope that was informative!
+Join and watch if you would like updates for more tutorials or graphics. :)
Today, we'll be going from:

to

The art in this icon is by the very awesome reallycorking.
1. Crop your base to 100 x 100 and stuff.

2. Layers > Colors > Hue + Saturation > Saturation +35
3. Layers > Colors > Color Balance: Midtones > -100, -11, 75
4. Color Fill Layer with the color ffdfe5 and set it to Soft Light, Opacity 100%
5. Layers > Colors > Levels:
Value: (Input Levels) 0, 0.67, 203 (Output Levels) 0, 255
Red: (Input Levels) 0, 1, 255 (Output Levels) 0, 220
Blue: (Input Levels) 0, 1, 255 (Output Levels) 15, 255
6. Color Fill Layer with the color 6fe0e0 and set to Burn, Opacity 20%
7. Color Fill Layer with the color 001234 and set to Screen, Opacity 100%
8. Color Fill Layer with the color 001234 again and set to Subtract, Opacity 75%
9. Duplicate your base (which should be colored with the saturation, levels, etc. already) and bring it to the top. Set it to overlay 100%. (If your base is not the layer that is colored, just take the most recently colored layer (NOT color fill layers) and that's the one you'll bring to the top.
10. Now, add this texture

by fanatik and set it to Screen, 100% Opacity.
11. Duplicate that Screened layer and then go to Layer > Transform > Flip horizontally. That will give you the effect of the lights on both sides of the icon.
You should have this!

Hope that was informative!
+Join and watch if you would like updates for more tutorials or graphics. :)