Full Icon: PS: Sharpening, Textures, and Scarlett
Þ
LAYER 1
With the Rectangular Marquee Tool, hold shift and drag the tool to select a perfect square from whatever image you want to icon. Ctrl+C to copy the selection, Ctrl+N to open a new image, and Ctrl+V to paste your selection into this image. If your crop is larger than 100x100 pixels, Alt+Ctrl+I to resize. This is your icon's base.
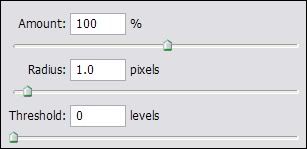
Since your new base is somewhat out of focus, the image needs to be sharpened. Filter >> Sharpen >> Unsharp Mask [settings]
Ctrl + J to duplicate this layer in preparation for the next step, blurring.
LAYER 2
You'll see in the image that the skin, after sharpening, is too pixilated. I like for the skin to look smooth, like in the original base, so select the Blur Tool, and choose a brush size somewhere between 3-5px. I like to start out with 5px and work my way down for smaller areas (like eyelids). I usually have my blur tool set to 20% strength as well. Ctrl+0 to zoom in, and start blurring.
<< you can see how the pixels are starting to blend together. Do this to the entire face, ear, and neck, but leave the eyes, lips, hair, and boa alone.
You should end up with something similar to this. Ctrl+J to duplicate again.
LAYER 3
Sharpening the eyes and lips for this dramatic effect. Fearkills wrote a tutorial on this in whoaicons_ (tutorial in new window). Summarizing for this icon:
Dodge Tool with 1px size brush (Range: Midtones-Highlights | Exposure 18% | airbrush) applied to the whites of the eyes, the glint in the pupil, the sheen below the eyebrow, the shine on her lips, and her teeth. Burn Tool with 1px brush (Range: Shadows | Exposure 20% | airbrush) applied to the eyelashes, outer 'ring' of the eye (iris), the pupil, and the darker parts of her lips. Finally, select the Sharpen Tool, set the brush to 3-5px, with strength at 25%, and run it over both eyes, lashes, eyebrows, and her lips.
LAYERS 4-5
Further adjustments after the dodge/burn/sharpen. Ctrl+Shift+N for a new layer. Select the Pencil Tool at 1px, zoom all the way in on the teeth, and draw over them with the pencil. Set this layer to Hue. Now we're rid of the blue tint from before. Ctrl+Shift+N for another new layer. This time set your color to a dark pink (#C3405D) and draw over the lips, watching out for the sheen. Set this layer to Soft Light.
LAYER 6
Now we adjust the color of her face. Ctrl+Shift+N for a new layer. Using color #C69562, take your Paintbrush (3-5px), paint over her skin (careful to avoid eyes, lips, hair, earring, and the boa). When you're finished, return to your Layers Window and set this layer to Color. Adjust it's Opacity to 36%.
LAYER 7
This first texture is one of mine. Paste it into a new layer (Ctrl+V) and set the layer to screen.
Time for some masking. If you don't know how to mask, I have a tutorial here. Make a new layer mask and paint away everything but the left side and the bottom right corner.
LAYER 8
Ctrl+Shift+N for new layer. Use the rectangular marquee to make a 4px high selection across the bottom of your icon. Fill it with white.
LAYER 9
Another texture, this one by immoral. Paste it into a new layer and set that layer to Lighten.
More masking. Make a new layer mask and black-out all but a few bits in the right corner and on the left.
LAYER 10
Texture 3, by inxsomniax. Paste into a new layer and set that layer to multiply.
Using color #E6C39E, taken from that texture, paint over her face and neck.
Create a new layer mask and black-out the area over her eyes and mouth.
LAYER 11
Another texture from inxsomniax. Paste into a new layer and set to Soft Light.
More modification, just like in layer 10 (but we don't need to mask this time). Using color #C4AE78, paint over her head and neck. I also used the Smudge Tool here and there.
LAYER 12
Adding some text, Ctrl+Shift+N for a new layer. Just a simple S. [text settings] Color #5C6B1B. Set the layer's Opacity to 90%.
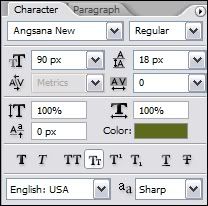
LAYER 13
More text, Ctrl+Shift+N. [settings] Color is black.
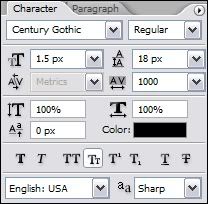
LAYER 14
Another of my textures. Paste it into a new layer and set it to Hard Light.
Again, I did some Smudging, this time on the tip of the symbol.
Apply a layer mask and (using a masking brush with lowered opacity), brush around the face and neck.
LAYER 15
Go back to Layer 6 and copy what you had from that point. One way to do this is to go to the layer window, and click on the little eye next to every layer until you get back down to 6. Ctrl+A to select all the canvas, Ctrl+Shift+C to copy all visible layers. Go back up the list of layers and click the little eyes to make them visible again. When you get to the top (would be Layer 14 on mine), Ctrl + V to paste layer 6 into a new layer. Then, desaturate this layer (Ctrl+Shift+U). Set this layer to Soft Light with an Opacity of 60%.
LAYER 16
Create a new layer (Ctrl+Shift+N). Set #5C6B1B as your color, select your Pencil Tool at 1px, zoom in all the way on her eyes, and draw pixel by pixel over the colored portions of those eyes. Set this layer to Color.
LAYER 17
Here is our final layer. Ctrl+A to select all the canvas, Ctrl+Shift+C to copy all visible layers, and Ctrl+V to paste into a new layer. Now we're going to apply the final pinash in the form of a filter.
Go to Filter >> Artistic >> Paint Daubs. [settings]
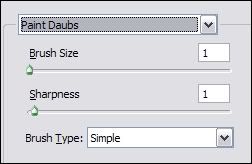
We don't need the eyes, lips, and earring so sharp, so apply a new layer mask and, with low opacity on your brush, paint away much of her face. With a higher opacity on your brush, heavily black-out her eyes, lips, and earring.
There you go! :D