Sunburst guide
I've seen a lot of people ask how to get the sunburst effects and I've seen a few tutorials on how to get the effect, but the method I like the most is a really simple way of getting a great two-tone sunburst effect. I haven't seen anybody post about it yet and I hope this small guide is helpful!
Translatability: This guide was made for PS CS2. I'm not so sure if it would work with other versions of Photoshop (except maybe CS3) and it most probably won't work for other programs since it uses a preset tool that comes with PS CS2.
How to get from
to
in a couple seconds!
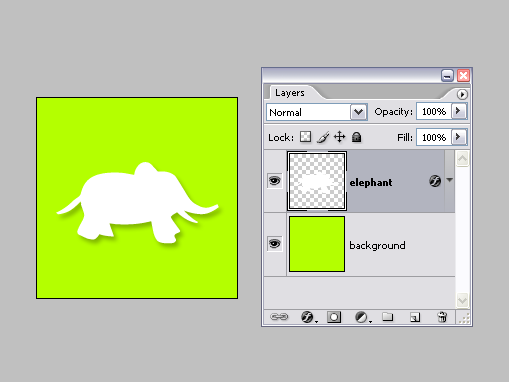
Okay, first, you start out with your image against a background. I'll be using a simple elephant shape against a solid background but you can always mix it up by having a person against texture or anything else.
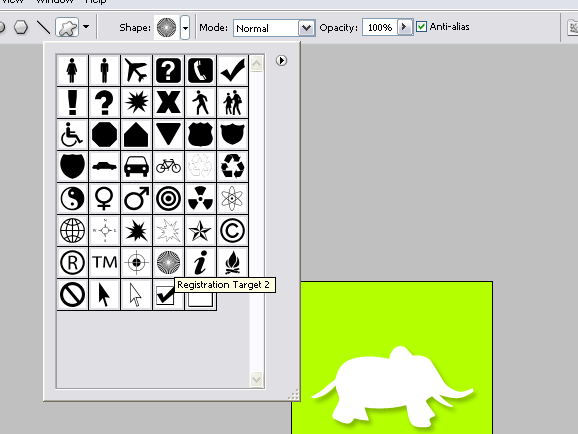
Then, you click on the Custom Shape Tool (which you can find in the same menu as the Rectangle Tool on the Tools bar) and load the shapes that fall under the "Symbols" category. Find the shape named Registration Target 2. It will look a bit like a wheel with many spokes. This is the handy-dandy tool that you can use to create sunbursts in about a second. :D
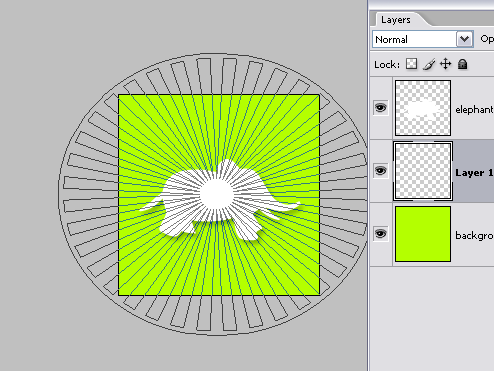
Then, you create a new layer between your background and your object and pick the color that you want this layer to be. In my case, I chose a light blue color. Click at a corner outside of your picture and drag the shape's outline like shown below. Make sure that the thick outline of the circle is outside of the area of your icon/image (if it makes it easier for you, you can zoom out a bit to do so). Also, make sure that the small, inner circle of the spokes is fully covered by your top image. As you can see from the example below, the inner circle is inside the body of the elephant.
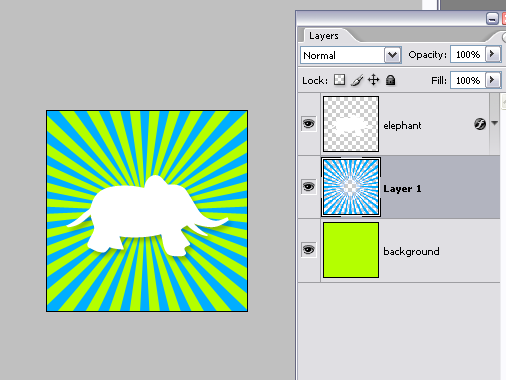
When you release your mouse, you should get something like what I got below. And you're pretty much done! :)
Of course, for different effects, you can play around where you have the small circle.

<-- for this one, I put the circle a little bit below the center of the image.

<-- for this one, I put the circle in the upper right corner so it was just outside the image.
I'm sure there are other ways to use this and it's a fun tool to experiment with. Since the middle layer with the sun burst is separate from the background, you can even fiddle with the blending options to achieve cool effects. I hope you found this tip helpful. Please let me know if you have any questions or confusions... and happy iconmaking!
Translatability: This guide was made for PS CS2. I'm not so sure if it would work with other versions of Photoshop (except maybe CS3) and it most probably won't work for other programs since it uses a preset tool that comes with PS CS2.
How to get from
to
in a couple seconds!
Okay, first, you start out with your image against a background. I'll be using a simple elephant shape against a solid background but you can always mix it up by having a person against texture or anything else.
Then, you click on the Custom Shape Tool (which you can find in the same menu as the Rectangle Tool on the Tools bar) and load the shapes that fall under the "Symbols" category. Find the shape named Registration Target 2. It will look a bit like a wheel with many spokes. This is the handy-dandy tool that you can use to create sunbursts in about a second. :D
Then, you create a new layer between your background and your object and pick the color that you want this layer to be. In my case, I chose a light blue color. Click at a corner outside of your picture and drag the shape's outline like shown below. Make sure that the thick outline of the circle is outside of the area of your icon/image (if it makes it easier for you, you can zoom out a bit to do so). Also, make sure that the small, inner circle of the spokes is fully covered by your top image. As you can see from the example below, the inner circle is inside the body of the elephant.
When you release your mouse, you should get something like what I got below. And you're pretty much done! :)
Of course, for different effects, you can play around where you have the small circle.
<-- for this one, I put the circle a little bit below the center of the image.
<-- for this one, I put the circle in the upper right corner so it was just outside the image.
I'm sure there are other ways to use this and it's a fun tool to experiment with. Since the middle layer with the sun burst is separate from the background, you can even fiddle with the blending options to achieve cool effects. I hope you found this tip helpful. Please let me know if you have any questions or confusions... and happy iconmaking!