tutorial
heypuppy requested a tutorial for the coloring on #3 in this icon batch. I don't save the steps when I'm iconing, so this won't be exact, but close enough. It's a very simple coloring. I use PSP 8, but I'm sure it's translatable.
Go from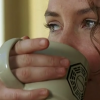
to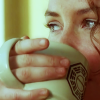
The original screencap is from swizzmizz.com.
1. The base is a little too dark, so duplicate it and set to screen (obviously this depends on how light your base is to begin with).
2. I want to bring out the reddish tones in Kate's skin and hair, as well as the greens/yellows of the coffee mug and background. Add a new raster layer and flood fill with a dark red/burgundy color (I used #400000) and set to exclusion.
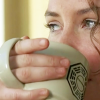
3. That's too washed out for my liking, so to add some depth, duplicate the base and bring it to the top. Set it at soft light.

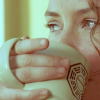
4. Much better. But I want to soften the icon up a bit, so merge all and duplicate the new base. With the duplicated layer selected, go to adjust-->blur-->motion blur*. I've set the motion blur here to 313.00 with a strength of 10. Apply the blur and set the layer to an opacity of 20. Merge all and you're done! Easy peasy, lemon squeezy.
*I usually use gaussian blur to soften icons, but I decided to play around with motion blur this time and liked how it turned out.
This coloring works best on screencaps with yellows and greens. Red also looks very nice with this coloring. It does have a tendency to make some skin tones too yellow/jaundiced-looking; if that happens, a color balance layer is useful for evening that out.
Similar colorings: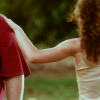
Icons are snaggable with credit, and I'd love to see what you come up with using this coloring!
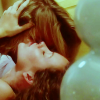
Go from
to
The original screencap is from swizzmizz.com.
1. The base is a little too dark, so duplicate it and set to screen (obviously this depends on how light your base is to begin with).
2. I want to bring out the reddish tones in Kate's skin and hair, as well as the greens/yellows of the coffee mug and background. Add a new raster layer and flood fill with a dark red/burgundy color (I used #400000) and set to exclusion.
3. That's too washed out for my liking, so to add some depth, duplicate the base and bring it to the top. Set it at soft light.
4. Much better. But I want to soften the icon up a bit, so merge all and duplicate the new base. With the duplicated layer selected, go to adjust-->blur-->motion blur*. I've set the motion blur here to 313.00 with a strength of 10. Apply the blur and set the layer to an opacity of 20. Merge all and you're done! Easy peasy, lemon squeezy.
*I usually use gaussian blur to soften icons, but I decided to play around with motion blur this time and liked how it turned out.
This coloring works best on screencaps with yellows and greens. Red also looks very nice with this coloring. It does have a tendency to make some skin tones too yellow/jaundiced-looking; if that happens, a color balance layer is useful for evening that out.
Similar colorings:
Icons are snaggable with credit, and I'd love to see what you come up with using this coloring!