beginner friendly mini movie tutorial
someone requested a beginner friendly animation tutorial, that has some a little bit fuzzy frame, so here is my version.
created on PS CS3 extended
basically translateable to any program that has curves (or curves as layer, less work to do ;) )
yeah, lot of talking and many images...
and maybe you shold reduce the brightness of your screen a tiny bit XD I forgot to up mine, so uhm yeah XD looks good with my settings XD
First open a new image size 100x100px with crt + n or over the file menue
You should get something like this

Don’t freak out that you don’t have a 100x100 preset XD I created it myself.
Now drag that empty icon in a corner and open the screencaps you want to use for animation.
I used a few my friend capped for me ;) *lazy person*
When there are too many caps open, just minimize them and leave the first displayed, looks like this now

Select the arrow in the toolbar to the left and drag your screencap into the empty icon
Ooops, a bit big, we’ll fix that imediatelly. Press crt + T or go to edit -> transform -> scale.
Your top bar below the menu must look like this now,

click the little chain symbol and start making the pic smaller. I usually go first 70 % and drag the pic more to the middle again, then 50, 30 and depending on the size of the original pic down to even 10 or below.
Here I had to go down to 15%.
Now click any tool and a box should pop up, apply the transformation.

Now you have the pic in there smaller, don’t worry, adding the other caps is faster. Minimize the first one, or close it, open the next to come *numbered caps are useful ;)*
Drag the next cap in again and press crt+shift+t or use edit -> transform -> again
Now after applying you should drag it onto the first cap with matching borders.
Repeat that with all the caps you want to use.
When you’re done with that, take a look at your layers palette, select the first layer you dropped on (should be layer 2) and click away the eyes on the following layers to hide them.

Now go to filter -> sharpen -> unsharp mask
Now mess around a bit with the settings to get to know this tool. Basically you don’t need to change the threshold, and the radius should be between 0,7 and 1,3 for quality pics. I choose amount 44% radius 1,3px, radius 1 lv. MAKE SURE THE PREVIEW IS SELECTED OR YOU GET SOME WEIRD RESULTS. Just be careful with sharpening, when there suddenly is a line around someones head that wasn’t there before you overdid it.

Now select the next layer, click the eye to unhide it and open the filters menue again. The filter last used is on top now, by clicking that photoshop uses the settings you used last time, so when you have caps of the same vid in the same size and stuff there should be no prblem, when using this at 2 completely different images it may be too much or not enough the second time. But now we can simply use the setting on all caps. So unhide and use the unsharpen mask on all layers.
I’m doing it one by one, because there is always the chance, that one cap needs a slightly different sharpening.
Next step, select your first layer, go to the paint bucket, black as foreground color and fill it. If you don’t see the bucket, you may have to right-click on that little rectangle thing that slowly turns from white to black.

Now we have to color it a bit. There are a few ways to do that, I start with curves, you can apply curves, directly onto a layer when going to image -> adjustments -> curves. But we should remember what we did for every layer. So I’ll make a curve layer, two ways to get there, first is over the menue: layer -> new adjustment layer -> curves
Or you take a look below your layers palette, there is that tiny b/w circle, and a little cick on that you get a menue too (pic)
Make sure you selected the top layer or you won’t see your effect. PS dumps the new layers always above the selected one!
When I open the curves I set 3 dots along the line displayed, on in the middle, the other 2 dots divide the 2 halves created by the first dot.
Now I drag the first dot at the bottom a bit down, that darkens the shaddows and dark colors. I’ll do the same with the second dot, but sometimes I have to drag it up, it highly depends on the base! The upper dot is usually dragged up, to brighten the image.
Every single dot has an input and an output, mine where
1. in: 66; out: 41
2. in: 136; out 126
3. in: 183; out: 210
my base has almost no color, but it looks good. If you use colorful pictures you can apply curves for the red, green and blue, if you’re not happy with a curve, drag the dots out and you’ll get the base line again to start over again.

Now on to the frame. Open a new layer, I usually use crt + shift + n, you can go to layers -> new -> new layer too, or click that white sheet below your layers palette.
Fill the new layer black again.
Now go to your toolbar and select the rectangular marquee tool (on my bar the very first tool)
Put the feather to 8 px, if you prefer not extremly round edges punch in a lower number.

Put a selection roughly over the stuff you want to see,

grab your paint bucket again, set the foreground color to white and fill the selection.

As you can see it fusses over the edges of the marquee. Now choose any selection tool, click and you have deselected your marquee.
Too bad that you can’t see your layers now, but that can be fixed easily. Double click on your layer, or use the symbol to the left below your layers palette. There you can try to add some stuff to the layer.
We stay at the first option and only choose darken to make the white disappear XD

Now the only thing that’s missing is the animation itsself.
If you have PS below CS 3 transfere your image to imageready, if you have PS CS3 go to windows and select the animation window.


As you can see there is one frame already in it, but we want all layers to be displayed.
Click on that tiny menus symbol and choose “make frames from layers”

Select all frames that don’t display the background (click the first, hold shift and click on the last). Now you go to the layers palette and click the eye on the layers you want to be visible in every frame.
Make sure you also select the curves layer!
Now delete the unneeded frames (like the curves layer and the frame).

Now you can see if you choose the size of your frame right, if you see the edges bopping around, select the first frame and make the layer smaller (dont forget to refill the corners)
Now set the time to whatever you feel like goes perfectly well with your icon, I chose 0,1 seconds.
I always keep the psd of the things I did, so I first go to save as punch in the name and press save, then I choose: file -> safe for web and devices.
You should see something like this.

You even see that the icon is too big for LJ (always remember the 100x100 and 40 kb rule) you can fix that, through deleting a few frames, or playing around with some of the settings like dither, lossy or how many colors should be displayed.
I had to delete a few frames and set the lossy to about 10 to have it still fluid and at a high quality. Yeah I know, I used too many layers XD
Make sure you selected .gif, click on save and you’re done.
Now you can make the frame you want with using the shape tool instead of the rectangular marking, or just erasing some stuff, add brushes and text above the frame, just mess around and create many icons with that base.

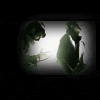
that one was done the same way, just some other curve adjustments and the opacity set to 70% or so, when I filled the marquee

plain rectangular marquee, added the text in white, chose a gradient overlay (font is the king and queen)
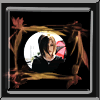
and this one was done while erasing with a round hard brush, set a floral frame (gradient overlay) on another layer and added some bevel and emboss on another one too
I hope everything is easy to understand, if you have questions to any step feel free to ask.
if you want a psd ask, but maybe I have to search it after a few weeks (saved somewhere else then)
any comments would be very nice
posting your own results is an option too XD
oh and please don't hotlink my animated pics, the other ones are on lj, but the animated ones are on photobucket and shouldn't run out of bandwidth ne ^^
have fun
nitachan
created on PS CS3 extended
basically translateable to any program that has curves (or curves as layer, less work to do ;) )
yeah, lot of talking and many images...
and maybe you shold reduce the brightness of your screen a tiny bit XD I forgot to up mine, so uhm yeah XD looks good with my settings XD
First open a new image size 100x100px with crt + n or over the file menue
You should get something like this
Don’t freak out that you don’t have a 100x100 preset XD I created it myself.
Now drag that empty icon in a corner and open the screencaps you want to use for animation.
I used a few my friend capped for me ;) *lazy person*
When there are too many caps open, just minimize them and leave the first displayed, looks like this now
Select the arrow in the toolbar to the left and drag your screencap into the empty icon
Ooops, a bit big, we’ll fix that imediatelly. Press crt + T or go to edit -> transform -> scale.
Your top bar below the menu must look like this now,
click the little chain symbol and start making the pic smaller. I usually go first 70 % and drag the pic more to the middle again, then 50, 30 and depending on the size of the original pic down to even 10 or below.
Here I had to go down to 15%.
Now click any tool and a box should pop up, apply the transformation.
Now you have the pic in there smaller, don’t worry, adding the other caps is faster. Minimize the first one, or close it, open the next to come *numbered caps are useful ;)*
Drag the next cap in again and press crt+shift+t or use edit -> transform -> again
Now after applying you should drag it onto the first cap with matching borders.
Repeat that with all the caps you want to use.
When you’re done with that, take a look at your layers palette, select the first layer you dropped on (should be layer 2) and click away the eyes on the following layers to hide them.
Now go to filter -> sharpen -> unsharp mask
Now mess around a bit with the settings to get to know this tool. Basically you don’t need to change the threshold, and the radius should be between 0,7 and 1,3 for quality pics. I choose amount 44% radius 1,3px, radius 1 lv. MAKE SURE THE PREVIEW IS SELECTED OR YOU GET SOME WEIRD RESULTS. Just be careful with sharpening, when there suddenly is a line around someones head that wasn’t there before you overdid it.
Now select the next layer, click the eye to unhide it and open the filters menue again. The filter last used is on top now, by clicking that photoshop uses the settings you used last time, so when you have caps of the same vid in the same size and stuff there should be no prblem, when using this at 2 completely different images it may be too much or not enough the second time. But now we can simply use the setting on all caps. So unhide and use the unsharpen mask on all layers.
I’m doing it one by one, because there is always the chance, that one cap needs a slightly different sharpening.
Next step, select your first layer, go to the paint bucket, black as foreground color and fill it. If you don’t see the bucket, you may have to right-click on that little rectangle thing that slowly turns from white to black.
Now we have to color it a bit. There are a few ways to do that, I start with curves, you can apply curves, directly onto a layer when going to image -> adjustments -> curves. But we should remember what we did for every layer. So I’ll make a curve layer, two ways to get there, first is over the menue: layer -> new adjustment layer -> curves
Or you take a look below your layers palette, there is that tiny b/w circle, and a little cick on that you get a menue too (pic)
Make sure you selected the top layer or you won’t see your effect. PS dumps the new layers always above the selected one!
When I open the curves I set 3 dots along the line displayed, on in the middle, the other 2 dots divide the 2 halves created by the first dot.
Now I drag the first dot at the bottom a bit down, that darkens the shaddows and dark colors. I’ll do the same with the second dot, but sometimes I have to drag it up, it highly depends on the base! The upper dot is usually dragged up, to brighten the image.
Every single dot has an input and an output, mine where
1. in: 66; out: 41
2. in: 136; out 126
3. in: 183; out: 210
my base has almost no color, but it looks good. If you use colorful pictures you can apply curves for the red, green and blue, if you’re not happy with a curve, drag the dots out and you’ll get the base line again to start over again.
Now on to the frame. Open a new layer, I usually use crt + shift + n, you can go to layers -> new -> new layer too, or click that white sheet below your layers palette.
Fill the new layer black again.
Now go to your toolbar and select the rectangular marquee tool (on my bar the very first tool)
Put the feather to 8 px, if you prefer not extremly round edges punch in a lower number.
Put a selection roughly over the stuff you want to see,
grab your paint bucket again, set the foreground color to white and fill the selection.
As you can see it fusses over the edges of the marquee. Now choose any selection tool, click and you have deselected your marquee.
Too bad that you can’t see your layers now, but that can be fixed easily. Double click on your layer, or use the symbol to the left below your layers palette. There you can try to add some stuff to the layer.
We stay at the first option and only choose darken to make the white disappear XD
Now the only thing that’s missing is the animation itsself.
If you have PS below CS 3 transfere your image to imageready, if you have PS CS3 go to windows and select the animation window.
As you can see there is one frame already in it, but we want all layers to be displayed.
Click on that tiny menus symbol and choose “make frames from layers”
Select all frames that don’t display the background (click the first, hold shift and click on the last). Now you go to the layers palette and click the eye on the layers you want to be visible in every frame.
Make sure you also select the curves layer!
Now delete the unneeded frames (like the curves layer and the frame).
Now you can see if you choose the size of your frame right, if you see the edges bopping around, select the first frame and make the layer smaller (dont forget to refill the corners)
Now set the time to whatever you feel like goes perfectly well with your icon, I chose 0,1 seconds.
I always keep the psd of the things I did, so I first go to save as punch in the name and press save, then I choose: file -> safe for web and devices.
You should see something like this.
You even see that the icon is too big for LJ (always remember the 100x100 and 40 kb rule) you can fix that, through deleting a few frames, or playing around with some of the settings like dither, lossy or how many colors should be displayed.
I had to delete a few frames and set the lossy to about 10 to have it still fluid and at a high quality. Yeah I know, I used too many layers XD
Make sure you selected .gif, click on save and you’re done.
Now you can make the frame you want with using the shape tool instead of the rectangular marking, or just erasing some stuff, add brushes and text above the frame, just mess around and create many icons with that base.
that one was done the same way, just some other curve adjustments and the opacity set to 70% or so, when I filled the marquee
plain rectangular marquee, added the text in white, chose a gradient overlay (font is the king and queen)
and this one was done while erasing with a round hard brush, set a floral frame (gradient overlay) on another layer and added some bevel and emboss on another one too
I hope everything is easy to understand, if you have questions to any step feel free to ask.
if you want a psd ask, but maybe I have to search it after a few weeks (saved somewhere else then)
any comments would be very nice
posting your own results is an option too XD
oh and please don't hotlink my animated pics, the other ones are on lj, but the animated ones are on photobucket and shouldn't run out of bandwidth ne ^^
have fun
nitachan