(no subject)
from 
to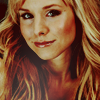
Program: Photoshop 7
Involves: Levels, Selective Coloring
Translatable: No
Psd: included
( original post)
The very first thing I do after resizing the image is to duplicate the base and use the unsharpen mask or simpy sharpen, so I can regulate the sharpness with lowering the opacity of the base-copy.
Step 01: Create a new levels layer with these settings and set it to 90% opacity:
RGB: 8 - 1,70 - 255
Step 02: Create a new Brightness/Contrast layer with 15% opacity:
Brightness: -12 Contrast: +36
Step 03: Create a new Selective Color layer. My settings:
Reds: -45, +5, +22, +15
Yellows: -36, -6, -20, -20
Whites: 0, 0, 0, -15
Neutrals: -4, 0, -4, +7
Step 04: Create a new Color Balance layer:
Color Levels: +18, +7, -6
Step 05: Create a new fill layer with #4D0D0D and set it to Difference with 55% opacity.
Step 06: Create a new Selective Color Layer:
Reds: -15, 0, +55, +35
Yellows: -40, 0, +25, +25
Greens: 0, +80, +100, +70
Whites: -15, +30, +40, -15
Neutrals: -10, +1, +7, +4
Step 07: Create a new fill layer with #E83C00 and set it to Soft Light with 15% opacity.
Step 08: Create a new Selective Color Layer:
Reds: 0,0,0,+30
Yellows: 0,0,-40,0
Step 09: Create a new Hue/Saturation layer at 30% opacity
Saturation: +30
Step 10: I pasted this texture by vol4itca and blurred it with Gaussian blur. I set it to Lighten and 60% opacity.
Download the psd here. Hope it's useful :)
Other results [with some changes of settings]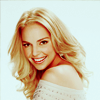