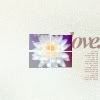
(no subject)
how to go from this to 
1.) Get your base picture and resize it to 100x100, but do not flatten it! We'll be resizing it later. (Note: If you resize it and you get a weird faded border, try resizing it under Bilinear instead of Bicubic)
2.) Next take this texture by cielo_gris and create a layer mask with the little squares cut out. I added a faded noise layer for a grungy effect, but this is optional.
3.) Okay, back to your base. You're gonna resize it to fit the texture used above. I put mine at 44x44, but yours may depend on what you want to capture. Once that is done, flatten it.
pretty time!
4.) New Curves layer:
RGB
point 1: 70, 111
point 2: 116, 156
Blue
point 1: 78, 111
point 2: 132, 135
5.) Apply this texture by eveningwalk on Multiply
6.) Add this texture by gfxgurl on Screen
7.) New Channel Mixer layer
Red
115, 0, -30
Done! =D