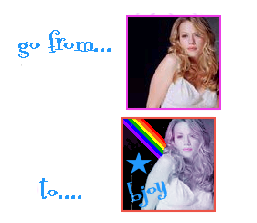
New Tutorial! (Bethany Joy Galeotti)
Program: PSP 8 (translatable to others!)
Edit: forgot to add the textures! Silly me! Fixed a few other things wrong with it too
I wasn’t creative enough to come up with anything beyond basic colorings until now, mostly because I have no idea how to create “cool” textures. The ones used here are all pretty basic, made by me. All links lead to the textures I used. All opacities 100% in Layer properties unless otherwise stated or it doesn’t come out on your picture.
1) Take image and crop to 100x100
2) Make it black and white
3) Add pink and blue color texture as new layer. Flip/Mirror/Rotate it so that the subject stays mainly black-and-white with a hint of color. Layer Properties: Soft Light (opacity MAY need to be turned down.
4) Enhance a color in the original picture by creating a new layer (blank). Using freehand selection, trace around where that part is visible in the black and white layer. Fill the selection with that color and set the layer to Color (for intense colors) or Soft Light (if you want it “muted”/Color is too intense, like for lips)
5) Merge all layers.
6) Paste the rainbow in a new layer. Set the layer itself to Negative Image, and the layer properties to Screen. Now, before "fixing" it, orient the rainbow relative to your subject.
7) To get the rainbow colors back, set the Hue of that layer to 180 (Adjustments --> Hue and Saturation --> Hue/Saturation/Lightness). Make sure “Colorize” isn’t checked off, or it won’t work! Erase the parts going over your subject. You can, if you want, fill the “lines” of the rainbow back to their original (non-faded) colors. To do this, all the layers have to be merged. Otherwise, don’t! I did put the original colors back because the blue was faded into the background completely, but really this part is optional
8) And finally, the scratch texture. I admit to cheating on creating this, since I really don’t know how. I took a black 100x100 square and used the “Image Effect, Scratches” in Animation Shop. Either way, take the scratch texture and paste it as a new layer, and set the properties to Screen.
9) Merge all layers! And there you go. Text can be added if desired! The star in this example is actually the selection tool shaped like a star and then filled in with blue.
Other Examples: