Exclusion Layers explanation
Exclusion layers are beautiful things, but I constantly see them rather poorly explained in comments on "How do I get this coloring?" posts-- or other tools being attributed when an exclusion layer will do. SO, I decided to throw together a quick set of examples and some rules of thumb. :3
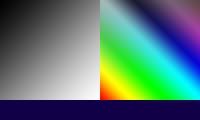
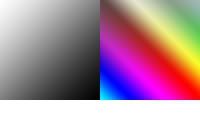
This is my base, on which I will show the effects of different colors of exclusion layers.
I have a B/W gradient and a rainbow gradient, the latter of which has lower saturation at the top; the bar of color at the bottom (in this case, #110048) will show the color of the exclusion layer I'm using.
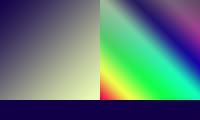
Same image, but with #110048 as an exclusion layer overtop. The effect is subtle on the rainbow, but on the b/w, it's quite pronounced-- the "black" has become the same shade of blue as the exclusion layer, and the "white" is the complimentary color of the exclusion layer.
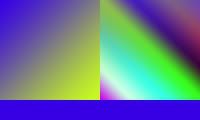
Now the exclusion layer is #3600E4 (same hue, higher brightness/saturation). Far more pronounced effect, wouldn't you say? But still, the "Black" is the same shade as the exclusion layer!
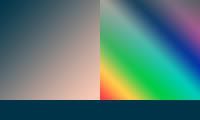
#003348 exclusion layer; the darkest color is the same shade as the exclusion layer. Do we see a pattern? :3
"Wait, what?" you say, and I reply, "White exclusion layers invert the image. :3" See how what was black is now the same color as the exclusion layer?
So, rules of thumb:
All "blacks" in an image will turn the same color as the exclusion layer; whites are an inverted color from the exclusion layer.
Dark exclusion layers are more subtle than bright exclusion layers.
You can get blue/yellow coloring without mucking about with Selective Coloring, Curves,or any other tools like that. ;3
You can figure out what shade the exclusion layer is by picking out the darkest color in the image!
I hope this is useful~

This is my base, on which I will show the effects of different colors of exclusion layers.
I have a B/W gradient and a rainbow gradient, the latter of which has lower saturation at the top; the bar of color at the bottom (in this case, #110048) will show the color of the exclusion layer I'm using.

Same image, but with #110048 as an exclusion layer overtop. The effect is subtle on the rainbow, but on the b/w, it's quite pronounced-- the "black" has become the same shade of blue as the exclusion layer, and the "white" is the complimentary color of the exclusion layer.

Now the exclusion layer is #3600E4 (same hue, higher brightness/saturation). Far more pronounced effect, wouldn't you say? But still, the "Black" is the same shade as the exclusion layer!

#003348 exclusion layer; the darkest color is the same shade as the exclusion layer. Do we see a pattern? :3

"Wait, what?" you say, and I reply, "White exclusion layers invert the image. :3" See how what was black is now the same color as the exclusion layer?
So, rules of thumb:
All "blacks" in an image will turn the same color as the exclusion layer; whites are an inverted color from the exclusion layer.
Dark exclusion layers are more subtle than bright exclusion layers.
You can get blue/yellow coloring without mucking about with Selective Coloring, Curves,or any other tools like that. ;3
You can figure out what shade the exclusion layer is by picking out the darkest color in the image!
I hope this is useful~