Layer Mask Tutorial for Beginners / Blending Pictures Smoothly (Photoshop)
I was asked to make a general tutorial on how to use the layer mask. So here it is. I am going to assume that you know next to nothing about Photoshop. It's short but quite heavy on images, so probably not dial-up friendly. I'm sorry that this isn't strictly icon related but lately, a lot of people have been asking about blending around here so...
I'm using Photoshop 7 but the basics should be fairly similar in other versions, as well (provided that said version has the layer mask tool; just look from slightly different places). EDIT: This technique also works quite similarly in GIMP. Or so I've been told. I have no idea about Paint Shop Pro.
What does a Layer Mask do, precisely? Basically, a Layer Mask works like the eraser tool but if you make a mistake, it's easier to correct. You don't have to worry about your History Palette or how many steps back you can take. I prefer masks to the eraser for this sole reason.
So, here I'm going to do a little sample featuring The Dresden Dolls, using pictures from their website.
First of all, here's what my Photoshop workspace looks like, if you don't know what Layers Palette and the lot are. I'll be talking about them, so if you don't know your way around the workspace, take a look at the picture behind the link. [EDIT: If you can't find the palette you're looking for, go to Window-->(the name of the palette).]
1. I started off with these two pictures. I opened them in Photoshop and then opened a new file (Untitled-1). I made the background of that new file black, but you can have anything (or nothing at all) on the background, it doesn't matter. Then I pasted both of my pictures into Untitled-1 (take the Move tool, click on the picture and drag, or right click on the Layer palette, choose Duplicate and "Untitled-1" from the drop down menu). Arrange the pictures the way you want. Now my Layer Palette looks like this.
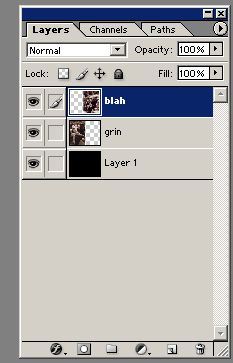
And Untitled-1 looks like this.
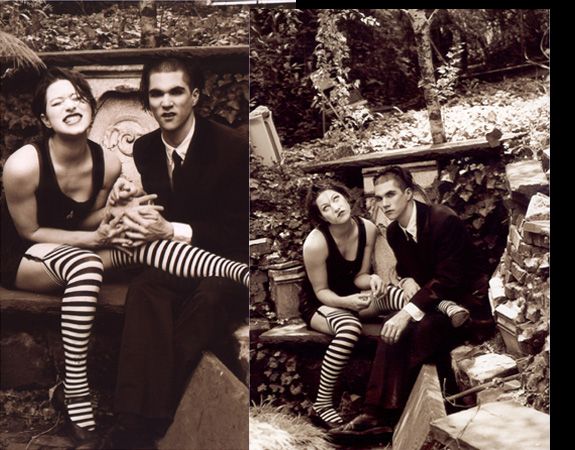
2. So, now to using the Layer Mask. Select the layer on top (in this case "blah") from your Layers Palette. Then find the Layer Mask symbol, a square box with the circle in the middle, from the bottom of the Layers Palette. (Layer Mask can also be "switched on" by going to Layer-->Add Layer Mask-->Reveal All, but I prefer this quick button.)

Click on the button. Now your Layer Mask is activated and you're "in the layer mask mode", so to speak, using the tackiest term ever. The layers now look like this.
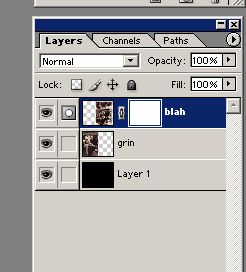
You can get out of "the layer mask mode" by clicking on the small picture of the layer next to that white box in order to work normally again (to get back to the "mode", click on the white box again). But let's not do that yet, keep the layer mask mode on for now.
3. Next, make sure that your foreground colour is set to black. Then choose the Brush tool from your Tools Palette. Go to the Tool Options Bar and choose a brush. I usually use Airbrush - at first at quite big a size (35px-65px) and then smaller when/if I start working with greater detail - because I think that Airbrush guarantees the smoothest result, but you can use any brush you want as long as the colour is black. Generally, it's not a good idea to start with the brush opacity at 100%. I usually set it around 40%-60%, sometimes even lower.
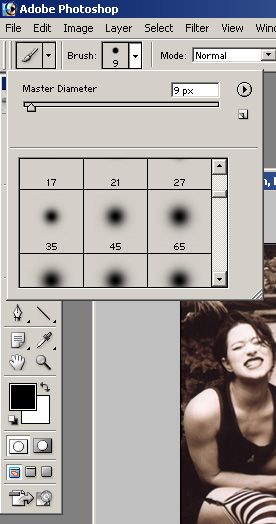
4. So now we've got our brush, the colour set to black, and the mask mode on. Start drawing with the brush with short strokes along the edge of the picture or on whatever the area is that you want to erase.
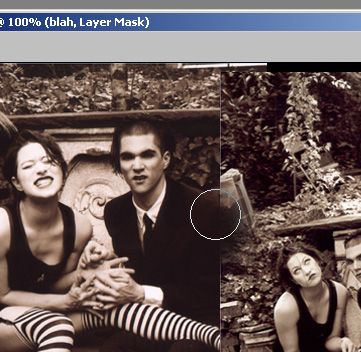
If you make a mistake, no problem. Just change the foreground colour to white and apply the brush on the area you want to get back. Then continue erasing by changing the colour back to black again.
This is what I got.
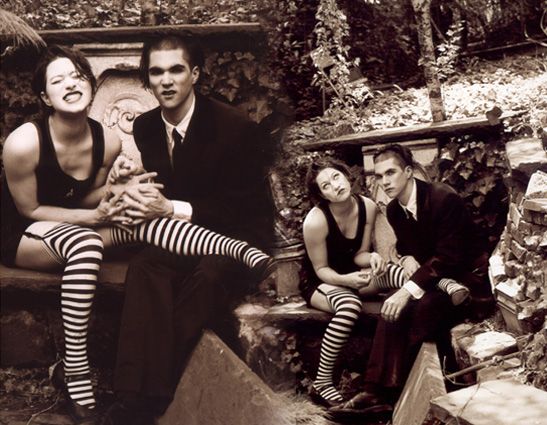
If you combine the layer mask and the technique used in this tutorial, you'll be able to achieve quite smooth blends.
[EDIT: Note that you will have to apply the layer mask on each layer you want to edit separately.]
I tried to make this tutorial easy to understand yet fully covering, but if I missed something or if something was left unclear, just give a shout.
(And if you want to see what came out of this when I started playing around, go here. :shameless self-promotion:: *grin*)
I'm using Photoshop 7 but the basics should be fairly similar in other versions, as well (provided that said version has the layer mask tool; just look from slightly different places). EDIT: This technique also works quite similarly in GIMP. Or so I've been told. I have no idea about Paint Shop Pro.
What does a Layer Mask do, precisely? Basically, a Layer Mask works like the eraser tool but if you make a mistake, it's easier to correct. You don't have to worry about your History Palette or how many steps back you can take. I prefer masks to the eraser for this sole reason.
So, here I'm going to do a little sample featuring The Dresden Dolls, using pictures from their website.
First of all, here's what my Photoshop workspace looks like, if you don't know what Layers Palette and the lot are. I'll be talking about them, so if you don't know your way around the workspace, take a look at the picture behind the link. [EDIT: If you can't find the palette you're looking for, go to Window-->(the name of the palette).]
1. I started off with these two pictures. I opened them in Photoshop and then opened a new file (Untitled-1). I made the background of that new file black, but you can have anything (or nothing at all) on the background, it doesn't matter. Then I pasted both of my pictures into Untitled-1 (take the Move tool, click on the picture and drag, or right click on the Layer palette, choose Duplicate and "Untitled-1" from the drop down menu). Arrange the pictures the way you want. Now my Layer Palette looks like this.

And Untitled-1 looks like this.

2. So, now to using the Layer Mask. Select the layer on top (in this case "blah") from your Layers Palette. Then find the Layer Mask symbol, a square box with the circle in the middle, from the bottom of the Layers Palette. (Layer Mask can also be "switched on" by going to Layer-->Add Layer Mask-->Reveal All, but I prefer this quick button.)

Click on the button. Now your Layer Mask is activated and you're "in the layer mask mode", so to speak, using the tackiest term ever. The layers now look like this.

You can get out of "the layer mask mode" by clicking on the small picture of the layer next to that white box in order to work normally again (to get back to the "mode", click on the white box again). But let's not do that yet, keep the layer mask mode on for now.
3. Next, make sure that your foreground colour is set to black. Then choose the Brush tool from your Tools Palette. Go to the Tool Options Bar and choose a brush. I usually use Airbrush - at first at quite big a size (35px-65px) and then smaller when/if I start working with greater detail - because I think that Airbrush guarantees the smoothest result, but you can use any brush you want as long as the colour is black. Generally, it's not a good idea to start with the brush opacity at 100%. I usually set it around 40%-60%, sometimes even lower.

4. So now we've got our brush, the colour set to black, and the mask mode on. Start drawing with the brush with short strokes along the edge of the picture or on whatever the area is that you want to erase.

If you make a mistake, no problem. Just change the foreground colour to white and apply the brush on the area you want to get back. Then continue erasing by changing the colour back to black again.
This is what I got.

If you combine the layer mask and the technique used in this tutorial, you'll be able to achieve quite smooth blends.
[EDIT: Note that you will have to apply the layer mask on each layer you want to edit separately.]
I tried to make this tutorial easy to understand yet fully covering, but if I missed something or if something was left unclear, just give a shout.
(And if you want to see what came out of this when I started playing around, go here. :shameless self-promotion:: *grin*)