My First Tutorial. PS7 Colouring Tutorial
Go from >> 
to >>
or >>
[>>] Made using Adobe Photoshop 7.0
[>>] Uses Gaussian Blur, Linear Dodge, Soft Light, Multiply, Color, Luminosity Layers.
[>>] Translatable
[>>] .PSD File included
Other Finished Examples (using same technique)


I made this tutorial with friends who have only just started using PS7 in mind.
Therefore I tried to keep the steps very detailed but basic.
For me I know my way around PS7 and It takes less than five minutes to do this.
STEP 01. Choose an image.
Take the image you wish to use and crop to icon size (100 x 100).
Sharpen image if need be by going to: Filter >> Sharpen >> Sharpen Sharpening gives an image more definition.
If your image is a too dark, sometimes this doesn't matter with this effect. You don't want an image too bright with this one.
But if you want to lighten it go to: Image >> Adjustments >> Brightness/Contrast and play with the settings until you're happy.
OR
Go to:
Image >> Adjustments >> Auto Levels. (Shift + Ctrl + L)
AND
Image >> Adjustments >> Auto Contrast. (Alt + Shift + Ctrl + L)
THIS IS YOUR BACKGROUND LAYER.
STEP 02. Duplicate your background layer
Go to:
Layer >> Duplicate Layer >>
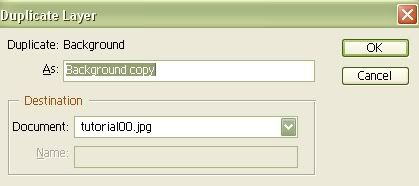
Rename As: Layer 1 Press OK
STEP 03. Desaturate Layer 1
To desaturate go to: Image >> Adjustments >> Desaturate
or
Press Shift + Ctrl + U
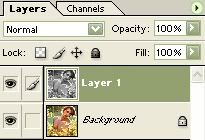
Your Layers now looks like this:
STEP 04. Duplicate your Layer 1
Go to:
Layer >> Duplicate Layer >>
Duplicate: Layer 1
As: (Layer 1 copy)
Rename to Layer 2 Press OK
STEP 05. Invert the colours of Layer 2.
Go to:
Image >> Adjustments >> Invert
or press Ctrl + I
STEP 06. Linear Dodge Layer
With Layer 2 Selected in Layers
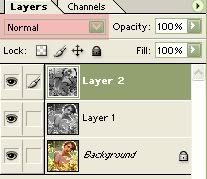
Go to the scrolldown menu highlighted in Pink and select Linear Dodge
Your image will now look almost if not completely White. Do not worry! This is how it is supposed to be.
STEP 07. Blurry Haze. Gaussian Blur
Go to:
Filter >> Blur >> Gaussian Blur
Move the radius tab around until you get an image you are happy with. (Be it faded or just an outline. It's up to you.)
I went with 151.8 pixels. Now my icon looks like this:

STEP 08. Create a New Layer
Go to:
Layer >> New >> Layer
Name new layer, Layer 3 Press OK.
STEP 09. Apply Image
With Layer 3 Selected in Layers
Go to:
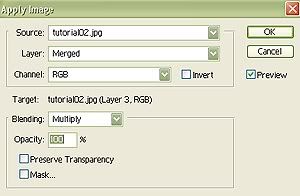
Image >> Apply Image >> OK
My settings are:
STEP 10. Gaussian Blur
This time we only want a light blur.
With Layer 3 Selected in Layers
Go to:
Filter >> Blur >> Gaussian Blur >>
And set the radius tab at 1 pixels or below.
STEP 11. Soft Light
Set Layer 3 to Soft Light 100% Opacity

Depending on your image (too light / too dark / not enough definition). You may want to set this Layer 3 to Multiply instead of Soft Light.
STEP 12. Duplicate. Multiply
Duplicate Layer 3. Name as Layer 4. Set this layer to Multiply 100% Opacity.
STEP 13. Background Colour Layer Copy
Duplicate the original background layer (colour image).
Layer >> Duplicate Layer >>
Duplicate: Background
As: (Background Copy)
Rename to Layer 5 Press OK
Move this layer to the top of the layers view as shown here.
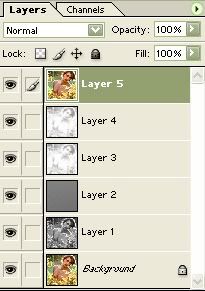
STEP 14. Layer 5 Color
Set Layer 5 to Color 50% Opacity
STEP 15. Duplicate Layer 5
Layer >> Duplicate Layer >>
Duplicate: Layer 5
As: (Layer 5 copy)
Rename to Layer 6 Press OK
STEP 16. Layer 6 Luminosity.
Set Layer 6 to Luminosity 100% Opacity.
** You can finish here if you wish.**
STEP 17. Duplicate Layer 6
Layer >> Duplicate Layer >>
Duplicate: Layer 6
As: (Layer 6 copy)
Rename to Layer 7 Press OK
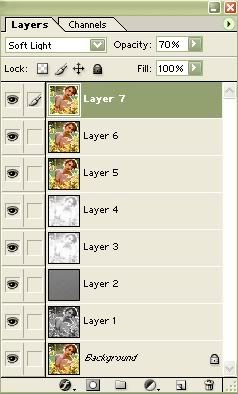
STEP 18. Layer 7 Soft Light.
Set Layer 7 to Soft Light 70% Opacity.
Complete Layers View
FINISHED ICON.

[>>] Download .PSD FILE [<<]
sendspace.com hosted. 252Kb
If you do use this tutorial, please share your results...
Icon I am using now, was also made using this tutorial.

to >>

or >>

[>>] Made using Adobe Photoshop 7.0
[>>] Uses Gaussian Blur, Linear Dodge, Soft Light, Multiply, Color, Luminosity Layers.
[>>] Translatable
[>>] .PSD File included
Other Finished Examples (using same technique)


I made this tutorial with friends who have only just started using PS7 in mind.
Therefore I tried to keep the steps very detailed but basic.
For me I know my way around PS7 and It takes less than five minutes to do this.
STEP 01. Choose an image.
Take the image you wish to use and crop to icon size (100 x 100).
Sharpen image if need be by going to: Filter >> Sharpen >> Sharpen Sharpening gives an image more definition.
If your image is a too dark, sometimes this doesn't matter with this effect. You don't want an image too bright with this one.
But if you want to lighten it go to: Image >> Adjustments >> Brightness/Contrast and play with the settings until you're happy.
OR
Go to:
Image >> Adjustments >> Auto Levels. (Shift + Ctrl + L)
AND
Image >> Adjustments >> Auto Contrast. (Alt + Shift + Ctrl + L)
THIS IS YOUR BACKGROUND LAYER.
STEP 02. Duplicate your background layer
Go to:
Layer >> Duplicate Layer >>

Rename As: Layer 1 Press OK
STEP 03. Desaturate Layer 1
To desaturate go to: Image >> Adjustments >> Desaturate
or
Press Shift + Ctrl + U
Your Layers now looks like this:

STEP 04. Duplicate your Layer 1
Go to:
Layer >> Duplicate Layer >>
Duplicate: Layer 1
As: (Layer 1 copy)
Rename to Layer 2 Press OK
STEP 05. Invert the colours of Layer 2.
Go to:
Image >> Adjustments >> Invert
or press Ctrl + I
STEP 06. Linear Dodge Layer
With Layer 2 Selected in Layers

Go to the scrolldown menu highlighted in Pink and select Linear Dodge
Your image will now look almost if not completely White. Do not worry! This is how it is supposed to be.
STEP 07. Blurry Haze. Gaussian Blur
Go to:
Filter >> Blur >> Gaussian Blur
Move the radius tab around until you get an image you are happy with. (Be it faded or just an outline. It's up to you.)
I went with 151.8 pixels. Now my icon looks like this:

STEP 08. Create a New Layer
Go to:
Layer >> New >> Layer
Name new layer, Layer 3 Press OK.
STEP 09. Apply Image
With Layer 3 Selected in Layers
Go to:
Image >> Apply Image >> OK
My settings are:

STEP 10. Gaussian Blur
This time we only want a light blur.
With Layer 3 Selected in Layers
Go to:
Filter >> Blur >> Gaussian Blur >>
And set the radius tab at 1 pixels or below.
STEP 11. Soft Light
Set Layer 3 to Soft Light 100% Opacity

Depending on your image (too light / too dark / not enough definition). You may want to set this Layer 3 to Multiply instead of Soft Light.
STEP 12. Duplicate. Multiply
Duplicate Layer 3. Name as Layer 4. Set this layer to Multiply 100% Opacity.
STEP 13. Background Colour Layer Copy
Duplicate the original background layer (colour image).
Layer >> Duplicate Layer >>
Duplicate: Background
As: (Background Copy)
Rename to Layer 5 Press OK
Move this layer to the top of the layers view as shown here.

STEP 14. Layer 5 Color
Set Layer 5 to Color 50% Opacity
STEP 15. Duplicate Layer 5
Layer >> Duplicate Layer >>
Duplicate: Layer 5
As: (Layer 5 copy)
Rename to Layer 6 Press OK
STEP 16. Layer 6 Luminosity.
Set Layer 6 to Luminosity 100% Opacity.
** You can finish here if you wish.**
STEP 17. Duplicate Layer 6
Layer >> Duplicate Layer >>
Duplicate: Layer 6
As: (Layer 6 copy)
Rename to Layer 7 Press OK
STEP 18. Layer 7 Soft Light.
Set Layer 7 to Soft Light 70% Opacity.
Complete Layers View

FINISHED ICON.

[>>] Download .PSD FILE [<<]
sendspace.com hosted. 252Kb
If you do use this tutorial, please share your results...
Icon I am using now, was also made using this tutorial.