Sophia Bush Tutorial
From this 
to

to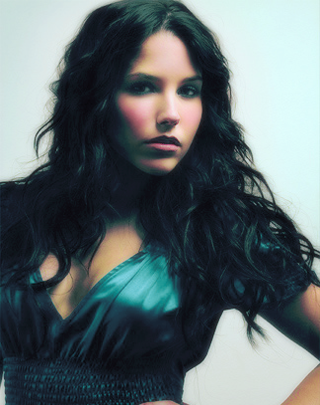
Made in Photoshop CS2, uses Selective Coloring so it is not transferable! Sorry PSP users
picture from www.stunningsophiabush.net
http://www.sophiabush.net/gallery/albums/userpics/10735/andrewmatusik1.jpg
Open image and duplicate. Set to screen at 30%
Colorfill layer - #B4DDFF Color Burn 100%
Selective color layer
Red
+35 +28 -48 0
Yellow
+25 -54 +16 0
Magenta
-100 +50 +53 -39
Neutrals
-27 0 +13 -3
Click ok
Another Selective color layer
Red
-33 +33 00
Yellow
+48 -33 100
Cyan
-95 -59 0 +17
Blue
+92 -81 +24 0
Neutrals
+44 -22 -13 0
New color balance layer
Color values
+15 -5 -15
New hue/saturation layer
Saturation +15
Color Fill layer
#FBB2DF Soft Light 50%
Drag your pink colorfill layer down in between the color balance and hue/saturation layers
Flatten image
Duplicate the merged image
Select the background layer and go to FilterSet the raduis to 3.0 pix
Click ok
Now select the duplicated layer and lower the opacity to 64%.
Flatten image
Done!!
This would be great for an icon, i just couldn't decide where to crop it because the coloring was so stunning all over!! LOL
I would love to see what you come up with!!
to
to
Made in Photoshop CS2, uses Selective Coloring so it is not transferable! Sorry PSP users
picture from www.stunningsophiabush.net
http://www.sophiabush.net/gallery/albums/userpics/10735/andrewmatusik1.jpg
Open image and duplicate. Set to screen at 30%
Colorfill layer - #B4DDFF Color Burn 100%
Selective color layer
Red
+35 +28 -48 0
Yellow
+25 -54 +16 0
Magenta
-100 +50 +53 -39
Neutrals
-27 0 +13 -3
Click ok
Another Selective color layer
Red
-33 +33 00
Yellow
+48 -33 100
Cyan
-95 -59 0 +17
Blue
+92 -81 +24 0
Neutrals
+44 -22 -13 0
New color balance layer
Color values
+15 -5 -15
New hue/saturation layer
Saturation +15
Color Fill layer
#FBB2DF Soft Light 50%
Drag your pink colorfill layer down in between the color balance and hue/saturation layers
Flatten image
Duplicate the merged image
Select the background layer and go to FilterSet the raduis to 3.0 pix
Click ok
Now select the duplicated layer and lower the opacity to 64%.
Flatten image
Done!!
This would be great for an icon, i just couldn't decide where to crop it because the coloring was so stunning all over!! LOL
I would love to see what you come up with!!