Veronica/Logan: PS7. Exclusion, pin light, gradient color burn, radial gradients
Go from 
to
in PS7.
1. Start with your base. Crop it and sharpen it.

2. Duplicate the base, set it to screen, 100%.

3. Add a dark blue (#000845) exclusion layer, 100%.

>>
4. Add a gradient. I used the 'Yellow, Green, Blue' gradient found in the pastels. Set it to colorburn, 100%.

>>
5. Duplicate the base again. Drag it to the top of the layers. Set it to screen, 100%.

6. Then, make a new layer and fill it with #FFCC99 and set it to multiply, 100%.

>>
7. Duplicate the base again. Drag it to the top of the layers. Desaturate (Shift-Ctrl-U) and set to soft light, 100%.

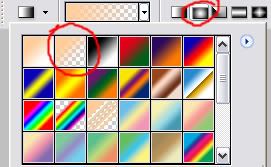
8. Create a new layer. Using #FFCC99 as your foreground color, click the gradient tool. Select the gradient that goes foreground - transparency & set the gradient to radial gradient. Drag the gradient tool from a corner to about the center of the icon. Set the layer to Pin Light, 100%.
>>
9. Now for the text. Using 24pt LainieDaySH, I typed 'epic' using the color #FFCC99 in a dark spot. Set that layer to Hard Light, 70%. Duplicate that layer and set the new layer to Soft Light, 100%.

Done! Other icons I've made using similar effects:



For more tutorials, icons, and textures by me, join kirjava17icons. You can request icons by me there as well.
For all my Harry Potter graphics, visit Phoenixi.

to

in PS7.
1. Start with your base. Crop it and sharpen it.

2. Duplicate the base, set it to screen, 100%.

3. Add a dark blue (#000845) exclusion layer, 100%.

>>

4. Add a gradient. I used the 'Yellow, Green, Blue' gradient found in the pastels. Set it to colorburn, 100%.

>>

5. Duplicate the base again. Drag it to the top of the layers. Set it to screen, 100%.

6. Then, make a new layer and fill it with #FFCC99 and set it to multiply, 100%.

>>

7. Duplicate the base again. Drag it to the top of the layers. Desaturate (Shift-Ctrl-U) and set to soft light, 100%.

8. Create a new layer. Using #FFCC99 as your foreground color, click the gradient tool. Select the gradient that goes foreground - transparency & set the gradient to radial gradient. Drag the gradient tool from a corner to about the center of the icon. Set the layer to Pin Light, 100%.

>>

9. Now for the text. Using 24pt LainieDaySH, I typed 'epic' using the color #FFCC99 in a dark spot. Set that layer to Hard Light, 70%. Duplicate that layer and set the new layer to Soft Light, 100%.

Done! Other icons I've made using similar effects:


For more tutorials, icons, and textures by me, join kirjava17icons. You can request icons by me there as well.
For all my Harry Potter graphics, visit Phoenixi.