My First Ever Icon Tutorial
Made using Photoshop CS.
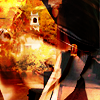
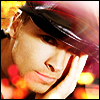
Go from this to
We are going to be using this picture.

1. Crop the picture & resize it so that it's 100 X 100 pixels & then sharpen it.

2. Duplicate image twice & set the first duplicate to Soft Light, opacity 48%.

3. And the second duplicate to Overlay, 53%.

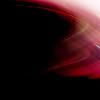
4. On a new layer, use this gradient by crumblingwalls

Set to Soft Light, 100%
5. On another new layer, paste this texture.

Set to Hard Light, 100%
Use the masking tool & erase the area covering Brian

6. Next, paste this light texture by awmpnet on another new layer

Set to Hard Light, 100%

7. Create a new layer again & paste this texture by colorfilter.
Set to Hard Light, 100%

8. Select image, then go to Image-->Copy Merged, paste on a new layer.
Next, go to Edit-->Stroke, select #000000 for the color, Width: 1px, Location: Center, Mode: Normal & Opacity 100%.
9. Finishing touches.
I used this brush, selected Outer Glow & Drop Shadow from Blending options.

Done!
Let me know what you think =)
PS: I forgot where I got one of the textures & the brush from, so if you know where they're from, let me know & I'll credit.
Go from this to
We are going to be using this picture.
1. Crop the picture & resize it so that it's 100 X 100 pixels & then sharpen it.
2. Duplicate image twice & set the first duplicate to Soft Light, opacity 48%.
3. And the second duplicate to Overlay, 53%.
4. On a new layer, use this gradient by crumblingwalls
Set to Soft Light, 100%
5. On another new layer, paste this texture.
Set to Hard Light, 100%
Use the masking tool & erase the area covering Brian
6. Next, paste this light texture by awmpnet on another new layer
Set to Hard Light, 100%
7. Create a new layer again & paste this texture by colorfilter.
Set to Hard Light, 100%
8. Select image, then go to Image-->Copy Merged, paste on a new layer.
Next, go to Edit-->Stroke, select #000000 for the color, Width: 1px, Location: Center, Mode: Normal & Opacity 100%.
9. Finishing touches.
I used this brush, selected Outer Glow & Drop Shadow from Blending options.
Done!
Let me know what you think =)
PS: I forgot where I got one of the textures & the brush from, so if you know where they're from, let me know & I'll credit.