PS & IR - flashy animation
Here's a tutorial for a flashy animation in Photoshop and ImageReady.

to
Crop your base. This is an older picture of Gwen Stefani in concert.

Sharpen to your preference, use the Blur tool to smooth graininess. Duplicate the base twice, set the first layer to Soft Light 100%, and Desaturate the second layer (Shift+Ctrl+U) and set to Soft Light 68%. Adjust the Curves (Image ---> Adjustments ---> Curves) to your liking. I've seen tons of tutorials in this community about using Curves, so check them out for help if you've never done it.

Flatten the image. Create a new layer, and fill with the pink/black gradient below. Set the gradient layer to Lighten 100%. Create another new layer, add brushes of your choice in a lighter color that matches your icon (here I used light pink) and set to Linear Dodge 100%. The brushes used here are by Misprinted-Type.


Add text. The font used here is Love Letter TW, and I created a new layer underneath the text and used the Rectangle Marquee tool to create a box of color under the words.

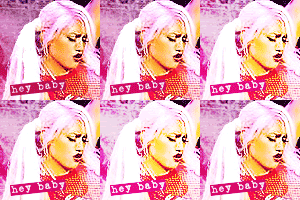
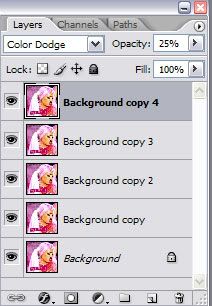
Again, flatten the image. Now duplicate your flattened image, and set the duplicated layer to Color Dodge 25%. Duplicate the Color Dodge layer 3 more times, so combined the four layers will be the same as one layer set at Color Dodge 100%. The icon should appear similar to the one below when all the layers are visible, and your layer menu should look like the menu below.


Now we're going to start using ImageReady. ImageReady should have come bundled with your Photoshop package, and you can access it by clicking the button at the very bottom of your toolbar, or by going to File ---> Edit in ImageReady. Select the option to edit in ImageReady. When your image opens in image ready, make sure the Animation menu is visible (it looks like the image below). If it isn't, go to Window ---> Animation. You're going to see one frame currently on the Animation bar.
On the Animation menu, click the little black arrow on the right-hand side and select "Copy Frame" from the pop-down menu. Now do the same, but select "Paste Frame," and choose "Paste After Selection" on the menu that comes up. Do this 5 times, so that you have a total of 6 frames altogether.
Select your first frame. Look at the layer menu and notice how all layers are selected. For the first (background) frame, you're going to click the little eye next to all the layers except for the base layer (the one with no Color Dodge) so that it's the only one visible. Now, go to frame 2. Click the eyes so that only 1 Dodge layer is visible. Below is a list of the settings I have for each of my frames:
1.) Background only
2.) BG + 1 layer
3.) BG + 3 layers
4.) BG + 2 layer
5.) BG + 4 layers
6.) BG + 2 layers
Lastly, make sure the loop in the bottom left-hand corner is set to "Forever" (NOT "ONCE"), and that each of your frames is set to cycle every 0.1 second (see menu below).

When you click the "play" button, you animation should look like the icon below. That's essentially all there is to it. Click on the "Optimized" tab to make sure your icon is going to be under 40K. If not, tweak the settings on the Optimize menu until it is. Make sure you save as a .gif file. To save, go to File ---> Save Optimized As... Don't try to add more frames... this icon, with 6 frames, just barely made the 40K cut. You can add more frames if you make the area of animation smaller... say, 1/4 size instead of full size. The smaller the animation, the more frames you can have before you reach the limit.
You may notice your icon looks a little grainy... unfortunetely, it's hard to avoid that completely. The smaller the animation, the better the quality should be.

That's all she wrote :)
to
Crop your base. This is an older picture of Gwen Stefani in concert.
Sharpen to your preference, use the Blur tool to smooth graininess. Duplicate the base twice, set the first layer to Soft Light 100%, and Desaturate the second layer (Shift+Ctrl+U) and set to Soft Light 68%. Adjust the Curves (Image ---> Adjustments ---> Curves) to your liking. I've seen tons of tutorials in this community about using Curves, so check them out for help if you've never done it.
Flatten the image. Create a new layer, and fill with the pink/black gradient below. Set the gradient layer to Lighten 100%. Create another new layer, add brushes of your choice in a lighter color that matches your icon (here I used light pink) and set to Linear Dodge 100%. The brushes used here are by Misprinted-Type.
Add text. The font used here is Love Letter TW, and I created a new layer underneath the text and used the Rectangle Marquee tool to create a box of color under the words.
Again, flatten the image. Now duplicate your flattened image, and set the duplicated layer to Color Dodge 25%. Duplicate the Color Dodge layer 3 more times, so combined the four layers will be the same as one layer set at Color Dodge 100%. The icon should appear similar to the one below when all the layers are visible, and your layer menu should look like the menu below.
Now we're going to start using ImageReady. ImageReady should have come bundled with your Photoshop package, and you can access it by clicking the button at the very bottom of your toolbar, or by going to File ---> Edit in ImageReady. Select the option to edit in ImageReady. When your image opens in image ready, make sure the Animation menu is visible (it looks like the image below). If it isn't, go to Window ---> Animation. You're going to see one frame currently on the Animation bar.
On the Animation menu, click the little black arrow on the right-hand side and select "Copy Frame" from the pop-down menu. Now do the same, but select "Paste Frame," and choose "Paste After Selection" on the menu that comes up. Do this 5 times, so that you have a total of 6 frames altogether.
Select your first frame. Look at the layer menu and notice how all layers are selected. For the first (background) frame, you're going to click the little eye next to all the layers except for the base layer (the one with no Color Dodge) so that it's the only one visible. Now, go to frame 2. Click the eyes so that only 1 Dodge layer is visible. Below is a list of the settings I have for each of my frames:
1.) Background only
2.) BG + 1 layer
3.) BG + 3 layers
4.) BG + 2 layer
5.) BG + 4 layers
6.) BG + 2 layers
Lastly, make sure the loop in the bottom left-hand corner is set to "Forever" (NOT "ONCE"), and that each of your frames is set to cycle every 0.1 second (see menu below).
When you click the "play" button, you animation should look like the icon below. That's essentially all there is to it. Click on the "Optimized" tab to make sure your icon is going to be under 40K. If not, tweak the settings on the Optimize menu until it is. Make sure you save as a .gif file. To save, go to File ---> Save Optimized As... Don't try to add more frames... this icon, with 6 frames, just barely made the 40K cut. You can add more frames if you make the area of animation smaller... say, 1/4 size instead of full size. The smaller the animation, the more frames you can have before you reach the limit.
You may notice your icon looks a little grainy... unfortunetely, it's hard to avoid that completely. The smaller the animation, the better the quality should be.
That's all she wrote :)