Basic DROP SHADOW in PSp
This is pretty simple... someone asked how to do this and since I have the time, I said I would
This is the original by _ithinkican //
your going from this
to this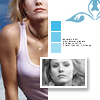
DEMO ONLY DO NOT TAKE ICON, THANKS
start with your base, which you've colored and done whatever you needed to do with to make it pretty and so on.
All I used was the auto settings in PS and Variations.
Your going to take your select tool and select part of the icon and fill it in with white or whaterever color you want, if you're going with color, select the eye drop tool and select a color already in the icon.

after that select a smaller part of the original or another picture and copy it and past it into the icon and desaturate it (command+shift+u) then I made a box in a new layer around the smaller picture and merged them together
i made it black so you could see it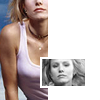
Left click on the layer and select "blending options," check "drop shadow" and adjust your settings to your liking and press ok.
ok almost done.. yay!
I made these boxes size 10
and then pick a color i picked #41bbe7
and make a new layer and repeated the boxes over the black ones and set them to screen
I used this brush
by inxsomniax and put it off to the side and it should look like this
I typed my text in arial size 1
... it says "this is kristen bell as veronicamars on upn at 9 on wed you should watch it, you wont regret it" :) /end of subliminal message
** this tutorial was desinged to inspire NOT to be copied million times and so on
** please DO NOT TAKE THE ICON that was made as the idea was not mine to begin with, thank you :)
and if you have any question please let me know
nina
This is the original by _ithinkican //
your going from this
to this
DEMO ONLY DO NOT TAKE ICON, THANKS
start with your base, which you've colored and done whatever you needed to do with to make it pretty and so on.
All I used was the auto settings in PS and Variations.
Your going to take your select tool and select part of the icon and fill it in with white or whaterever color you want, if you're going with color, select the eye drop tool and select a color already in the icon.
after that select a smaller part of the original or another picture and copy it and past it into the icon and desaturate it (command+shift+u) then I made a box in a new layer around the smaller picture and merged them together
i made it black so you could see it
Left click on the layer and select "blending options," check "drop shadow" and adjust your settings to your liking and press ok.
ok almost done.. yay!
I made these boxes size 10
and then pick a color i picked #41bbe7
and make a new layer and repeated the boxes over the black ones and set them to screen
I used this brush
by inxsomniax and put it off to the side and it should look like this
I typed my text in arial size 1
... it says "this is kristen bell as veronicamars on upn at 9 on wed you should watch it, you wont regret it" :) /end of subliminal message
** this tutorial was desinged to inspire NOT to be copied million times and so on
** please DO NOT TAKE THE ICON that was made as the idea was not mine to begin with, thank you :)
and if you have any question please let me know
nina