PS 6 Full Icon Tutorial Blending Gradients Text
I'm using PS 6
I hope it's easy to translate.
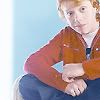
From this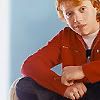
to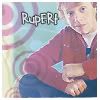
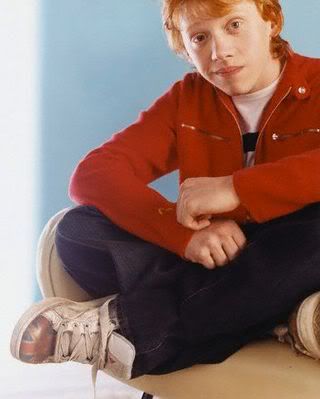
okay so first I got this image:
Then I cropped it using the Rectangle Selection tool set to Constrained Aspect Ratio
(be sure in in width and height box it's the same number so that you get a square)
Next sharpen the image twice Filter>Sharpen>Sharpen[2x](it looks pixelly but when you resize it it'll look fine)
You should have this:

Now go to Image>Image Size Make sure it's on Constrain Proportions (this is for when you plug in width it automatically resizes the height with it. Set to 100x100
You have this:

Now go to Filter>Sharpen>Sharpen Edges [1x]
I think he looks to red orangey so I went to Image>Adjust>Variations and I played with the colors until I got this:
To me this looks much better :)
So then I got this:
gender
And I copy it then paste it over the base and set it to Multiply
Now I didn't like the orange over his face so I took the eraser tool with a soft round brush and set it to Opacity 40 and erased the layer over his face.
Like so:
Then I got this gradient:
unknown
And paste it over both layers setting it to Lighten Opacity 60%
Then I did the same erasing that I did with the muliply layer. So now it looks like this:

Then I used the rectangle tool to make 2px border around the edge.
Like so:
So now I added text
Font: Calvin and Hobbes (dafont)
Size: 12
Opacity: 70
Color FFFFFF
Then I right clicked the text layer Blending Options>Stroke
Color 000000
1px
Position Outside
Blend Mode: Normal
Finally I went to Layer>Flatten Image
Save it as you like and you're done!
I hope you like this tutorial.
Icon is up for grabs just credit me :)
I hope it's easy to translate.
From this
to
okay so first I got this image:
Then I cropped it using the Rectangle Selection tool set to Constrained Aspect Ratio
(be sure in in width and height box it's the same number so that you get a square)
Next sharpen the image twice Filter>Sharpen>Sharpen[2x](it looks pixelly but when you resize it it'll look fine)
You should have this:
Now go to Image>Image Size Make sure it's on Constrain Proportions (this is for when you plug in width it automatically resizes the height with it. Set to 100x100
You have this:
Now go to Filter>Sharpen>Sharpen Edges [1x]
I think he looks to red orangey so I went to Image>Adjust>Variations and I played with the colors until I got this:
To me this looks much better :)
So then I got this:
gender
And I copy it then paste it over the base and set it to Multiply
Now I didn't like the orange over his face so I took the eraser tool with a soft round brush and set it to Opacity 40 and erased the layer over his face.
Like so:
Then I got this gradient:
unknown
And paste it over both layers setting it to Lighten Opacity 60%
Then I did the same erasing that I did with the muliply layer. So now it looks like this:
Then I used the rectangle tool to make 2px border around the edge.
Like so:
So now I added text
Font: Calvin and Hobbes (dafont)
Size: 12
Opacity: 70
Color FFFFFF
Then I right clicked the text layer Blending Options>Stroke
Color 000000
1px
Position Outside
Blend Mode: Normal
Finally I went to Layer>Flatten Image
Save it as you like and you're done!
I hope you like this tutorial.
Icon is up for grabs just credit me :)