Tutorial #6 and 7
Today, I've got two tutorials for PS7 (non-translatable, sorry!):
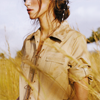
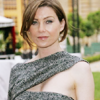
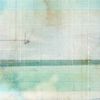
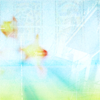
How to go from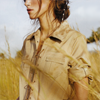
to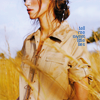
Start by cropping your image into 100x100. Sharpen if necessary.
Add a curves adjustment layer to make it brighter and less yellow:
RGB: 24/24, 124/137
Red: 27/23, 217/219
Green: 108/103
Blue: 59/56, 243/247
---
Add a selective color layer to bring out the reds and blues:
Reds: -26, 0, +7, 0
Yellows: -8, 0, +21, 0
Cyans: +95, 0, -81, 0
Blues: +31, 0, -63, 0
Neutrals: +6, 0, -8, 0
Set to Absolute.
---
Duplicate the first curves layer to make brighter and enhance contrast.
Set to normal 35%.
---
This step is optional, but I feel the icon is a bit too bright now, so add a brightness/contrast adjustment layer:
Brightness: -3
Contrast: +2
---
Add some text, and place it near her shoulder (Arial, 5 pt, leading 4 pt, tracking -25; in #2360B0).
---
And you’re done!
Download the .psd file here.
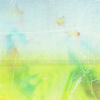
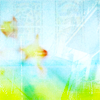
Second tutorial:
Go from
to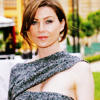
to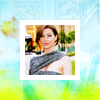
Do all the necessary cropping, sharpening, resizing.
Add a curves layer to brighten things up.
RGB: 21/27, 109/160
Red: 190/203
Blue: 69/62, 237/238
---
Add another curves layer to create more contrast:
RGB: 33/29, 126/132
Red: 36/32, 226/238
Green: 58/52
Blue: 71/61, 240/247
Set to soft light, 100%.
---
Make a new selective color layer to make her skin rosier and make the colors more saturated.
Reds: -24, 0, +9, 0
Yellows: -6, 0, +20, 0
Greens: +44, 0, +67, 0
Cyans: +58, 0, -73, 0
Neutrals: +3, 0, -5, 0
Set to absolute.
---
You can download the .psd file for this icon here.
The first part is done, and you can leave your icon as is, or you can paste it onto a textured background for a different icon.
First, we’re going to prep the base.
Take this texture from discolore as the background. Add this texture, also by discolore and paste it on top. Set to color burn, 100%.
+
=
Paste this third texture again by discolore and set to color burn, 100%.
+
=
Now we can start to add on the image.
Add a 60x60 white square in the middle. This will serve as a kind of frame for the icon we just made.
Resize the Ellen icon to 50x50 and paste it in the middle.
I usually find that after you resize an icon, it looks a bit duller, so I’m going to add a hue/saturation layer.
Saturation: +10.
And that’s it! Of course you can add other stuff to it, like more textures, text, etc. Go crazy!
I'd love to see what you guys come up with!
Like what you see? Join us @ icon_supernova.
How to go from
to
Start by cropping your image into 100x100. Sharpen if necessary.
Add a curves adjustment layer to make it brighter and less yellow:
RGB: 24/24, 124/137
Red: 27/23, 217/219
Green: 108/103
Blue: 59/56, 243/247
---
Add a selective color layer to bring out the reds and blues:
Reds: -26, 0, +7, 0
Yellows: -8, 0, +21, 0
Cyans: +95, 0, -81, 0
Blues: +31, 0, -63, 0
Neutrals: +6, 0, -8, 0
Set to Absolute.
---
Duplicate the first curves layer to make brighter and enhance contrast.
Set to normal 35%.
---
This step is optional, but I feel the icon is a bit too bright now, so add a brightness/contrast adjustment layer:
Brightness: -3
Contrast: +2
---
Add some text, and place it near her shoulder (Arial, 5 pt, leading 4 pt, tracking -25; in #2360B0).
---
And you’re done!
Download the .psd file here.
Second tutorial:
Go from
to
to
Do all the necessary cropping, sharpening, resizing.
Add a curves layer to brighten things up.
RGB: 21/27, 109/160
Red: 190/203
Blue: 69/62, 237/238
---
Add another curves layer to create more contrast:
RGB: 33/29, 126/132
Red: 36/32, 226/238
Green: 58/52
Blue: 71/61, 240/247
Set to soft light, 100%.
---
Make a new selective color layer to make her skin rosier and make the colors more saturated.
Reds: -24, 0, +9, 0
Yellows: -6, 0, +20, 0
Greens: +44, 0, +67, 0
Cyans: +58, 0, -73, 0
Neutrals: +3, 0, -5, 0
Set to absolute.
---
You can download the .psd file for this icon here.
The first part is done, and you can leave your icon as is, or you can paste it onto a textured background for a different icon.
First, we’re going to prep the base.
Take this texture from discolore as the background. Add this texture, also by discolore and paste it on top. Set to color burn, 100%.
+
=
Paste this third texture again by discolore and set to color burn, 100%.
+
=
Now we can start to add on the image.
Add a 60x60 white square in the middle. This will serve as a kind of frame for the icon we just made.
Resize the Ellen icon to 50x50 and paste it in the middle.
I usually find that after you resize an icon, it looks a bit duller, so I’m going to add a hue/saturation layer.
Saturation: +10.
And that’s it! Of course you can add other stuff to it, like more textures, text, etc. Go crazy!
I'd love to see what you guys come up with!
Like what you see? Join us @ icon_supernova.