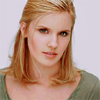
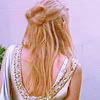
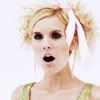
#18 3 tutorials (lozzy)
to

.PSD FILE
Photoshop 7
Image Heavy
Easy
No selective colouring!
o1. Crop and prep yours base, whatever you normally do. Duplicate the base and set to SCREEN @ 100%.

o2. Duplicate the ‘screen’ layer twice, leave the second layer (the one closest to the bottom) at 100%, but put the top one on 50% opacity and 30% fill.
&&
o3. Next, go Select-->All, Edit-->Copy Merged, Edit-->Paste. If you use Photoshop you can also press ctrl, alt, shift & e. I’m not sure about other programs though. Desature the merged layer.. Image-->Adjustments-->Destaturate. Now set the layer to SOFT LIGHT, with 100% opacity and 40% fill.

&&

o4. Create a Curves New Adjustment layer. Layer-->New Adjustment Layer-->Curves. I used the following settings, but all images will need and have different results.
RBG:
First point:
Input; 15 || Output; o
Second point:
Input; 128 || Output; 124
Third point:
Input; 240 || Output; 255
BLUE:
First point:
Input; 70 || Output; 65
Second point:
Input; 126 || Output; 140
Third point:
Input: 187 || Output: 191
Lower the opacity to 70%.

o5. Create a new layer. Layer-->New à Layer. Fill the layer with #626262. Set the layer to MULTIPLY with 50% opacity and 20% fill.

&&
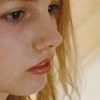
o5. Create a new layer. Fill the layer with #DEDCDC. Set the layer to COLOUR BURN with 50% opacity.

&&
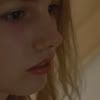
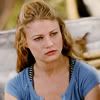
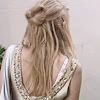
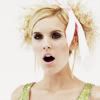
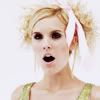
Also made with this colouring:
to
.PSD FILE
Photoshop 7
Image Heavy
Medium
Selective colouring
o1. Crop your icon and everything. Duplicate your base and set to SCREEN @ 100%.
o2. Create a new Hue & Saturation Adjustment Layer {Layer-->New Adjustment Layer-->Hue & Saturation}. Up the saturation by +34.
o3. Merge everything, by doing the Select-->All, Edit-->Copy Merged, Edit-->Paste. Desaturate the layer. Then invert it {Image-->Adjustments-->Invert}. Set this to SOFT LIGHT, lower the fill to 40%.

&&

o4. Create a Selective Colour New Adjustment Layer {Layer-->New Adjustment Layer-->Selective Colour}. These are my settings, but again obviously they’ll change for all pictures.
REDS:
Cyan ;; -71%
Yellow ;; - 80%
YELLOWS:
Cyan ;; +15%
Yellow ;; -17%
WHITES:
Yellow ;; -63%
NEUTRALS:
Cyan ;; -1%
Yellow ;; +8%
o5. Another Selective Colour layer.
REDS:
Cyan ;; -37%
Yellow ;; +16%
YELLOWS:
Cyan ;; -67%
Yellow ;; -5%
WHITES:
Yellow ;; -42%
NEUTRALS:
Cyan ;; +13%
Yellow ;; -4%
o6. Create a Curves New Adjustment Layer.
RBG:
First point:
Input; 15 || Output; o
Second point:
Input; 121 || Output; 137
Third point:
Input; 240 || Output; 255
BLUE:
First point:
Input; 61 || Output; 17
Second point:
Input; 191 || Output; 234
Lower the opacity for 50%
o7. Add this texture which I modified from one of “peoplemachine”‘s. Set to MULTIPLY @ 100%.
&&

o8. Finally, one last Curves layer.
RED:
First point:
Input; 106 || Output; o
GREEN:
First point:
Input; 77 || Output; 0
BLUE:
First point:
Input; 40 || Output; 0
Lower the opacity & fill to 50%.
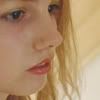
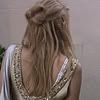
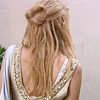
Also made with this colouring:


to

.PSD FILE
Photoshop 7
Image Heavy
Medium
Selective colouring
o1. Crop your base and all that stuff. Create a Selective Colour Adjustment Layer.
REDS:
Cyan ;; -100%
Yellow ;; -38%
YELLOWS:
Cyan ;; -60%
Yellow ;; +21%
NEUTRALS:
Cyan ;; +6%
Yellow ;; -4%

o2. Create a new layer, fill with #EAE8E6. Set to LINEAR BURN @ 50%.

&&
o3. Create a Levels New Adjustment Layer {Layers-->New Adjustment Layer-->Levels}.
RBG: 5, 1.05, 255
RED: 5, 1.05, 255
GREEN: 5, 1.05, 255
BLUE: 5, 1.05, 255
o4. Create another Levels New Adjustment Layer.
RBG: 21, 1.05, 255
RED: 3, 1.11, 255
GREEN: 0, 1.00, 255
BLUE: 0, 1.04, 246
o5. Duplicate the linear burn layer from before and drag it to the top of all your layers, leave all the settings the same but lower the fill to 50%.
o6. Selective Colour Adjustment Layer …
REDS:
Cyan ;; -47%
Yellow ;; +19%
YELLOWS:
Cyan ;; +20%
Yellow ;; -42%
NEUTRALS:
Cyan ;; +4%
Yellow ;; +2%
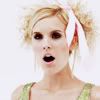
o7. Another Selective Colour Adjustment Layer.
REDS:
Cyan ;; -100%
Yellow ;; -38%
YELLOWS:
Cyan ;; -60%
Yellow ;; +21%
NEUTRALS:
Cyan ;; +6%
Yellow ;; -4%
Lower the opacity & fill to 50%.
o8. Select-->All, Edit-->Copy Merged, Edit-->Paste. Desaturate. Invert. Set to SOFT LIGHT with 80% opacity and 50% fill.
&&

08. Another Selective Colour Adjustment Layer.
REDS:
Cyan ;; +4%
Yellow ;; +11%
YELLOWS:
Cyan ;; +22%
Yellow ;; +9%
NEUTRALS:
Cyan ;; +1%
Yellow ;; -1%

o9. Create a Colour Balance Adjustment Layer {Layer-->New Adjustment Layer-->Colour Balance}.
Midtones: -11, -1, -3
Finished, finally haha. A lot of steps were not necessary in this and probably wouldn’t have made the icon look too different, but yeah…
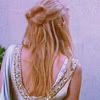
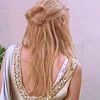
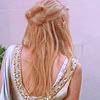
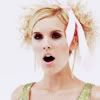
Also made with this colouring: