Opal Template (halffling)
Here be my Opal Template :D
UPDATES:
[Edit 3/15/05] Template has been reuploaded due to an error that occurs when userpics are turned off. Thank you, pamelajoy! <3
[Edit 4/14/05 & 4/17/05] Reuploaded template to enable the option of printing your default userpic instead of an intro box, explained behind cut, along with more stylesheet tips.
[Edit 5/15/05] Reuploaded to fix problems with spacing when making a userpic appear on the sidebar. Many thanks to omgwtf42 & roniabirk!
[Edit 8/19/05] Reuploaded template to enable tag support and changing the words "Edit Entry", "Add to Memories", etc. Added a few more tutorials.
[Edit 10/26/05] OUT OF BETA TESTING, this template is now "public"! The question session has been closed, please do not post any. They will not be answered.
[Edit 12/21/05] Reuploaded template to remove ugly scrolly-bar-thingies that appear in FireFox v1.5+ See edits below on how to do it manually.
[Edit 12/23/05] kunzite1 took it upon himself to clean up the coding. Go.
[Edit 05/31/06] Fixed error that appears when voice posts are made.
I must first say that this is based on ignited's fantabulous Opal template *worships* Even so, mine has literally been several months in the making, customizing the stylesheet to my liking, etc. I also worked on adding things, like having the keywords show up when you hover over a commenter's userpic. I actually never intended to share it with others, but that's mostly because I didn't think it was that special anyway *shrugs* I'm so happy, though, for all the wonderful feedback I've been getting about my layouts, and I'm more than honored that people want a template.
Ja ja, enough of the jabber, right? =) Apologies ahead of time, as I'm quite wordy and my spelling errors are vast.
CREDITS: (Thank you velly, velly much!)
GUIDELINES: (Which, unlike Pirate codes, should be followed)
PREVIEW: (A Picture is Worth a Thousand Words)
Here is a small screenshot I took with the template in action! *cough* It might look slightly different with yours, given that I changed some of the navigation links at the top, your screen resolution and browser may not be the same as mine, and various other factors.
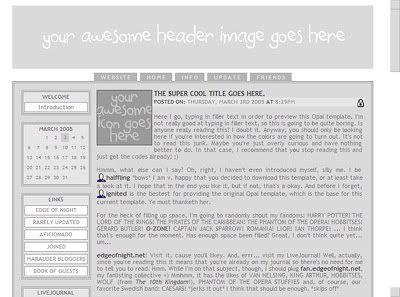
No, I didn't desaturate the image - the default color scheme is greyscale. :) The download file contains ONLY the HTML/CSS, not any header images or icons. Sadly, you will not receive the awesome header or icon pictured above =]
INSTRUCTIONS: (Part One)
CUSTOMIZATIONS: (A Segway)
INSTRUCTIONS: (Part Two)
I believe I covered all grounds. I ask that you don't distribute the codes on your own journal. Instead, direct people to this entry :)
Right now, I'm verreh verreh sleepy, so I shall hit the pillow. *waves wearily* <3
UPDATES:
[Edit 3/15/05] Template has been reuploaded due to an error that occurs when userpics are turned off. Thank you, pamelajoy! <3
[Edit 4/14/05 & 4/17/05] Reuploaded template to enable the option of printing your default userpic instead of an intro box, explained behind cut, along with more stylesheet tips.
[Edit 5/15/05] Reuploaded to fix problems with spacing when making a userpic appear on the sidebar. Many thanks to omgwtf42 & roniabirk!
[Edit 8/19/05] Reuploaded template to enable tag support and changing the words "Edit Entry", "Add to Memories", etc. Added a few more tutorials.
[Edit 10/26/05] OUT OF BETA TESTING, this template is now "public"! The question session has been closed, please do not post any. They will not be answered.
[Edit 12/21/05] Reuploaded template to remove ugly scrolly-bar-thingies that appear in FireFox v1.5+ See edits below on how to do it manually.
[Edit 12/23/05] kunzite1 took it upon himself to clean up the coding. Go.
[Edit 05/31/06] Fixed error that appears when voice posts are made.
I must first say that this is based on ignited's fantabulous Opal template *worships* Even so, mine has literally been several months in the making, customizing the stylesheet to my liking, etc. I also worked on adding things, like having the keywords show up when you hover over a commenter's userpic. I actually never intended to share it with others, but that's mostly because I didn't think it was that special anyway *shrugs* I'm so happy, though, for all the wonderful feedback I've been getting about my layouts, and I'm more than honored that people want a template.
Ja ja, enough of the jabber, right? =) Apologies ahead of time, as I'm quite wordy and my spelling errors are vast.
CREDITS: (Thank you velly, velly much!)
- ignited, for her template and for being such inspiration *huggles*
- pamelajoy, omgwtf42, phoenixdreaming, kunzite1, lumare and parsleh for their multitudes of help (both technologically and inspirationally) :D
- LJ communities opal_help and s2styles for ENDLESS amounts of resources
- All of the 'modifications' I did came from posts that I've added to my memories
GUIDELINES: (Which, unlike Pirate codes, should be followed)
- You need a paid account in order to use Opal.
- Credit to both ignited and halffling would be spiffy :) Or, at least link here, so other people know where to get it. Cause really, is it that hard?
- Comment if you take and/or use, or have a suggestion (no questions, sorry!)
- DO NOT COPY OR STEAL! Don't use this template to copy my layout (or anyone else's layouts, for that matter)
- DO NOT REDISTRIBUTE THE FILE! Likewise, do not repost it or hotlink!
- If you've never installed an Opal template before, I highly recommend skimming through ignited's entry, because her step-by-step instructions are very clear, and include screenshots! :D 'My' instructions are are practically the same, but taking a look at hers first, in my opinion, is very helpful in order to understand what the heck I'm was trying to say.
- You should know some basic HTML and CSS to be able to customize this template to your liking.
- I was going to offer this template using one of my old layouts, however, I decided to create a completely new color scheme instead. Thus, it is perfectly okay to keep the stylesheet as is. Of course, if would be better if you didn't, but even if you don't, I won't come after you with my fleet of Dementors.
- As of October 26, 2005, I will no longer offer support for this template. The question session was only offered during the beta-testing period because:
- I am not expert at this, and I do not pretend to be. To do things, I mainly guess and check - my sad attempt to learn. I know that there are lots of flaws in this template (for instance, I know it's annoying to have to directly code each stylesheet attribute by hand, but I don't have the skill to implement another method ;__;). I do welcome any and all suggestions, but please don't bite my head off :)
- The template has been updated to fix any known bugs. If you notice one that has been overlooked, do let me know.
- By then, additional questions should have already been answered in previous comments and in the entry itself.
- I don't have the time to keep up with it.
- I am not expert at this, and I do not pretend to be. To do things, I mainly guess and check - my sad attempt to learn. I know that there are lots of flaws in this template (for instance, I know it's annoying to have to directly code each stylesheet attribute by hand, but I don't have the skill to implement another method ;__;). I do welcome any and all suggestions, but please don't bite my head off :)
PREVIEW: (A Picture is Worth a Thousand Words)
Here is a small screenshot I took with the template in action! *cough* It might look slightly different with yours, given that I changed some of the navigation links at the top, your screen resolution and browser may not be the same as mine, and various other factors.
No, I didn't desaturate the image - the default color scheme is greyscale. :) The download file contains ONLY the HTML/CSS, not any header images or icons. Sadly, you will not receive the awesome header or icon pictured above =]
INSTRUCTIONS: (Part One)
- Download the template. Please right-click-save-target-as :) Save it somewhere you'll remember. (I also recommend making a copy of it, so in case you mess up the file, you can revert back to the original.) The URL to this template will be changing periodically, so don't even try to hotlink >O
ALTERNATIVELY, download the 'cleaner' version of my template by kunzite1 HERE. - Your style system should be on "New system (S2)". If it isn't, go to LJ's Customize page, and under 'Choose style system' drop-down menu, pick S2 & click 'Change'
- Venture to the Advanced Customization area (livejournal.com/customize/advanced/layers.bml)
- Near the bottom should be an area called Create layout-specific layer with two drop-down menus. In the first one (Type) choose "Theme"; in the second (Layout), choose "Opal (Libra OSWD)". Click Create.
- The page should refresh, and you will see a new layer under your previous stuff that looks somewhat like:
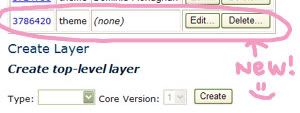
Click the Edit button next to the new layer, and you'll be taken to a page with the header "Edit layer source," and a giant text box. In that box reads something like this:
layerinfo "type" = "theme";
layerinfo "name" = "";
Now comes the fun part! Remember that template you downloaded earlier? Open it up and you can begin to customize it. How, you say? Well, read below for some of my tips!
CUSTOMIZATIONS: (A Segway)
- Layerinfo, setting text:
The first part is pretty self-explanatory. On the first few lines of copypaste.txt is the info for your specific layer, so change "Your Theme Name" to the name of your theme. Otherwise, you have to keep track of your layers by the numbers assigned to them - and that can be confusing in the future. Likewise, you can change how your comment, mood, music, links, back and forward text appear. - The Stylesheet/Background Image:
"function print_stylesheet()" is the meat of the layout - this is where you customize all the colors. I put comments within the stylesheet in order to help you figure out what each CSS class does. For further help on what each color affects (effects? Bah!), check out this post by omgwtf42, which I found to be quite helpful.
Included in the stylesheet (under body) is the property:
background-image:url(http://yourserver.com/blah/backgroundimage.jpg);
background-attachment:fixed;
For a background image, replace the URL above.
If you don't want it to stay fixed as you scroll, remove the second line (background-attachment).
If you don't want a background image at all, remove both lines.
I tried my best to rid of the classes that repeat or which happened to override each other, but of course I might have erased something important or overlooked another. (Do let me know if you stumble on something of that nature.) - Adding borders:
Most useful for .entryinfo and .entrylinks (where it lists your entry's info and links at the bottom). In the stylesheet, insert:
border:1px solid #000000;
to add a 1-pixel border. If you want just a top and bottom border, do this instead:
border-top:1px solid #000000;
border-bottom:1px solid #000000; - Moving the Navigation Tabs up: (thank you reprieved)
To move the Navigation buttons "up" first find #nav in your stylesheet. Add in "padding-bottom:#px" - where you replace the # with however many pixels you want. It should end up looking something like so:
#nav {
font-size:10px;
letter-spacing:2px;
text-transform:uppercase;
padding-top:10px;
padding-bottom:10px;
white-space:nowrap;
} - Sidecolumn contents:
"function Page::lay_print_sidebar ()" contains all of the items in the left side column. The first is the Introduction paragraph, which can be removed if you don't want one. I commented out "$this->lay_print_summary();" (by putting the # symbol on the side) thus, there is no page summary on the journal. Remove the # if you want the page summary.
Next are quick LJ links (updates, memories, edit filters, etc), feel free to remove or add more links as you please.
Replace "yourusername" with your username. (The Find & Replace function in Notepad, WordPad, or Microsoft Word works well.)
Afterwards I included two other columns, for images or whathaveyou ;) Again, add more or delete them (for that you must remove starting at 'var string' and ending at the ; at the end of the 'print_box' function). - Navigation Links: (those tabs at the top)
"function Page::lay_print_header ()" contains the navigation links. Edit the name that links to your website under "var string website," what follows are the navigation links themselves. You can renumber/delete/insert more of them, just remember to replace "yourusername" with your username. - Title, Header Image
Place your Journal's title within the .
Scroll down a bit and you may adjust the width of your journal (change where it says: width="650")
The next line is where you place your header:

If you want a header, just change the URL so it points to your image =) (Tip: the width of your header image should be the same as the width of your journal - the 650 mentioned above).
If you don't want a header, remove the ENTIRE line. - Default Usericon / Deleting Intro Paragraph
NEW! Edit, 4/14/05: I moved a bit of the coding around so that you can print your default usericon on the top of the sidebar, in case you'd rather have that than an intro post. You MUST redownload the file if you are attempting to follow the next few steps. First of all, search in copypaste.txt for a line that reads:
# $this->lay_print_userpic();
The userpic has been commented out, simply delete the "#" to enable it!
To delete the intro paragraph, find where it says:
var string intro = """
Insert a welcome message here!
""";
print_box("Introduction", $intro);
And delete all four lines. - Adding Tags
NEW! Edit, 8/17/05: If you have downloaded the template before this date, I suggest that you redownload it. You should only attempt to edit it yourself if you are comfortable with using advanced HTML, and can follow directions XD I will not answer any questions regarding this, since the template has the code already inserted and works perfectly. If you have trouble with the following instructions, I suggest you simply get the template. Thanks to kunzite1 and lumare for help :D
First, insert the following at the top of your coding, after the large set of "set text_"'s:
set tags_aware = true;
Then, place this into your stylesheet:
/* tags */
.tags {
color:#9A9A9A;
font-size:9px;
background-color:#D0D0D0;
text-transform:uppercase;
padding:1px;
}
The next is the most challenging part, but it's not really XD First, find the area that reads:
$e.subject
.... junk junk junk ...
REPLACE that with:
$e.subject
$security posted on: $date @ $time
""";
if($show_name) {
$this->lay_make_username($e);
}
var int count = 0;
var string tags = "";
var string tags_root = $.journal->base_url() + "/tag";
foreach var Tag t ($e.tags) {
$tags = $tags + """ $t.name""";
if(++$count < size($e.tags)) {
$tags = $tags + ", ";
}
}
if($tags != "") {
$tags = "Tags: " + $tags;
}
"""
$tags
Your tags will therefore print under the "posted on la la la" line, like so!
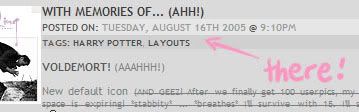
Feel free to edit the text so that it reads how you wish (instead of Tags: tag, tag, tag) and move it to where you like. Also, edit the stylesheet bit so it goes with your layout. - Converting nav links from tabs to one line, changing entrylinks words:
NEW! Edit, 8/17/05: See this thread :D Alternatively, check out s2howto's entry here. - Separating the sidebar from the entry text:
NEW! Edit, 10/24/05: See this thread on how to accomplish this by directly editing the code.
Alternatively, try parsleh's method by editing the stylesheet, as posted in opal_help here. - I GET OOGLY SCROLLBARS IN MY ENTRY! HELP!
NEW! Edit, 12/21/05: Remove the following portion from the stylesheet, and compile:
.entrytext {
overflow-x:hidden;
text-overflow:clip;
word-wrap:break-word;
text-align:justify;
} - Etc.
Everything afterwards can be left alone. You can most certainly go through them and customize your journal further, for instance, you can alter where it says "Posted On:" below the entry subject, or "Back To Top" at the bottom of each entry. If you edit things there, I cannot guarantee that the layout will still work. Please do so at your own discretion.
;)
INSTRUCTIONS: (Part Two)
- Please make sure you typed in a Theme name in order to recognize it later on. The stylesheet may be left unchanged for this next part, if you're curious as to how this works or don't have a layout ready yet.
- Do you still have that text area open on Advanced Customization? If not, go back to that page, find your theme layer, and click on 'Edit.' Again, you should have a giant text box with two lines, and a button that says 'Compile.' Copy all of the contents from copypaste.txt, then paste it into the box. Note: If working in Notepad, make sure 'Word Wrap' is OFF before copying. (Format --> Word Wrap (unchecked)) Once you've pasted, hit 'Compile'.
- If you've done everything correctly, you should read "No Errors" -- CONGRATS! If you've made a mistake, LJ will point out where the troubled line is, and you can fix the contents.
- Next, we must implement the layout. Go to Customize (livejournal.com/customize/).
On the Step 1: Layout drop-down list, choose "Opal (Libra OSWD)" & click the 'Change' button.
Once the page reloads, go down to Step 2: Customize Layout - Themes & choose the new layer you created (the name will be whatever you replaced "Your Theme Name" with). Click the 'Change' button, then visit your journal to see the results! Don't like? Go back to the layer editing... place and edit your theme. (Or go back to Customize and click 'Edit Customizations')
I believe I covered all grounds. I ask that you don't distribute the codes on your own journal. Instead, direct people to this entry :)
Right now, I'm verreh verreh sleepy, so I shall hit the pillow. *waves wearily* <3