4 Freakin Tuts!
A few people requested some tutorials so i come baring four!
The last three are very similar, but i thought I would make them anyway to show the similarities. :)
=>
=>
=>

=>
made with PSCS2 not translatable sorry!
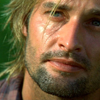
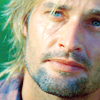
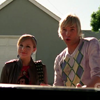
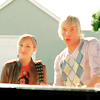
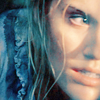
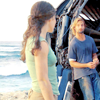
Tutorial #1: Sawyer
=>
-Start with your base. Duplicate it once and set it to screen
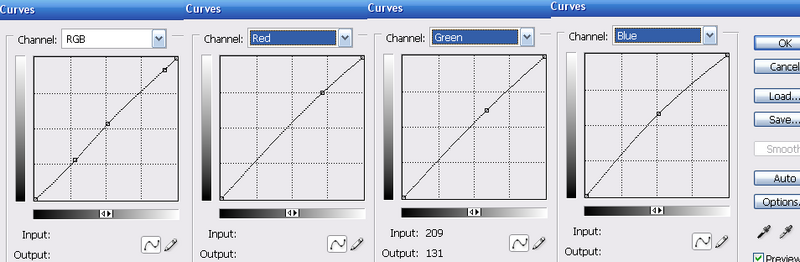
-Now make a curves adjustment layer.
RGB: firstpoint I:71 O:71
second point: I:131 O:137
third point I:234 O:234
RED: I:182 O:191
GREEN: I:150 O:158
BLUE: I:131 O:139
it should look like this
-Now make a selective colour adjustment layer.
REDS: C: -61
M: +39
Y: +83
YELLOWS: C: -64
Y: +100
B: -41
NUETRALS: C: +46
Y: -31
B: -14
and you are FINISHED!
other icons made using this method:


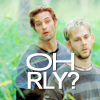
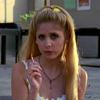
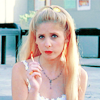
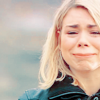
Tutorial #2: Buffy
=>
-Start off with your base. Duplicate it two times set them both to screen.
-Make a selective colour adjustment layer.
REDS: C: -100
M: +16
Y: +100
YELLOWS: C: -47
Y: -31
B: -22
NEUTRALS: C: +17
M: -11
Y: -18
B: -17
-Make another selective colour adjustment layer
REDS: C: -70
M: -30
Y: -27
B: +100
YELLOWS: C: -60
M: -27
Y: -27
B: -28
NEUTRALS: C: +25
M: -12
Y: -22
B: +5
and you are finished!
other icons made using this method:
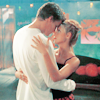
Tutorial #3: Veronica and Dick
=>
-Start off with your base. Duplicate it two times set them both to screen set the 2nd duplicate's opacity to 86%
-Make a selective colour adjustment layer. It's the same settings from tut2 step 2(the first selective colour layer.)
REDS: C: -100
M: +16
Y: +100
YELLOWS: C: -47
Y: -31
B: -22
NEUTRALS: C: +17
M: -11
Y: -18
B: -17
-Make another selective colour adjustment layer.
REDS: C: -70
M: -30
Y: -27
B: +22
YELLOWS: C: -60
M: -27
Y: -27
B: -28
NEUTRALS: C: -16
M: -4
Y: +21
B: +3
Pretty similar to tut2 huh?
other icons made using this method:
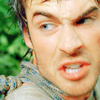

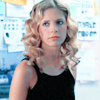
Tutorial #4: Ian Somerhalder
=>
-Start off with your base. Duplicate it once and set it to screen set it to 57% opacity/
-Make a selective colour adjustment layer.
REDS: C: -100
Y: +100
B: -27
YELLOWS: C: -68
Y: +59
B: -31
NEUTRALS: C: +49
Y: -27
B: -12
Duplicate that layer and set it to 20% opacity
-Make another selective colour adjustment layer
REDS: C: -70
M: -30
Y: -27
B: +24
YELLOWS: C: -60
M: -27
Y: -27
B: -28
NEUTRALS: C: -6
M: -2
Y: -17
B: -6
FINI!
other icons made using this method:
you're aaalllll finished! Hope they were easy to understand.
I'd LOVE to see what you all come up with!
The last three are very similar, but i thought I would make them anyway to show the similarities. :)
=>
=>
=>
=>
made with PSCS2 not translatable sorry!
Tutorial #1: Sawyer
=>
-Start with your base. Duplicate it once and set it to screen
-Now make a curves adjustment layer.
RGB: firstpoint I:71 O:71
second point: I:131 O:137
third point I:234 O:234
RED: I:182 O:191
GREEN: I:150 O:158
BLUE: I:131 O:139
it should look like this
-Now make a selective colour adjustment layer.
REDS: C: -61
M: +39
Y: +83
YELLOWS: C: -64
Y: +100
B: -41
NUETRALS: C: +46
Y: -31
B: -14
and you are FINISHED!
other icons made using this method:
Tutorial #2: Buffy
=>
-Start off with your base. Duplicate it two times set them both to screen.
-Make a selective colour adjustment layer.
REDS: C: -100
M: +16
Y: +100
YELLOWS: C: -47
Y: -31
B: -22
NEUTRALS: C: +17
M: -11
Y: -18
B: -17
-Make another selective colour adjustment layer
REDS: C: -70
M: -30
Y: -27
B: +100
YELLOWS: C: -60
M: -27
Y: -27
B: -28
NEUTRALS: C: +25
M: -12
Y: -22
B: +5
and you are finished!
other icons made using this method:
Tutorial #3: Veronica and Dick
=>
-Start off with your base. Duplicate it two times set them both to screen set the 2nd duplicate's opacity to 86%
-Make a selective colour adjustment layer. It's the same settings from tut2 step 2(the first selective colour layer.)
REDS: C: -100
M: +16
Y: +100
YELLOWS: C: -47
Y: -31
B: -22
NEUTRALS: C: +17
M: -11
Y: -18
B: -17
-Make another selective colour adjustment layer.
REDS: C: -70
M: -30
Y: -27
B: +22
YELLOWS: C: -60
M: -27
Y: -27
B: -28
NEUTRALS: C: -16
M: -4
Y: +21
B: +3
Pretty similar to tut2 huh?
other icons made using this method:
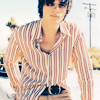
Tutorial #4: Ian Somerhalder
=>
-Start off with your base. Duplicate it once and set it to screen set it to 57% opacity/
-Make a selective colour adjustment layer.
REDS: C: -100
Y: +100
B: -27
YELLOWS: C: -68
Y: +59
B: -31
NEUTRALS: C: +49
Y: -27
B: -12
Duplicate that layer and set it to 20% opacity
-Make another selective colour adjustment layer
REDS: C: -70
M: -30
Y: -27
B: +24
YELLOWS: C: -60
M: -27
Y: -27
B: -28
NEUTRALS: C: -6
M: -2
Y: -17
B: -6
FINI!
other icons made using this method:
you're aaalllll finished! Hope they were easy to understand.
I'd LOVE to see what you all come up with!