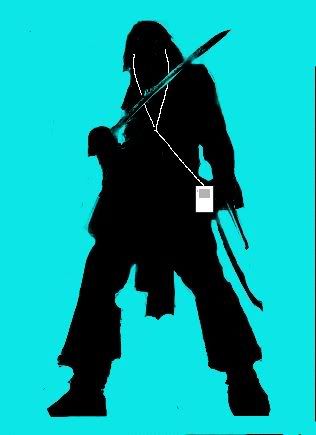
GIMP iPod Tutorial
I'm rather new to GIMP and just looking at other iPod tutorials, I had no idea how to convert them to GIMP. So I spent this morning messing around and figured out how to do the iPod look in GIMP. You don't need to know very much about GIMP to use this tutorial, as I explain a lot of steps in excrutiating detail for the layperson. Rather image heavy though. Happy iconing!
*This tutorial inspired greatly by gunneralchemist's PSP iPod tutorial. xPosted to icon_tutorial, gimp_users and my journal (leave a comment here if you'd like to be added to my icons friends-lock for the latest look at my icons (and possibly more tutorials))
Starting with this image:
~drools over Johnny Depp~
Ahem. Moving on.
01) If your picture has a colored background, erase it.

02) Copy your layer, then delete the original background layer
03) Go to Image->Mode->Grayscale

04) Go to Layer->Colors->Brightness-Contrast. Highten the contrast (I heightened mine to 71, otherwise I lost details like the base of the sword, which just would have looked weird later)

05) Go to Layer->Colors->Levels. Under "Imput Levels", go to the middle number set (the one without an eyedropper next to it) and change it to .10. If you hover over this box, it'll say "Gamma." Now almost everything in the picture is black, but a few things still show.

06) Create a new layer
07) On this layer, color everything that's white (or gray) black. I've left the sword and gun uncolored for a neat effect later on, but it's up to you what you do.

08) Create a new layer, and move it down so it's below your other two layers (this is why we deleted the original background layer earlier, since GIMP is silly and doesn't let you move that one.)
09) Fill this layer with the color of your choice (mine is #0DE6E6)
10) Set the layer that your original picture is on (the 'Background Copy' layer, if you haven't been changing layer names) to 'Multiply.' Now everything that wasn't black is your background color!

11) If you want to add in iPod wires, create a new layer that is above all of your other layers.
12) Change your color to white. Using the pencil tool with the 1x1 pixel brush, draw in the wires by hand (as, as far as I know, GIMP has no tools for creating curves. Or shapes, for that matter). Add in the actual iPod by drawing the rectangles in white and gray. Remember: if you hold down "shift" while you're making a line, a guideline will appear that you can use to ensure your line stays straight.

13) Crop and add text as you like! (Mine's Arial Black, size 20, in #FFFFFF)

*This tutorial inspired greatly by gunneralchemist's PSP iPod tutorial. xPosted to icon_tutorial, gimp_users and my journal (leave a comment here if you'd like to be added to my icons friends-lock for the latest look at my icons (and possibly more tutorials))
Starting with this image:

~drools over Johnny Depp~
Ahem. Moving on.
01) If your picture has a colored background, erase it.

02) Copy your layer, then delete the original background layer
03) Go to Image->Mode->Grayscale

04) Go to Layer->Colors->Brightness-Contrast. Highten the contrast (I heightened mine to 71, otherwise I lost details like the base of the sword, which just would have looked weird later)

05) Go to Layer->Colors->Levels. Under "Imput Levels", go to the middle number set (the one without an eyedropper next to it) and change it to .10. If you hover over this box, it'll say "Gamma." Now almost everything in the picture is black, but a few things still show.

06) Create a new layer
07) On this layer, color everything that's white (or gray) black. I've left the sword and gun uncolored for a neat effect later on, but it's up to you what you do.

08) Create a new layer, and move it down so it's below your other two layers (this is why we deleted the original background layer earlier, since GIMP is silly and doesn't let you move that one.)
09) Fill this layer with the color of your choice (mine is #0DE6E6)
10) Set the layer that your original picture is on (the 'Background Copy' layer, if you haven't been changing layer names) to 'Multiply.' Now everything that wasn't black is your background color!

11) If you want to add in iPod wires, create a new layer that is above all of your other layers.
12) Change your color to white. Using the pencil tool with the 1x1 pixel brush, draw in the wires by hand (as, as far as I know, GIMP has no tools for creating curves. Or shapes, for that matter). Add in the actual iPod by drawing the rectangles in white and gray. Remember: if you hold down "shift" while you're making a line, a guideline will appear that you can use to ensure your line stays straight.

13) Crop and add text as you like! (Mine's Arial Black, size 20, in #FFFFFF)
