Tutorial: Making a Video Screen Saver
Howdie, folks. Here is a tutorial showing you how you can make a screen saver using just about any piece of video you can get your hands on. For example, I made a lovely screen saver using the opening title cards for Supernatural.

You can get that screen saver HERE.
Making screen savers isn't actually that complicated. However, figuring out how to do it, and what software programs you will need to do whatever it is you want to do, can be the hard part. There can also be some labor involved depending on what video you have to work with, and how fancy you want to get with it.
Right now, I'm going to give you the absolute basics on making a screen saver from a video. Later, I'll post tips and tricks for any issues that come to mind (or that I run across as I make other screen savers).
Let's get started.
Step One: Choosing Your Video
You can use pretty much any piece of video you have to make a screen saver.
However, the longer your video, the bigger the screen saver file size will be. I've never made a 10 minute-long screen saver, but I imagine the file size would be huge. For example, I recently made a screen saver from the opening for Legend of the Seeker. The opening is a little over 20 seconds long, and the screen saver weighed in at nearly 6 MB without sound.
That's another thing. A screen saver with sound will be bigger than the same screen saver without sound. The sound version of that LotS screensaver was nearly 6.5 MB.
I don't know if a really big screen saver will cause problems. If you decide to make a saver from a really long piece of video, you'll just have to see for yourself.
If you have a video that's already the length you want, you're good to go. Otherwise, you can use a video editing program, like Windows Movie Maker, to edit the clip you want out of a TV episode or movie.
Step Two: Converting the Video
The program I use to make video screen savers (and most of the others I remember seeing) only works with video in SWF flash format. Which means that, unless your video is already in SWF format, you're going to have to convert it. The program I use for this when I want to keep it simple is called Pazera Free Video to Flash Converter. There are lots of free video converters out there. But this one is really easy to use, and you don't have to know anything about the technical side of video conversion to use it. This program also doesn't require installation.
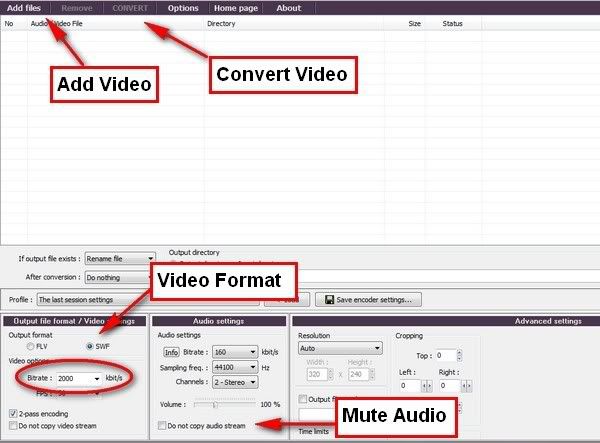
This is the main screen of the video converter.

The only setting you really have to worry about is making sure the video format is set to SWF. You might also want to set the bitrate (circled in red) to the highest setting, so the converted video will be the best quality possible. And if your video has sound, but you want your saver not to, put a check mark in the "Do not copy audio stream" box.
Now go to the top of the screen and click "Add File" to find and add your video, then click "Convert" to start the conversion. It should only take a few seconds (or maybe a minute or two if your video is really long.) The converted video will be saved in the same folder as the original video. (Unless you change it, but why make things more complicated for yourself?)
Warning: Stay away from the Advanced Settings section! You don't need it. Really. :-)
Step Three: Creating Your Screen Saver
Now, you're ready to create your video screen saver. I use a program called InstantStorm, a free flash screen saver creator, for this. InstantStorm has a lot of fancy schmancy settings. But my motto is, "Keep it simple."
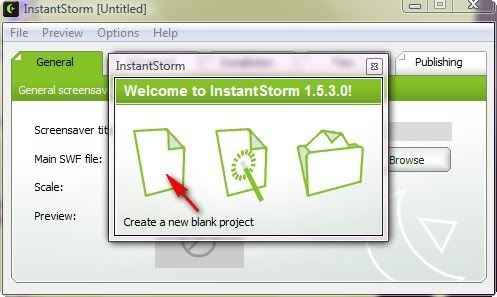
On the opening screen, click the image on the left.

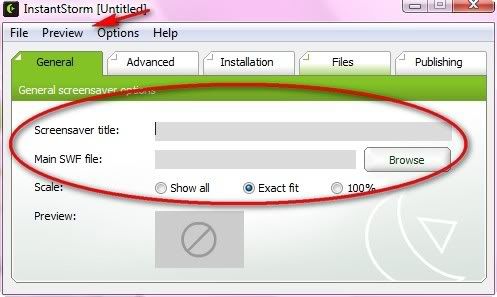
On the General tab, give your screen saver a title and add video. You can also preview your screensaver before moving on, and adjust the "Scale" setting if necessary. (Although I've never used anything but "Exact fit.")

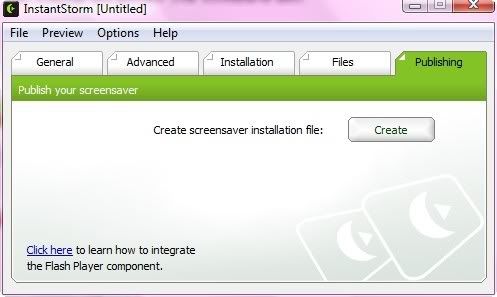
From there, I go right to the Publishing tab. There are all sorts of other settings you can fiddle with in InstantStorm, but it's really not necessary. And, again, why complicate things?

Click on "Create," and your video screen saver will be made in just a few seconds.
Step Four: Sharing Your Screen Saver
Before you share your screen saver with the world, install it on your own computer, and let it play to see if it works correctly. On some operating systems, the screen saver preview for screen savers with sound might be wonky. But the screensaver itself should work fine.
Now, in order to share your screen savers with other folks, you have to upload it to a file sharing service. And the one I try to use most often is MediaFire. There are no limits on how many files you can store on your free account, or how much space you can use. There are also no bandwidth limits, and you can upload files as big as 200 MB.
But I had a small problem with MediaFire a while back. (People could still download my files, but I couldn't upload anything new.) So I also got a Box.Net account. Box.Net is great, but there are more limits. The free account gives you 1 GB of storage, which is pretty good. (I have dozens of files there and have only used about a tenth of my storage.) There's also a monthly bandwidth limit of 10 GB. Once your account reaches that limit, it's pretty much frozen until the next month. (Those with Photobucket accounts might be familiar with this problem.) However, if you uploaded a 5 MB screensaver, and it was downloaded 200 times in a month, that would still leave you with roughly 9 GB of bandwidth.
I actually prefer MediFire for sharing my screen savers. However, when MediaFire is acting up, Box.Net is a good alternative.
So there you have it. The bare-bones basics on creating and sharing video screen savers. I hope you can put it to use. Keep an eye out for more screen saver tips and tricks. And let me know when you make a screen saver of your own. :-)

You can get that screen saver HERE.
Making screen savers isn't actually that complicated. However, figuring out how to do it, and what software programs you will need to do whatever it is you want to do, can be the hard part. There can also be some labor involved depending on what video you have to work with, and how fancy you want to get with it.
Right now, I'm going to give you the absolute basics on making a screen saver from a video. Later, I'll post tips and tricks for any issues that come to mind (or that I run across as I make other screen savers).
Let's get started.
Step One: Choosing Your Video
You can use pretty much any piece of video you have to make a screen saver.
- A funny clip from your favorite show.
- A snippet of a kickass action scene from your favorite movie.
- One of your short fanvids.
- Just about anything else.
However, the longer your video, the bigger the screen saver file size will be. I've never made a 10 minute-long screen saver, but I imagine the file size would be huge. For example, I recently made a screen saver from the opening for Legend of the Seeker. The opening is a little over 20 seconds long, and the screen saver weighed in at nearly 6 MB without sound.
That's another thing. A screen saver with sound will be bigger than the same screen saver without sound. The sound version of that LotS screensaver was nearly 6.5 MB.
I don't know if a really big screen saver will cause problems. If you decide to make a saver from a really long piece of video, you'll just have to see for yourself.
If you have a video that's already the length you want, you're good to go. Otherwise, you can use a video editing program, like Windows Movie Maker, to edit the clip you want out of a TV episode or movie.
Step Two: Converting the Video
The program I use to make video screen savers (and most of the others I remember seeing) only works with video in SWF flash format. Which means that, unless your video is already in SWF format, you're going to have to convert it. The program I use for this when I want to keep it simple is called Pazera Free Video to Flash Converter. There are lots of free video converters out there. But this one is really easy to use, and you don't have to know anything about the technical side of video conversion to use it. This program also doesn't require installation.
This is the main screen of the video converter.

The only setting you really have to worry about is making sure the video format is set to SWF. You might also want to set the bitrate (circled in red) to the highest setting, so the converted video will be the best quality possible. And if your video has sound, but you want your saver not to, put a check mark in the "Do not copy audio stream" box.
Now go to the top of the screen and click "Add File" to find and add your video, then click "Convert" to start the conversion. It should only take a few seconds (or maybe a minute or two if your video is really long.) The converted video will be saved in the same folder as the original video. (Unless you change it, but why make things more complicated for yourself?)
Warning: Stay away from the Advanced Settings section! You don't need it. Really. :-)
Step Three: Creating Your Screen Saver
Now, you're ready to create your video screen saver. I use a program called InstantStorm, a free flash screen saver creator, for this. InstantStorm has a lot of fancy schmancy settings. But my motto is, "Keep it simple."
On the opening screen, click the image on the left.

On the General tab, give your screen saver a title and add video. You can also preview your screensaver before moving on, and adjust the "Scale" setting if necessary. (Although I've never used anything but "Exact fit.")

From there, I go right to the Publishing tab. There are all sorts of other settings you can fiddle with in InstantStorm, but it's really not necessary. And, again, why complicate things?

Click on "Create," and your video screen saver will be made in just a few seconds.
Step Four: Sharing Your Screen Saver
Before you share your screen saver with the world, install it on your own computer, and let it play to see if it works correctly. On some operating systems, the screen saver preview for screen savers with sound might be wonky. But the screensaver itself should work fine.
Now, in order to share your screen savers with other folks, you have to upload it to a file sharing service. And the one I try to use most often is MediaFire. There are no limits on how many files you can store on your free account, or how much space you can use. There are also no bandwidth limits, and you can upload files as big as 200 MB.
But I had a small problem with MediaFire a while back. (People could still download my files, but I couldn't upload anything new.) So I also got a Box.Net account. Box.Net is great, but there are more limits. The free account gives you 1 GB of storage, which is pretty good. (I have dozens of files there and have only used about a tenth of my storage.) There's also a monthly bandwidth limit of 10 GB. Once your account reaches that limit, it's pretty much frozen until the next month. (Those with Photobucket accounts might be familiar with this problem.) However, if you uploaded a 5 MB screensaver, and it was downloaded 200 times in a month, that would still leave you with roughly 9 GB of bandwidth.
I actually prefer MediFire for sharing my screen savers. However, when MediaFire is acting up, Box.Net is a good alternative.
So there you have it. The bare-bones basics on creating and sharing video screen savers. I hope you can put it to use. Keep an eye out for more screen saver tips and tricks. And let me know when you make a screen saver of your own. :-)