Icon tutorial
Yep, an icontutorial. It's for PS7, but it'll work in other versions too.
From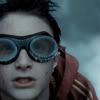
to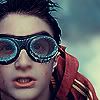
in a few easy steps.
1: Crop your image to the base you want.
2: The image is a bit dark. Go to Image -> Adjustments -> Curves and play a bit with the settings. If you're in a hurry, duplicate your base and set the layer to screen, that'll work too.
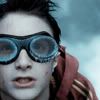
3: Duplicate your background layer and sharpen it twice. After that, pick the blur tool and set strength to 100%. Blur Harry's face, but do not touch his mouth or eyes. Just his skin. I blurred his nose with strength on 75%.

4: Take the Sponge Tool and set it to Seturate, strength 100% and 'sponge' the whole icon.

5: Make a new layer and set it on the top. Fill the layer with a dark blure color, I used 000838. Set the opacity on 75% and the blendmode on Exclusion.
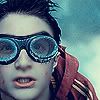
6: Make another new layer and set it again on the top. Fill it with dark red, 82OOOO for example, set it to soft light. Opacity: 50%.

7: This step is optional, but at last, I blurred the sky.
From
to
in a few easy steps.
1: Crop your image to the base you want.
2: The image is a bit dark. Go to Image -> Adjustments -> Curves and play a bit with the settings. If you're in a hurry, duplicate your base and set the layer to screen, that'll work too.
3: Duplicate your background layer and sharpen it twice. After that, pick the blur tool and set strength to 100%. Blur Harry's face, but do not touch his mouth or eyes. Just his skin. I blurred his nose with strength on 75%.
4: Take the Sponge Tool and set it to Seturate, strength 100% and 'sponge' the whole icon.
5: Make a new layer and set it on the top. Fill the layer with a dark blure color, I used 000838. Set the opacity on 75% and the blendmode on Exclusion.
6: Make another new layer and set it again on the top. Fill it with dark red, 82OOOO for example, set it to soft light. Opacity: 50%.
7: This step is optional, but at last, I blurred the sky.