Tutorial #002
I thought it was about time to post a second tut. :D

-->
TUTORIAL #002
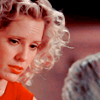
Buffy the Vampire Slayer: Anya Jenkins
made with PS CS2
1. Duplicate the base and set it to “Screen”.
2. Go to Layer >> New Adjustment Layer >> Hue/Saturation
Saturation: +9
3. Go to Layer >> New Adjustment Layer >> Curves
RGB: first point I:167 O:205
second point I:80 O:148
Red: first point I:227 O:211
second point I:153 O:150
third point I:99 O:79
Green: first point I:206 O:192
second point I:130 O:112
third point I:70 O:66
Blue: first point I:169 O:126
second point I:53 O:85
Your curves should look like THIS.
4. Then set the curves layer to “Soft Light”.
5. Go to Layer >> New Adjustment Layer >> Selective Color
Reds: Cyan: -100; Magenta: -18; Yellow: +37; Black: -12
Yellows: Cyan: -8; Yellow: -100
Cyans: Cyan: +91; Yellow: -100
Blues: Cyan: +100; Magenta: +100; Yellow: -100
Neutrals: Cyan: +49; Magenta: -9; Yellow: -26
6. Go to Layer >> New Adjustment Layer >> Levels
RGB: Input Levels: 28 / 1,04 / 255
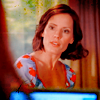
And you're finished!
Not that hard, is it? If you have any questions, feel free to ask!
I'd love to see what you do with the coloring.
other icons using this or similar technique
you don't have to copy each step exactly
feel free to FRIEND the comm(you cannot join)
Affiliate; Awards; Font Guide; Resources; The List; Tutorial #001
-->
TUTORIAL #002
Buffy the Vampire Slayer: Anya Jenkins
made with PS CS2
1. Duplicate the base and set it to “Screen”.
2. Go to Layer >> New Adjustment Layer >> Hue/Saturation
Saturation: +9
3. Go to Layer >> New Adjustment Layer >> Curves
RGB: first point I:167 O:205
second point I:80 O:148
Red: first point I:227 O:211
second point I:153 O:150
third point I:99 O:79
Green: first point I:206 O:192
second point I:130 O:112
third point I:70 O:66
Blue: first point I:169 O:126
second point I:53 O:85
Your curves should look like THIS.
4. Then set the curves layer to “Soft Light”.
5. Go to Layer >> New Adjustment Layer >> Selective Color
Reds: Cyan: -100; Magenta: -18; Yellow: +37; Black: -12
Yellows: Cyan: -8; Yellow: -100
Cyans: Cyan: +91; Yellow: -100
Blues: Cyan: +100; Magenta: +100; Yellow: -100
Neutrals: Cyan: +49; Magenta: -9; Yellow: -26
6. Go to Layer >> New Adjustment Layer >> Levels
RGB: Input Levels: 28 / 1,04 / 255
And you're finished!
Not that hard, is it? If you have any questions, feel free to ask!
I'd love to see what you do with the coloring.
other icons using this or similar technique
you don't have to copy each step exactly
feel free to FRIEND the comm(you cannot join)
Affiliate; Awards; Font Guide; Resources; The List; Tutorial #001