first tutorial: VM
from 
to
Janina asked me to make on for her, so I tried me best, I really hope it helps. :)
I used Photoshop 7 to make it. I never used PSP so I don't know if it is translatable for PSP. But I'm pretty sure it is.
okay, so lets get started.
I use this image from vm-caps.com.
I crop the picture and resize it to 100x100.

Filter>sharpen and then edit>fade sharpen75%
I duplicate the layer and set the upper layer to screen.
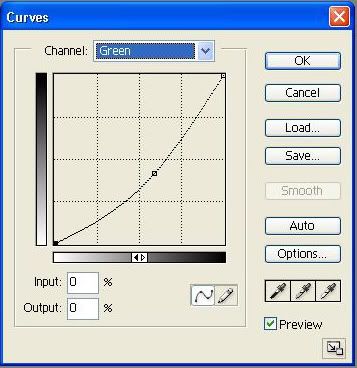
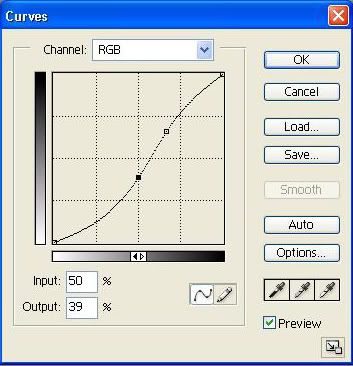
Then I use curves to get rid of the brownish look on the upper layer.
These are the settings I used:


After that I change the opacity to 46%.
I duplicate the original background image and set it to screen 23%.
Now the icon looks like this:

I want to light up the right half of the icon a bit, thats why I use this gradient and set it to soft light 45%.

Add a new layer fill with #00C6FF and then set it to soft light 28%.
I add another color layer fill with #010200, set to soft light 39%.
After that I use a layer mask to get rid of some parts of this layer.
Now layer looks like this:

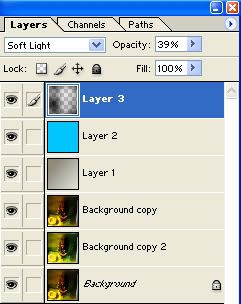
my layer palette looks like this:

I added some text and now I'm done.

I hope this tutorial will help you, and please don't copy the tutorial exactly.
Thanks.
If you have any questions, feel free to ask. :)
to
Janina asked me to make on for her, so I tried me best, I really hope it helps. :)
I used Photoshop 7 to make it. I never used PSP so I don't know if it is translatable for PSP. But I'm pretty sure it is.
okay, so lets get started.
I use this image from vm-caps.com.
I crop the picture and resize it to 100x100.
Filter>sharpen and then edit>fade sharpen75%
I duplicate the layer and set the upper layer to screen.
Then I use curves to get rid of the brownish look on the upper layer.
These are the settings I used:
After that I change the opacity to 46%.
I duplicate the original background image and set it to screen 23%.
Now the icon looks like this:
I want to light up the right half of the icon a bit, thats why I use this gradient and set it to soft light 45%.
Add a new layer fill with #00C6FF and then set it to soft light 28%.
I add another color layer fill with #010200, set to soft light 39%.
After that I use a layer mask to get rid of some parts of this layer.
Now layer looks like this:
my layer palette looks like this:
I added some text and now I'm done.
I hope this tutorial will help you, and please don't copy the tutorial exactly.
Thanks.
If you have any questions, feel free to ask. :)