ICON TUTORIAL FOR PEOPLE WITH TOO MUCH TIME ON THEIR HANDS
Coloring/Bordering tutorial for PSCS.
Requested by losty_ville

This will seem long winded to those of you familiar with Photoshop, but I'd like to make it clear for my friends who are just starting out. Feel free to ask any questions if something is confusing. ♥
Using THIS CAP by phoenixothon-
1. SHARPEN
Filter> Sharpen
2. IMAGE SIZE
Image> Image size>400x225
3. DUPLICATE
Right click bottom layer of the layer palette, select duplicate layer.
4. SCREEN/SOFTLIGHT
Using the pulldown options, set this new layer to screen. Right click and duplicate it so there are two screen layers. Duplicate it a third time and set this top layer to Softlight.
RESULT: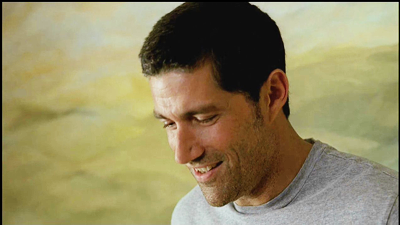
5. FLATTEN IMAGE
Layer> Flatten image
6. Curves
Layer> New Adjustment Layer> Curves >Normal Mode
Settings: RBG Green Blue
7. GRADIENT SCREEN LAYER
Change he foreground palette color to FFD5D5 (a light pink color)
Layer> New Fill Layer> Gradient> Set to Screen
Angle the light so that it's most prominent in the upper right side-
8. FLATTEN THE IMAGE
Layers> Flatten Image
RESULT:
9. DUPLICATE AND MULTIPLY
Right click bottom layer of the layer palette, select duplicate layer-set to multiply. Duplicate Multiply Layer, change opacity to %50. So you should have the background, a layer set to Multiply 100%, and a 3rd layer set to Multiply 50%.
10. CROP
Using the rectangular marquee tool set to 150px by 150px I cropped the image to-
RESULT: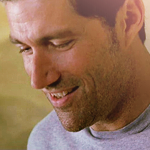
11. FLATTEN & RESIZE IMAGE
IMAGE> IMAGE SIZE set to 100px by 100px
12. GRADIENT SCREEN LAYER
The foreground palette color should still be FFD5D5 (a light pink color)
Layer> New Fill Layer> Gradient> Set to Screen
Angle the light so that it's most prominent in the upper left side-
RESULT:
13. FLATTEN/DUPLICATE/MULTIPLY/SHARPEN
Layers> Flatten Image
Duplicate> set new layer to mulitply 100%
Layers> Flatten Image
FILTER> SHARPEN
RESULT:
14. BORDERING
Change he foreground palette color to FFFFFF (White)
Using the custom shape tool
Select the box shape thingy with the rounded corners
(thingy is the technical term ;0)
At the top menu bar make sure SHAPE LAYERS is selected
Starting at the upper left corner click and drag the shape until the outer edges of the icon are bordered with white.
Go to Edit> Free Transform Path. Move the sides so that they are close enough to the edge of the icon as possible without leaving the corners bare. (once you do this you'll understand my gibberish.)
Result:
15. SOFTENING BORDER
Right click the shape in your palette (your new border) and rasterize layer.
Duplicate this shape.
Go to Filter> Blur> Gaussian Blur 2.4px
16. HUE SATURATION/FINAL RESULT
Layer> New Adjustment Layer> Hue/Saturation
Edit the Master color by
Saturation +15 Lightness +9
Flatten Image
Final Result:
Other icons made using similar methods-


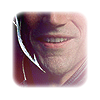
YES, I do like Matthew Fox..why do you ask? DO YOU? Join insertfoxyhere. YEAH I know, best comm name EVER.
Let me know if this tutorial helped any of you, if you have any questions, and of course I'd love to see your results. ♥ -Laura
ETA: WANT TRANSPARENT EDGES???
At step 14 choose PATHS instead of shape layers-

Once you get the shape you'd like open up PATHS from VIEW> PATHS> RIGHT CLICK> Make Selection> anti alias selected, 0 px feathered radius.
Go to select, inverse selection
Edit Copy> File new 100px by 100px file> Edit paste. (DO NOT FLATTEN.) Save as .PNG to have transparent background. Background will only be transparent on none explorer browsers.
final result:

<--image on black bg
Requested by losty_ville

This will seem long winded to those of you familiar with Photoshop, but I'd like to make it clear for my friends who are just starting out. Feel free to ask any questions if something is confusing. ♥
Using THIS CAP by phoenixothon-
1. SHARPEN
Filter> Sharpen
2. IMAGE SIZE
Image> Image size>400x225
3. DUPLICATE
Right click bottom layer of the layer palette, select duplicate layer.
4. SCREEN/SOFTLIGHT
Using the pulldown options, set this new layer to screen. Right click and duplicate it so there are two screen layers. Duplicate it a third time and set this top layer to Softlight.
RESULT:

5. FLATTEN IMAGE
Layer> Flatten image
6. Curves
Layer> New Adjustment Layer> Curves >Normal Mode
Settings: RBG Green Blue
7. GRADIENT SCREEN LAYER
Change he foreground palette color to FFD5D5 (a light pink color)
Layer> New Fill Layer> Gradient> Set to Screen
Angle the light so that it's most prominent in the upper right side-
8. FLATTEN THE IMAGE
Layers> Flatten Image
RESULT:

9. DUPLICATE AND MULTIPLY
Right click bottom layer of the layer palette, select duplicate layer-set to multiply. Duplicate Multiply Layer, change opacity to %50. So you should have the background, a layer set to Multiply 100%, and a 3rd layer set to Multiply 50%.
10. CROP
Using the rectangular marquee tool set to 150px by 150px I cropped the image to-
RESULT:

11. FLATTEN & RESIZE IMAGE
IMAGE> IMAGE SIZE set to 100px by 100px
12. GRADIENT SCREEN LAYER
The foreground palette color should still be FFD5D5 (a light pink color)
Layer> New Fill Layer> Gradient> Set to Screen
Angle the light so that it's most prominent in the upper left side-
RESULT:

13. FLATTEN/DUPLICATE/MULTIPLY/SHARPEN
Layers> Flatten Image
Duplicate> set new layer to mulitply 100%
Layers> Flatten Image
FILTER> SHARPEN
RESULT:

14. BORDERING
Change he foreground palette color to FFFFFF (White)
Using the custom shape tool

Select the box shape thingy with the rounded corners
(thingy is the technical term ;0)

At the top menu bar make sure SHAPE LAYERS is selected

Starting at the upper left corner click and drag the shape until the outer edges of the icon are bordered with white.
Go to Edit> Free Transform Path. Move the sides so that they are close enough to the edge of the icon as possible without leaving the corners bare. (once you do this you'll understand my gibberish.)
Result:

15. SOFTENING BORDER
Right click the shape in your palette (your new border) and rasterize layer.
Duplicate this shape.
Go to Filter> Blur> Gaussian Blur 2.4px
16. HUE SATURATION/FINAL RESULT
Layer> New Adjustment Layer> Hue/Saturation
Edit the Master color by
Saturation +15 Lightness +9
Flatten Image
Final Result:

Other icons made using similar methods-


YES, I do like Matthew Fox..why do you ask? DO YOU? Join insertfoxyhere. YEAH I know, best comm name EVER.
Let me know if this tutorial helped any of you, if you have any questions, and of course I'd love to see your results. ♥ -Laura
ETA: WANT TRANSPARENT EDGES???
At step 14 choose PATHS instead of shape layers-

Once you get the shape you'd like open up PATHS from VIEW> PATHS> RIGHT CLICK> Make Selection> anti alias selected, 0 px feathered radius.
Go to select, inverse selection
Edit Copy> File new 100px by 100px file> Edit paste. (DO NOT FLATTEN.) Save as .PNG to have transparent background. Background will only be transparent on none explorer browsers.
final result:


<--image on black bg