Two Tone T-Shirt Tutorial (Part One)
A while ago I started experimenting with two-tone stencils for t-shirt designs. I made a Flight of the Conchords tee, and then made an Enterprise one. So when I embarked upon a t-shirt with the Enterprise D on it, I figured it was time for another tutorial post, since the bleached-out t-shirt design tutorial went down quite well.
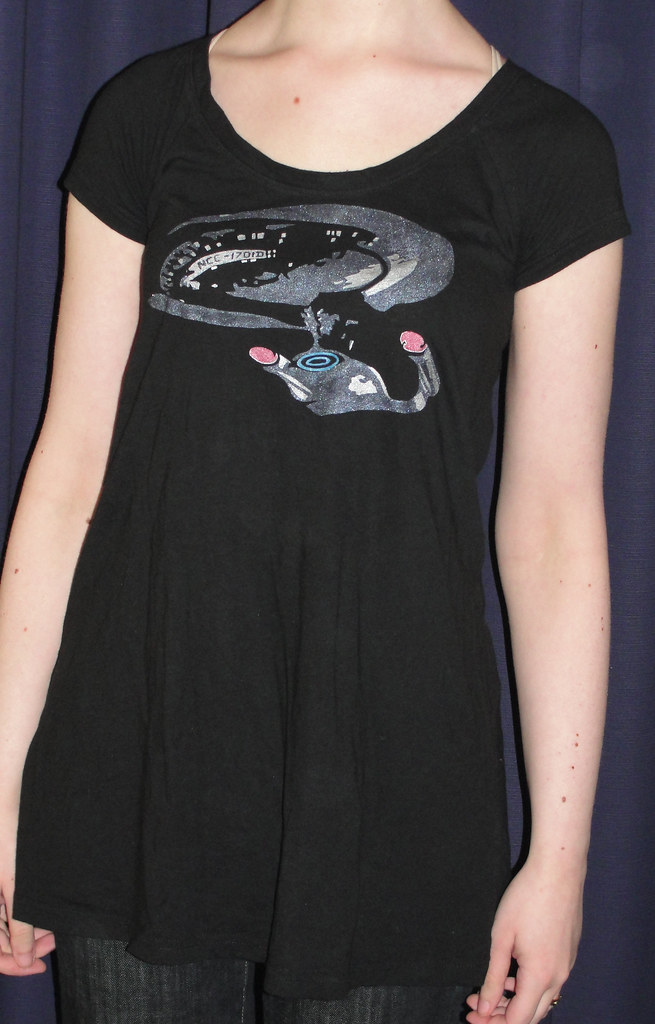
I'm going to do this in two parts - this post is about turning an image into the stencil, then the second part will be about putting that design onto a t-shirt.
So, let's find out how I made this:
(See, Star Trek fandom, I haven't entirely abandoned you for Inception!)
Things you will need :
A photo editing programme (I'm using Photoshop 7, but I'm fairly certain most programmes will do all the things listed here)
A printer
Something to be a stencil (options discussed below, I use freezer paper)
A craft knife
Something that is safe to cut on
A t-shirt or piece of fabric to put your design on
An iron
Fabric pens or paints
A paint brush or sponge if you're using fabric paint
First of all, you need to pick an image for your design, I'd advise you start out with something fairly simple (I know I wished I had!). Objects are usually easier than people or animals, and the fewer colours and complicated shapes in the original image the more the simplified version will look right. I chose this:

So, we need to simplify this image. The cutout function on Photoshop makes this really easy.

Play around with the options until you feel you've struck a good balance between simplifying the image and the image still being recognizable. For example, I almost always set "Edge Simplicity" to 3 or 4, and "Edge Fidelity" to 2 or 3, but "No. of Levels" is where you'll see the most dramatic differences. Here's what happens if you set "No. of Levels" to 4 with this image:

It doesn't really look enough like the Enterprise anymore, does it?
So here are the settings I chose:

This made it look like this:

It's still recognisably the Enterprise, but it's considerably simpler now. (You can make your images even simpler. You probably should, I'm just a crazy person who likes to make things more complicated than they need to be. If you're going for something black and white, or black and grey like my Flight of the Conchords tee, then this tutorial can help you out further.)
I liked how the image looked, but was unhappy that I'd lost the NCC-1701D along the way. So I went back to a more complicated version of the image and just cut and pasted it into the appropriate place.

I seem to make a lot of stuff on black t-shirts and the images therefore have black backgrounds. But I hate printing them out like that (and it sometimes confuses me somehow) so I tend to invert them before I print them. So doing this:

...gives me this:

Now, what I should have done here was print this directly onto freezer paper twice. That's what I'd advise you to do. But it's not what I did. I am a fool to myself. I don't always trust Photoshop to have simplified everything to my satisfaction so I did a few more tweaks here. I traced the paler grey sections onto freezer paper (there are five different greys in this image, but I'm choosing to treat them as two, I am my own version of Photoshop at this stage!) knowing that they would be the darker grey sections on the t-shirt. I also took the opportunity here to smooth out the top line of the saucer section. I then traced the darker sections onto another piece of freezer paper and marked where other colours needed to be added. Be sure to think about whether you’ll have to paint one colour on top of another at any point and therefore which layer needs to be done first.
* A quick note on the stencil itself. I find freezer paper to be the absolute best crafting stencil, because it can be ironed directly on to the t-shirt. This makes the process nice and simple, and there's very little chance of fabric paint seeping where it's not wanted. As an added bonus, if you peel the freezer paper away very carefully when you're done, then it's ready to use again. But, you can use pretty much anything as a stencil - card and acetate work well, if you tape them onto the t-shirt, or sticky back plastic (known as contact paper in the US) can also do the job (remember to flip the image if you're printing it directly onto the sticky back plastic, as you're printing on the paper on the back of it).
So, now I've got my stencils ready to cut out:

I use a Fiskars craft knife and cutting mat (their fingertip knives are so much more comfortable than using a regular craft knife) but any old method will do as long as you get nice sharp lines on your stencil (and don't hurt yourself or any work surfaces in the process!). So now I have this:

Now I've got my stencil it's time to move onto part two of this tutorial!
If you've got any questions, please feel free to ask.
I'm going to do this in two parts - this post is about turning an image into the stencil, then the second part will be about putting that design onto a t-shirt.
So, let's find out how I made this:
(See, Star Trek fandom, I haven't entirely abandoned you for Inception!)
Things you will need :
A photo editing programme (I'm using Photoshop 7, but I'm fairly certain most programmes will do all the things listed here)
A printer
Something to be a stencil (options discussed below, I use freezer paper)
A craft knife
Something that is safe to cut on
A t-shirt or piece of fabric to put your design on
An iron
Fabric pens or paints
A paint brush or sponge if you're using fabric paint
First of all, you need to pick an image for your design, I'd advise you start out with something fairly simple (I know I wished I had!). Objects are usually easier than people or animals, and the fewer colours and complicated shapes in the original image the more the simplified version will look right. I chose this:
So, we need to simplify this image. The cutout function on Photoshop makes this really easy.
Play around with the options until you feel you've struck a good balance between simplifying the image and the image still being recognizable. For example, I almost always set "Edge Simplicity" to 3 or 4, and "Edge Fidelity" to 2 or 3, but "No. of Levels" is where you'll see the most dramatic differences. Here's what happens if you set "No. of Levels" to 4 with this image:
It doesn't really look enough like the Enterprise anymore, does it?
So here are the settings I chose:
This made it look like this:
It's still recognisably the Enterprise, but it's considerably simpler now. (You can make your images even simpler. You probably should, I'm just a crazy person who likes to make things more complicated than they need to be. If you're going for something black and white, or black and grey like my Flight of the Conchords tee, then this tutorial can help you out further.)
I liked how the image looked, but was unhappy that I'd lost the NCC-1701D along the way. So I went back to a more complicated version of the image and just cut and pasted it into the appropriate place.
I seem to make a lot of stuff on black t-shirts and the images therefore have black backgrounds. But I hate printing them out like that (and it sometimes confuses me somehow) so I tend to invert them before I print them. So doing this:
...gives me this:
Now, what I should have done here was print this directly onto freezer paper twice. That's what I'd advise you to do. But it's not what I did. I am a fool to myself. I don't always trust Photoshop to have simplified everything to my satisfaction so I did a few more tweaks here. I traced the paler grey sections onto freezer paper (there are five different greys in this image, but I'm choosing to treat them as two, I am my own version of Photoshop at this stage!) knowing that they would be the darker grey sections on the t-shirt. I also took the opportunity here to smooth out the top line of the saucer section. I then traced the darker sections onto another piece of freezer paper and marked where other colours needed to be added. Be sure to think about whether you’ll have to paint one colour on top of another at any point and therefore which layer needs to be done first.
* A quick note on the stencil itself. I find freezer paper to be the absolute best crafting stencil, because it can be ironed directly on to the t-shirt. This makes the process nice and simple, and there's very little chance of fabric paint seeping where it's not wanted. As an added bonus, if you peel the freezer paper away very carefully when you're done, then it's ready to use again. But, you can use pretty much anything as a stencil - card and acetate work well, if you tape them onto the t-shirt, or sticky back plastic (known as contact paper in the US) can also do the job (remember to flip the image if you're printing it directly onto the sticky back plastic, as you're printing on the paper on the back of it).
So, now I've got my stencils ready to cut out:
I use a Fiskars craft knife and cutting mat (their fingertip knives are so much more comfortable than using a regular craft knife) but any old method will do as long as you get nice sharp lines on your stencil (and don't hurt yourself or any work surfaces in the process!). So now I have this:
Now I've got my stencil it's time to move onto part two of this tutorial!
If you've got any questions, please feel free to ask.