Tutorial #40 - Hannibal Rising icon
Requested by snowflakie06.
this and this to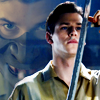
.
*Made using Photoshop CS*
**Can still be translatable with other programs.
PLEASE DON'T COPY THIS ICON, USE THE STEPS TO CREATE SOMETHING THAT IS YOUR OWN; THAT'S MAKES IT MORE FUN, ANYWAY :)
- I first cropped this image and this image from Hannibal Rising that I found at Gaspard Ulliel Online down to two 100x100 bases:

&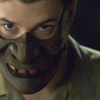
*I mirrored the second base.
- I took the first base and did an Auto Color (Image>Adjustments>Auto Color); this made the image a bit more muted and a tad darker.
*If you're using a program that doesn't have Auto Color, then really all you need to do it play around with the contrast and maybe lower the saturation a bit, if you feel your image needs it.
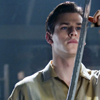
- Still working on the same base, duplicate it twice; set the middle layer to screen 50% and the top layer to soft light 100%.

- Still on the same base; next I used Selective Coloring with the following settings:
REDS:
-10, 0, +10, +20
YELLOWS:
-10, 0, +10, +10
CYANS:
+100, +10, -50, +10
BLUES:
+100, +10, -10, +10
NEUTRALS:
+5, 0, 0, +5
Hit OK.
Then I upped the contrast by +10.
*If using a program without SC, the main thing I did was make the blues and cyans more prominent. You could most likely achieve this by using Color Balance or a Hue/Saturation/Lightness layer.

- Now onto the other base; I started the same way I started with the other one, used Auto Color, but I also used Auto Levels (Image>Adjustments>Auto Levels):
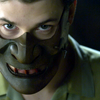
What this mainly does is make it lighter and contrasted nicer and also, as before, a bit more muted.
That's really all I wanted to do with it since it's not going to be the main focus of the icon anyway.
- Now copy your second base and paste it as a new layer on your first base; set this layer to Exclusion.

>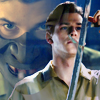
For now, just leave the opacity at 100% and start erasing the parts covering young Hannibal's face and body, so that the second base is only showing in the left part of the icon. When you've finished erasing, lower the opacity of the top layer (the second base) to 75%.

And that's it. :) Not identical to the original, but it's close. ^-^'
**Opacities for layers may vary depending upon your image; don't be afraid to experiment!**
Hope this helps someone! :)
FRIEND ME | RESOURCES | OTHER TUTORIALS
this and this to
.
*Made using Photoshop CS*
**Can still be translatable with other programs.
PLEASE DON'T COPY THIS ICON, USE THE STEPS TO CREATE SOMETHING THAT IS YOUR OWN; THAT'S MAKES IT MORE FUN, ANYWAY :)
- I first cropped this image and this image from Hannibal Rising that I found at Gaspard Ulliel Online down to two 100x100 bases:
&
*I mirrored the second base.
- I took the first base and did an Auto Color (Image>Adjustments>Auto Color); this made the image a bit more muted and a tad darker.
*If you're using a program that doesn't have Auto Color, then really all you need to do it play around with the contrast and maybe lower the saturation a bit, if you feel your image needs it.
- Still working on the same base, duplicate it twice; set the middle layer to screen 50% and the top layer to soft light 100%.
- Still on the same base; next I used Selective Coloring with the following settings:
REDS:
-10, 0, +10, +20
YELLOWS:
-10, 0, +10, +10
CYANS:
+100, +10, -50, +10
BLUES:
+100, +10, -10, +10
NEUTRALS:
+5, 0, 0, +5
Hit OK.
Then I upped the contrast by +10.
*If using a program without SC, the main thing I did was make the blues and cyans more prominent. You could most likely achieve this by using Color Balance or a Hue/Saturation/Lightness layer.
- Now onto the other base; I started the same way I started with the other one, used Auto Color, but I also used Auto Levels (Image>Adjustments>Auto Levels):
What this mainly does is make it lighter and contrasted nicer and also, as before, a bit more muted.
That's really all I wanted to do with it since it's not going to be the main focus of the icon anyway.
- Now copy your second base and paste it as a new layer on your first base; set this layer to Exclusion.
>
For now, just leave the opacity at 100% and start erasing the parts covering young Hannibal's face and body, so that the second base is only showing in the left part of the icon. When you've finished erasing, lower the opacity of the top layer (the second base) to 75%.
And that's it. :) Not identical to the original, but it's close. ^-^'
**Opacities for layers may vary depending upon your image; don't be afraid to experiment!**
Hope this helps someone! :)
FRIEND ME | RESOURCES | OTHER TUTORIALS