tutorial #4

to
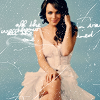
Photoshop CS2 but ONLY color layers.
Easily translatable.
Notes
This tutorial will not work for every icon and is not intended to produce an exact replica.
Play around with opacities and layers to acheive your own unique look.
This tutorial works best with bases similar to this example.
Step 1.
Duplicate your base.
Set this layer to screen at 60%.

Step 2.
Duplicate your base.
Drag this layer to the top and set it to softlight at 100%.

Step 3.
Create a new layer and fill it with (#021b32).
Set this layer to exclusion at 100%.

Step 4.
Create a new layer and fill it with (#fff9f6).
Set this layer to multiply at 100%.

(just a tiny bit darker, if you cant see the difference)
Step 5.
Create a new layer and fill it with (#d9d9d9)
Set this layer to colorburn at 100%.

Step 6.
Texture/Brushes.
I chose this scratch texture and set it to screen.
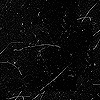
(by

peoplemachines, current knowledge)

Finally I added a simple text brush near Lindsay's shoulders and erased the parts that covered her.

And there you have it!
This icon will be featured in an icon post later on in the next couple days.
Join/watch

afternoon_view to catch it :D
Feel free to use this icon early; just make sure to credit

afternoon_view or

glamourfix