TUTORIAL III - Blue Vibrant Coloring
TUTORIAL III
Dumbledore and Minister
Blue-ish Green Coloring, Vibrant Coloring
Hey everybody! Tutorial #3 today! Everybody liked the coloring of a particular icon so much, I wrote a tutorial! Whoop!
Today we'll be going from: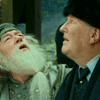
to: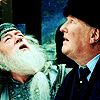
. Under the cut!
I. Step One
Okay, we start with this base image of Dumbledore and the Minister I got off
Teh_Indy's GoF Gallery. I suggest you check it out, the prime resource of GoF screencaps, aside from
dj43's of course, unless you have dial-up. Anyway, the image was blurry so I cropped, resized to 100x100 and sharpened once. I suggest you do the same with your image and Edit>Fade Sharpen as needed. Also, you might want to use Image>Adjustments>Auto Levels and Auto Color. I faded my Auto Color to 55% because I wanted to keep some of the blue-ness of the image. Then, I duplicated the background image and set it to Screen 100%. This coloring procedure will take a lot of Screen layer but we'll leave it like that for now. I used 2 screen layers (one 100% and the other one 50%) for mine, but that's just me.
A F T E R S T E P O N E
II. Step Two
Next, I added two gradients made by
77words. Instead of looking for these specific gradients, simply download her Zip file containing ALL her gradients, or simply copy and paste these:
Add this first:
and set it to Color Burn 42%. Add this next:
and set it to Linear Burn 100%.
A F T E R S T E P T W O
III. Step Three
Next, I added a gradient again made by
77words. Again either download her Zip File or simply copy and paste the one below. I also added an Exclusion layer with the color #141a58.
Add this first:
and set it toScreen 55%. Add this next:
and set it to Exclusion 80%.
A F T E R S T E P T H R E E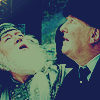
III. Step Four
Next, I added 2 fill color layer. One is #90daef in Hard Light 31% and the other is #efe190 on Darken 100%. Or you can be lazy and copy and paste these:
Add this first:
and set it to Hard Light 31%. Add this next:
and set it to Darken 100%.
A F T E R S T E P F O U R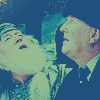
III. Step Five
Now, duplicate your base image and bring it to the top of the layers. Set it ot either Soft Light 100%, Hard Light 100%, Overlay 100%. This depends on your personal image. I set mine to Hard Light 100%. IF THE FINAL PRODUCT SEEMS TO DARK, GO BACK TO YOUR BASE IMAGE, DUPLICATE IT AND SET THE DUPLICATE TO SCREEN, Do this as it is needed.
A F T E R S T E P F O U R
And we're done! Feel free to friend me, mem this, ask me anything! Tell me if you found this useful and show me what you made with this tutorial.
SAMPLE ICONS MADE WITH THIS TUTORIAL:

A N D
A N D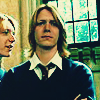
A N D
THANKS FOR READING!
Dumbledore and Minister
Blue-ish Green Coloring, Vibrant Coloring
Hey everybody! Tutorial #3 today! Everybody liked the coloring of a particular icon so much, I wrote a tutorial! Whoop!
Today we'll be going from:
to:
. Under the cut!
I. Step One
Okay, we start with this base image of Dumbledore and the Minister I got off
Teh_Indy's GoF Gallery. I suggest you check it out, the prime resource of GoF screencaps, aside from
dj43's of course, unless you have dial-up. Anyway, the image was blurry so I cropped, resized to 100x100 and sharpened once. I suggest you do the same with your image and Edit>Fade Sharpen as needed. Also, you might want to use Image>Adjustments>Auto Levels and Auto Color. I faded my Auto Color to 55% because I wanted to keep some of the blue-ness of the image. Then, I duplicated the background image and set it to Screen 100%. This coloring procedure will take a lot of Screen layer but we'll leave it like that for now. I used 2 screen layers (one 100% and the other one 50%) for mine, but that's just me.
A F T E R S T E P O N E
II. Step Two
Next, I added two gradients made by
77words. Instead of looking for these specific gradients, simply download her Zip file containing ALL her gradients, or simply copy and paste these:
Add this first:
and set it to Color Burn 42%. Add this next:
and set it to Linear Burn 100%.
A F T E R S T E P T W O
III. Step Three
Next, I added a gradient again made by
77words. Again either download her Zip File or simply copy and paste the one below. I also added an Exclusion layer with the color #141a58.
Add this first:
and set it toScreen 55%. Add this next:
and set it to Exclusion 80%.
A F T E R S T E P T H R E E
III. Step Four
Next, I added 2 fill color layer. One is #90daef in Hard Light 31% and the other is #efe190 on Darken 100%. Or you can be lazy and copy and paste these:
Add this first:
and set it to Hard Light 31%. Add this next:
and set it to Darken 100%.
A F T E R S T E P F O U R
III. Step Five
Now, duplicate your base image and bring it to the top of the layers. Set it ot either Soft Light 100%, Hard Light 100%, Overlay 100%. This depends on your personal image. I set mine to Hard Light 100%. IF THE FINAL PRODUCT SEEMS TO DARK, GO BACK TO YOUR BASE IMAGE, DUPLICATE IT AND SET THE DUPLICATE TO SCREEN, Do this as it is needed.
A F T E R S T E P F O U R
And we're done! Feel free to friend me, mem this, ask me anything! Tell me if you found this useful and show me what you made with this tutorial.
SAMPLE ICONS MADE WITH THIS TUTORIAL:
A N D
A N D
A N D
THANKS FOR READING!