![](http://i226.photobucket.com/albums/dd232/Friends_RnR/Previews/jentut.png)
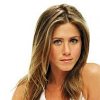
First we are going to start with
this image,Remember that you can change the settings according to your image.
![](http://i226.photobucket.com/albums/dd232/Friends_RnR/Tutorials/tut1.png)
Sharpen your base 20
![](http://i226.photobucket.com/albums/dd232/Friends_RnR/Tutorials/tut2.png)
Screen it and set the opacity at %20
![](http://i226.photobucket.com/albums/dd232/Friends_RnR/Tutorials/tut3.png)
Create a new layer with #79e3ff,set this layer as Grain Merge at %50
![](http://i226.photobucket.com/albums/dd232/Friends_RnR/Tutorials/tut4.png)
Duplicate your base,drag it to the top and set to Soft Light at %100
![](http://i226.photobucket.com/albums/dd232/Friends_RnR/Tutorials/tut5.png)
Create a new layer and fill it with #ffdcab,set it to Burn(I think in PS this is Colour Burn),at %100,and you´re done!
Other results:
![](http://i226.photobucket.com/albums/dd232/Friends_RnR/Tutorials/tut6.png)
![](http://i226.photobucket.com/albums/dd232/Friends_RnR/Tutorials/tut7.png)
![](http://i226.photobucket.com/albums/dd232/Friends_RnR/Tutorials/tut8.png)