Tutorial | Icon #032
How to go from 
to
For Photoshop CS2. The .psd file can be found here.
I'm using one Hue/Saturation Layer, one Curves Layer and one Color Balance Layer.
S T E P : O N E - T H E : B A S E

Crop your image down to 100x100.
Sharpen it once and (if you want) smooth the skin.

S T E P : T W O - H U E / S A T U R A T I O N

Go to Layer >> New Adjustment Layer >> Hue/Saturation
Set the Saturation to -62.
This takes out the color - alot ^^

S T E P : T H R E E - C O P Y : B A S E

Duplicate your base.
Drag the copy on top of the other layers.
Set the copy to Soft Light.

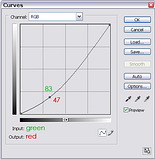
S T E P : F O U R - C U R V E S

Go to Layer >> New Adjustment Layer >> Curves.
Use Input: 83 and Output: 47.
This intensifies the colors.

S T E P : F I V E - Color Balance

Go to Layer >> New Adjustment Layer >> Color Balance.
For Midtones use +15 | -15 | +5.
For Shadows use +16 | 0 | 0.
Leave Highlights untouched.

T H E : E N D
to
For Photoshop CS2. The .psd file can be found here.
I'm using one Hue/Saturation Layer, one Curves Layer and one Color Balance Layer.
S T E P : O N E - T H E : B A S E
Crop your image down to 100x100.
Sharpen it once and (if you want) smooth the skin.
S T E P : T W O - H U E / S A T U R A T I O N
Go to Layer >> New Adjustment Layer >> Hue/Saturation
Set the Saturation to -62.
This takes out the color - alot ^^
S T E P : T H R E E - C O P Y : B A S E
Duplicate your base.
Drag the copy on top of the other layers.
Set the copy to Soft Light.
S T E P : F O U R - C U R V E S
Go to Layer >> New Adjustment Layer >> Curves.
Use Input: 83 and Output: 47.
This intensifies the colors.
S T E P : F I V E - Color Balance
Go to Layer >> New Adjustment Layer >> Color Balance.
For Midtones use +15 | -15 | +5.
For Shadows use +16 | 0 | 0.
Leave Highlights untouched.
T H E : E N D