Tutorial | Icon #028
How to go from 
to
For Photoshop CS2. I'm using a Curves Layer and a Color Balance Layer.
The .psd file can be found here.
S T E P : O N E - T H E : C U R V E S : L A Y E R

Sharpen the base once and/or smooth the skin.
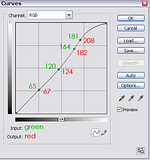
Go to Layer >> New Adjustment Layer >> Curves.
Use the settings you see in the screencap.
This gives the skin more color, a slightly healthier look :)

S T E P : T W O - C O L O R : B A L A N C E : 0 1

Go to Layer >> New Adjustment Layer >> Color Balance.
For Midtones use -9 | -4 | +19.

S T E P : T H R E E - C O L O R : B A L A N C E : 0 2

For Shadows use 0 | 0 | +25.

S T E P : F O U R - C O L O R : B A L A N C E : 0 3

For Highlights use 0 | 0 | +16.

S T E P : F I V E - T H E : B L O B

Take one of my light blobs and paste it over the layers.
Find a suitable position and set it to Screen.

S T E P : S I X - T H E : T E X T

Now write your text in Birch Std | Size: 24.

T H E : E N D
to
For Photoshop CS2. I'm using a Curves Layer and a Color Balance Layer.
The .psd file can be found here.
S T E P : O N E - T H E : C U R V E S : L A Y E R
Sharpen the base once and/or smooth the skin.
Go to Layer >> New Adjustment Layer >> Curves.
Use the settings you see in the screencap.
This gives the skin more color, a slightly healthier look :)
S T E P : T W O - C O L O R : B A L A N C E : 0 1
Go to Layer >> New Adjustment Layer >> Color Balance.
For Midtones use -9 | -4 | +19.
S T E P : T H R E E - C O L O R : B A L A N C E : 0 2
For Shadows use 0 | 0 | +25.
S T E P : F O U R - C O L O R : B A L A N C E : 0 3
For Highlights use 0 | 0 | +16.
S T E P : F I V E - T H E : B L O B
Take one of my light blobs and paste it over the layers.
Find a suitable position and set it to Screen.
S T E P : S I X - T H E : T E X T
Now write your text in Birch Std | Size: 24.
T H E : E N D