Vivandiere Modding Tutorial
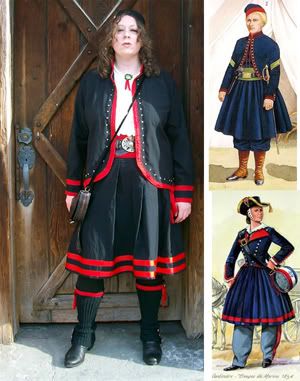
I looked at dozens of photos and illustrations of vivandieres before I started making this costume. (If you missed my post showing off this costume at the South Street Seaport, here it is again. I settled on the two at right for my primary inspiration - the jacket of the top one, and the skirt of the bottom. The shirt was purchased, and I simply added a velvet medallion, button, and bit of ribbon to the throat. The sash was also purchased, although it would have been easy to make one, but I found a sutler with great prices, so it was hardly worth the effort. Everything else but the bag and boots was modded or made by me. As I mentioned when I first posted these photos, I didn't use a pattern or machine, just a lot of patience. Credit must be given to Jen Thompson's Steampunk Zoauve costume, as that was a definite inspiration. If you want to know how I did it, see my directions behind the cut.
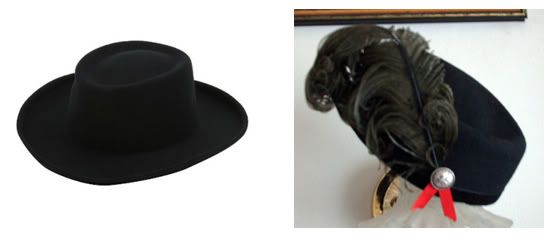
Most vivandieres wore hats like the one in the bottom illustration. A few wore kepis typical of Civil War uniforms. I decided to go my own way with the hat since I don't like kepis and couldn't find a reasonably priced brimmed hat (this vivandiere hat, while very nice, is $100) My hat originally looked more or less like the one at left, except even uglier. I had removed the plume to put on another hat, and tried unsuccessfully to mold it into a tricorn, when I figured I had nothing left to lose by cutting it. I simply cut off the brim and cut the crown down to be a low skimmer. Then I sewed velvet ribbon around the bottom and sewed on a vintage plume, antiqued button, and bit of ribbon to pick up the color of the contrasting trim of my costume. Bobby pins keep it affixed to my head. I had all of this stuff lying around the house so the hat cost me nothing.
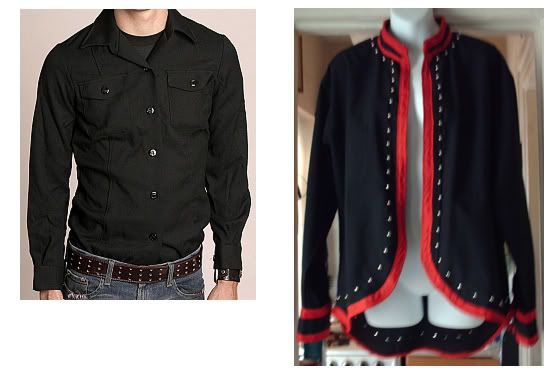
The jacket was by far the most labor intensive. Vivandiere jackets are of two types: short with cutaway hems and ball buttons or studs as seen in the top illustration, and longer, tightly fitted jackets with buttons or braid down the front as seen in the bottom illustration. I started with a navy surplus shirt as seen at left. Any shirt can be modded into a jacket, but it works best with thicker fabrics such as canvas, denim, chamois, twill, heavy polyester, etc. However your shirt fits, that's how your jacket will fit, so if you want a fitted jacket, start with a fitted shirt. Below are the steps involved in turning a shirt into a jacket:
- Carefully pick off the pockets with a seam ripper and cut off the collar. Also remove the buttons except those at the cuffs, which you will need to hold your sleeves closed.
- Try the shirt on in front of a mirror. With a piece of tailor's chalk, draw a new hem on one side only. Be as creative as you want - you can make a short bolero, a cutaway or swallowtail hem, or just a straight hem like a sack coat. I decided on curves coming to a point. I left the back of the shirt as it was, but you can alter the back as well.
- Cut slightly below the chalk lines - best to leave an inch or two in case you change your mind. If you aren't going to use bias tape, then don't forget about seam allowances.
- Try the shirt on again and see how you like the hem. If it looks good, cut along the actual chalk lines. Then fold the shirt in half and trace the hem onto the other side, and cut that too.
- This part takes forever, but bias tape is the easiest way to work with curved corners. If you don't have curved corners, you can just hem your jacket. Otherwise, use bias tape that is wide enough to cover the button holes. Red is traditional for vivandieres, but you can use a constrating or same color. Satin bias tape might create a fancier finished product, but I used cotton. It is best to use double-sided bias tape so your stitches won't show on the inside. You will need approximately 8-12 yards of tape to trim your jacket as mine is, depending on the size of your shirt. Pin the bias tape around the hem, making sure to go through both sides of the tape. It's tricky to get it around the curves, but it helps to press it with a hot iron.
- Now sew all that bias tape on using a thread that matches the color of the tape. It will take about a year if you do the sleeves and collar as I've done.
- For the collar, sew the tape to cover the raw edge, then add a narrower ribbon in a matching color below it. I used grosgrain ribbon.
- The hard part is over. Now get some push-through studs, like from StudsAndSpikes.com, and affix them next to the tape. Size and positioning are up to you. You can use ball buttons too, but it will take a lot longer.
- You can go further and add military braid or trim to the chest, wrists, or elbows, fancier cuff buttons, chains and buttons to hold the jacket closed, a lining, or anything else you wish to add.
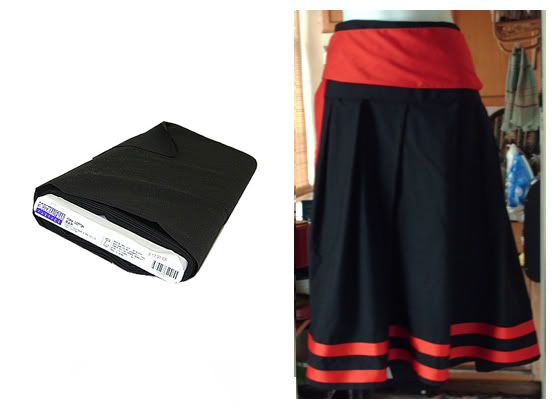
The skirt wasn't a mod, just a quickie pleated skirt I whipped up because I had a nice long piece of black cotton lying around. It's a lot easier than I thought it would be, however, pleating takes up way more fabric than I had expected, so I didn't get as many pleats as I had wanted. It's very simple - start by making a waistband as wide as you like. I knew I'd be wearing a sash (which is not part of the skirt), so I made a wide waistband. The skirt part should be a long strip of a width corresponding to the desired length of the skirt, minus the waistband. If you want a lot of pleats, use a very long strip of fabric and pin one end to an end of the waistband. If you have a finite amount of fabric, pin both ends, and start pleating in the middle. Fold your pleats, pinning each one in place. Press down, then sew across the waistband. To give your pleats more resilience, add a few stitches running vertically down the edge of each pleat. Then sew up the open edge of the skirt, starting at the bottom and going up to the waist in case you screw up - easier to hide an uneven waist than uneven hem. I used hook-and-eye closure but a zipper would be fine,too. Then add your trim. Since I did all this by hand, to save time, I used fusible tape to affix the red ribbon around the hem and for the top hem of the waistband.
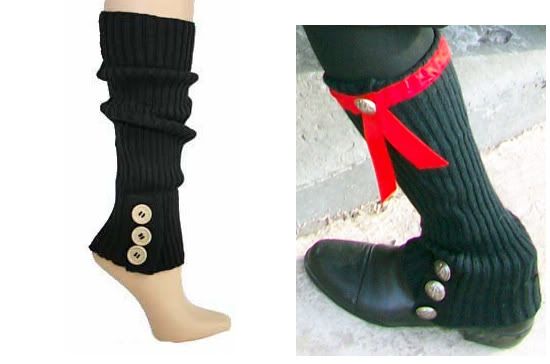
Vivandieres always covered their legs, as any decent 19th century woman would have done. Some wore leggings as in the top illustration, but most wore loose trousers underneath their shorter skirts. I'm not crazy about the pants-under-skirts look; it's rather unflattering. So I transformed these cheap button legwarmers into gaiters. Swapping out the plain buttons for silver military ones was easy. The hard part was getting the bias tape trim around the top, because these are stretchy leg warmers, so I had to sew the trim on while I was wearing them, otherwise it would have been too narrow. After I sewed on the trim, I folded it down and added the silver button and the ribbon at the top. The red ribbon trim is meant to resembled the sock flashes worn with Scottish kilts.
The proper accessories for a vivandiere would be a barrel containing brandy, whiskey, or water, a gun, a sword, sash, and/or a belt. As I mentioned, I couldn't find a barrel at a reasonable price, and carrying even fake weaponry in NYC is too risky, so my only accessories are my sash, belt, and the leather bag.
I hope I've inspired you, if not to make your own complete vivandiere costume, at least to try modding a shirt into a jacket or spiffing up a pair of inexpensive legwarmers. You don't need a lot of money, fancy machines, patterns, or even skill or talent to make a splendid outfit. All you need is patience!