animationShop Tutorial: Making icon out of gif (plus PSDs)
alriiight tutorial tiime :D
today we will be making an icon out of any gif you want (if you dont have a gif ready [here] is a tutorial to make one out of any video). we are going to be using AS & PS because i know not everyone has imageready on photoshop. :D
** dont laugh at my XP "skin" :P

>>
AS = AnimationShop
PS = Photoshop
you will need the following:
*animationshop
*photoshop
*.gif file
1. open up photoshop and animation shop. we will start with AnimationShop.
2. after opening AS open the gif that you want in the icon
i will be using a pre-made one ^_^


3. now crop it to a sort of rectangle shape as you progress you will find new and more creative ways you make these but this is basic


CROPPED

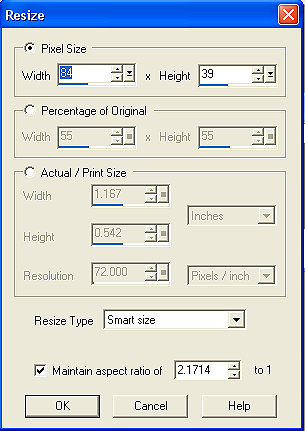
4. now resize it
Animation >> resize or Shift - S
these are my resizing settings :D
5. after resizing it, select the first frame, right-click and copy
6. we will then open it in Photoshop
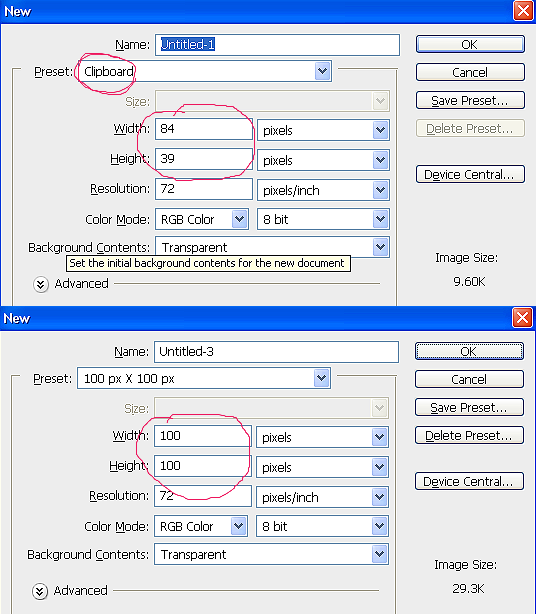
file >> new >> OK [photoshop would already have your clipboard
sizing. my current size is 00x00 . i usally change it to 100x100. cause thats what we'll need in the end, so go ahead and change from 00x00 to 100x100
7. now start on the icon base this will be where your gif will lay ^^. ctrl+V or paste the 1st image of the gif on to the 100x100 image

i have the following bases; click either one or both to download PSD versions!


*you want to make sure that the border or whatever will around the gif is the right size, thats why we copied the first image of the animation.
8. after spicing up your base, you want to save it as a .png file.

*im keeping the first frame on the base so i can get it just right
9. now back AS! open up the .png file
10. after youve done that you want to go back to the animation and see the number of frames in the animation
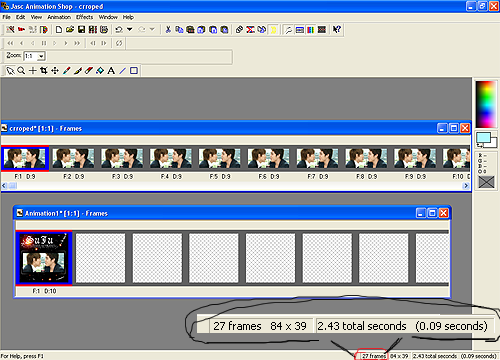
11. now you want to have that same number frames with your .png image! so what we are going to do is copy Ctrl - C and paste behind the current frame Ctrl - Shift - L till you have the same amount of frame!
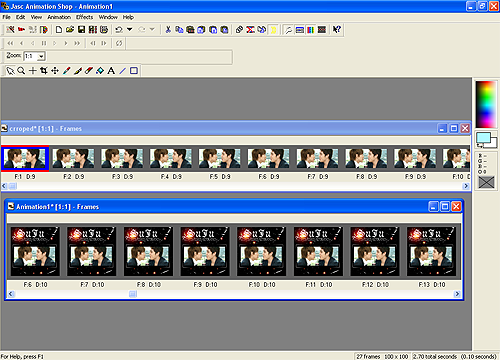
12. now, go back to the first frame of your .png file and click on it, you dont have to do anything to it just make you sure youve selected the very first frame.
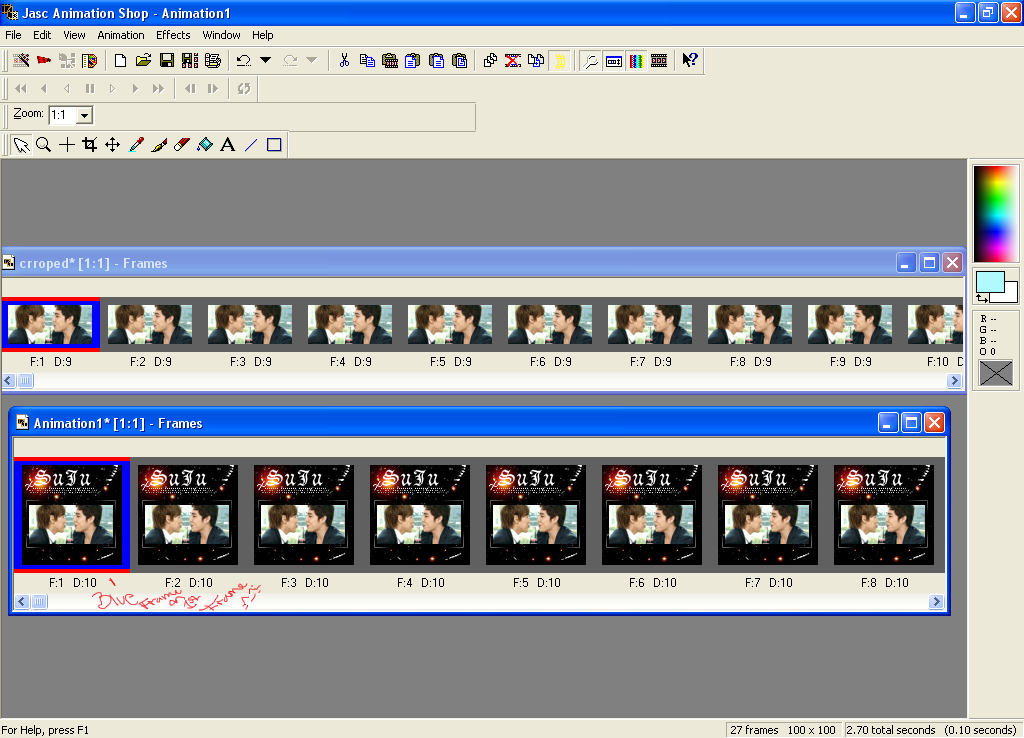
13. now back to the gif ^^ select all frames (Ctrl - A)

14. Now drag the animation onto the .png image!!! place it just right... right where you want it... just how you like it ...

PERFECT!!
*selecting the first frame like we did = animation starts on the first frame*
15. to preview your animation click the
button on top of AS screen!
16. now that you have your icon you most likely have to delete some frames in order for it to be under 40 KB, or LJ wont accept your icon *_*
*i usually delete frames that duplicate, and delete every other frame
then press the
button to delete
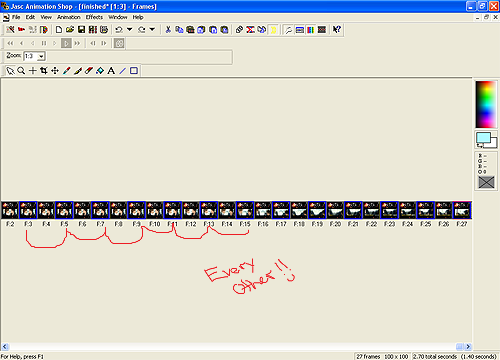
*one way to see how many KBs/MBs your icon is to save your file
F12 >> save as a << .gif
and next >> next >> next >> till you get a a window like this
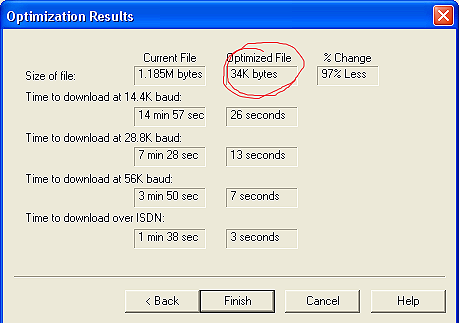
thats how you know!! -- remember we want it to be 40kb or under ^_^
so delete enough frames
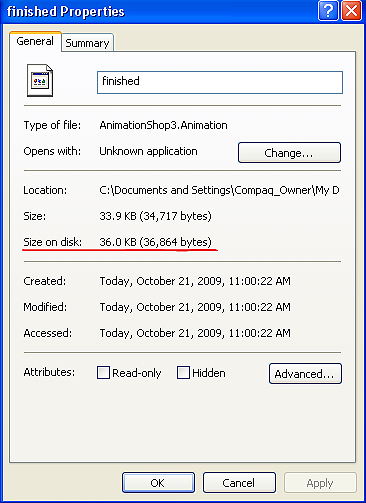
another way to kind out how many kbs your icon is, save and open the folder it is in hover over the image and it will till you
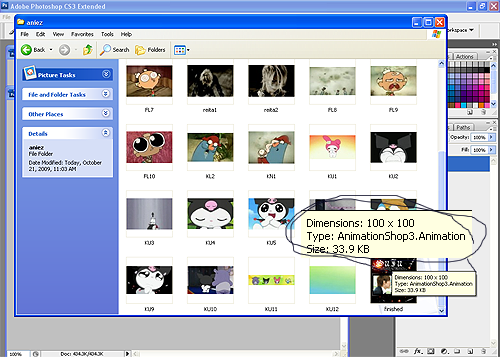
or right click >> properties
17. the result! ~ its a bit faster then before i think thats a plus though ^^

my finished producted is messed up because of the !!!!!! xD. yours will turn out better -- FOR SURE!! =D
i hope this helped you in ANYWAY! =D
if you have any questions or any problem or if ive made any mistakes with this tutorial please let me know! i would gladly take your requests, suggestions, and Questions!!~
Comments Are <3
-ADD ME! :: For more updates!
-My DEVIANT ART. :: For more art..?
- RESOURCES. :: My Resources/credit list!
THANK YOU.
today we will be making an icon out of any gif you want (if you dont have a gif ready [here] is a tutorial to make one out of any video). we are going to be using AS & PS because i know not everyone has imageready on photoshop. :D
** dont laugh at my XP "skin" :P

>>

AS = AnimationShop
PS = Photoshop
you will need the following:
*animationshop
*photoshop
*.gif file
1. open up photoshop and animation shop. we will start with AnimationShop.
2. after opening AS open the gif that you want in the icon
i will be using a pre-made one ^_^


3. now crop it to a sort of rectangle shape as you progress you will find new and more creative ways you make these but this is basic


CROPPED

4. now resize it
Animation >> resize or Shift - S
these are my resizing settings :D

5. after resizing it, select the first frame, right-click and copy
6. we will then open it in Photoshop
file >> new >> OK [photoshop would already have your clipboard
sizing. my current size is 00x00 . i usally change it to 100x100. cause thats what we'll need in the end, so go ahead and change from 00x00 to 100x100

7. now start on the icon base this will be where your gif will lay ^^. ctrl+V or paste the 1st image of the gif on to the 100x100 image

i have the following bases; click either one or both to download PSD versions!
*you want to make sure that the border or whatever will around the gif is the right size, thats why we copied the first image of the animation.
8. after spicing up your base, you want to save it as a .png file.

*im keeping the first frame on the base so i can get it just right
9. now back AS! open up the .png file
10. after youve done that you want to go back to the animation and see the number of frames in the animation

11. now you want to have that same number frames with your .png image! so what we are going to do is copy Ctrl - C and paste behind the current frame Ctrl - Shift - L till you have the same amount of frame!

12. now, go back to the first frame of your .png file and click on it, you dont have to do anything to it just make you sure youve selected the very first frame.

13. now back to the gif ^^ select all frames (Ctrl - A)

14. Now drag the animation onto the .png image!!! place it just right... right where you want it... just how you like it ...

PERFECT!!
*selecting the first frame like we did = animation starts on the first frame*
15. to preview your animation click the

button on top of AS screen!
16. now that you have your icon you most likely have to delete some frames in order for it to be under 40 KB, or LJ wont accept your icon *_*
*i usually delete frames that duplicate, and delete every other frame
then press the

button to delete

*one way to see how many KBs/MBs your icon is to save your file
F12 >> save as a << .gif
and next >> next >> next >> till you get a a window like this

thats how you know!! -- remember we want it to be 40kb or under ^_^
so delete enough frames
another way to kind out how many kbs your icon is, save and open the folder it is in hover over the image and it will till you

or right click >> properties

17. the result! ~ its a bit faster then before i think thats a plus though ^^

my finished producted is messed up because of the !!!!!! xD. yours will turn out better -- FOR SURE!! =D
i hope this helped you in ANYWAY! =D
if you have any questions or any problem or if ive made any mistakes with this tutorial please let me know! i would gladly take your requests, suggestions, and Questions!!~
Comments Are <3
-ADD ME! :: For more updates!
-My DEVIANT ART. :: For more art..?
- RESOURCES. :: My Resources/credit list!
THANK YOU.