Tutorial # 3
So we'll go from this 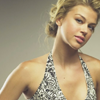
to this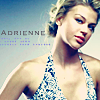
- Made in ps7
- Not translatable
- Very easy
1.Crop your pic, duplicate it twice (Ctrl+J). Set the first duplicate on screen 100% and the second duplicate on soft light 100%
2.Go to Layer> New adjustment layer>Selective color, and put these settings
Reds
C = -100
M = +24
Y = +100
B = +100
Neutrals
C = +38
M = +11
Y = -16
B = +2

3.Go to Layer > New adjustment layer > Brightness/contrast. And put in these settings
Brightness = -8
Contrast = +16

4.Duplicate that layer
5.Go to Layer > New fill layer > solid color and fill with # 022243 and set it to exclusion 50%

to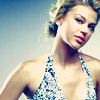
6.Add some brushes and text..I used tiny text by Rauvinne and typed Adrienne by using the font copperplate gothic light.
7.Merge all layers (shft + ctrl+ E) go to Filter> sharpen> unsharp mask .. use these settings
Amount 35%
Radius 1.0 px
Threshold 0 levels
And you're done!
Other icons with same technique
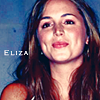

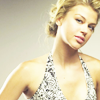
to this
- Made in ps7
- Not translatable
- Very easy
1.Crop your pic, duplicate it twice (Ctrl+J). Set the first duplicate on screen 100% and the second duplicate on soft light 100%
2.Go to Layer> New adjustment layer>Selective color, and put these settings
Reds
C = -100
M = +24
Y = +100
B = +100
Neutrals
C = +38
M = +11
Y = -16
B = +2
3.Go to Layer > New adjustment layer > Brightness/contrast. And put in these settings
Brightness = -8
Contrast = +16
4.Duplicate that layer
5.Go to Layer > New fill layer > solid color and fill with # 022243 and set it to exclusion 50%
to
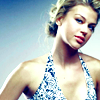
6.Add some brushes and text..I used tiny text by Rauvinne and typed Adrienne by using the font copperplate gothic light.
7.Merge all layers (shft + ctrl+ E) go to Filter> sharpen> unsharp mask .. use these settings
Amount 35%
Radius 1.0 px
Threshold 0 levels
And you're done!
Other icons with same technique