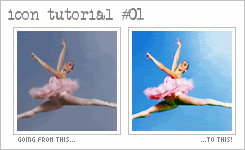
Icon Tutorial #01 - Simple Colouring

This tutorial was created using PSP 8, but can the same effects can be used in Photoshop as well.

1. Crop and resize your base so it is 100x100 pixels. When resizing, make sure your base has already been cropped so it is a perfect square, and that you resize using Smart Size. (To do this go to Image - Resize, then near the bottom find Resample using: and select Smart Size)

2. Go to Layers - New Adjustment Layer - Curves... Under the Adjustment bar, and Channel RGB, make the Input 160, and the Output 175. Depending on your image, you may need to fiddle with these numbers.

3. Right click your Background layer, and Duplicate it. Drag this to the top, and set the Blend Mode to Screen. Set the opacity to 70%. (You may need to set the opacity higher or lower, depending on how dark or light your image was just begin with. The darker the image, the higher the opacity needed)

4. Create a new layer (Layers - New Raster Layer), set the Blend Mode to Burn, and the opacity to 35%. Fill it with the colour #61F9F4. (To do this, double click the colour on your Materials tool bar, and paste the hex code in the box that says HTML:)

5. Create a new layer (Layers - New Raster Layer), set the Blend Mode to Saturation, and the opacity to 38%. Fill it with the colour #5DFF1D.

6. Right click your Background layer, and Duplicate it. Drag this to the top, and set the Blend Mode to Soft Light. Set the opacity to 100%. (You may need to set the opacity higher or lower, depending on your image)

7. Create a new layer (Layers - New Raster Layer), set the Blend Mode to Burn, and the opacity to 100%. Fill it with the colour #E6E6E6.

8. Flatten the layers. (Layers - Merge - Merge All (Flatten). Right click your new Background layer, and Duplicate it. Set the opacity to 50%. Sharpen this new layer. (Adjust - Sharpness - Sharpen) For a softer effect, lower the opacity of this layer. For a sharper effect, raise it.

9. Create a new layer (Layers - New Raster Layer), set the Blend Mode to Screen, and the opacity to 60%. Now, click on your paint brush tool. Set the Hardness to 0, and the size to 100. Click once in the upper right corner. To make this brighter, set the opacity of the layer higher. To make it less noticeable, decrease the opacity.