GIMP Tutorial #015
Going from this: 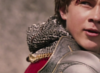
to this: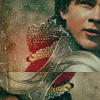
Requested by wunderkind_lucy .
1. Open up a 100x100 image in GIMP. Open your chosen base as a layer. Scale and crop it so that it’s shorter than 100 pixels high.
2. Sharpen, etc. I sharpened mine to 25.
3. Duplicate it and use the flip tool to flip it once horizontally and once vertically. Position this layer below your original one. Merge your layers.
4. Duplicate your base and set the new layer to ‘Overlay’ at 40% opacity. Merge your layers.
5. Go Colours>Colour Balance. Use these settings:
Shadows: -10, 4, 13
Midtones: 35, -6, 35
Highlights: 0, 20, 0
Check ‘Preserve Luminosity’.
6. Create two new layers filled with 311c08. Set both to ‘Screen’ at 80%.
7. Duplicate your base and bring it to the top. Set this layer to ‘Darken Only’ at 100%. Your image will go back to looking exactly like your base for a minute here. Don’t worry - that’ll change in the next step.
8. Keep this layer selected and go to Colour Balance:
Shadows: 0, 6, 3
Midtones: -17, 11, -14
Highlights: -8, 0, 0
Check ‘Preserve Luminosity’.
This layer might not look like it makes a difference at all, but it almost always does, even if it’s hard to see.
9. Duplicate your base again and bring it to the top. Set this layer to ‘Hard Light’ at 40%.
10. Go to Colour Balance one more time:
Shadows: -17, 7, -15
Midtones: 39, 31, -29
Highlights: 13, 4, 0
Check ‘Preserve Luminosity’.
11. Create a new layer filled with 3086b3. Set it to ‘Lighten Only’ at 15%. Merge your layers.
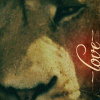
12. Add a fuzzy red brush set to ‘Screen’ at 70%.
13. Insert this texture:
 by jordannamorgan . Set it to ‘Multiply’ at 100%. Flip it if necessary.
14. Insert this texture:
 also by jordannamorgan . Set it to ‘Screen’ at 80%. I used a black brush to get rid of the white spots on Peter’s face.
15. Add text if you like, merge your layers and save.
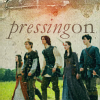
Variations on this tut:
to this:
Requested by wunderkind_lucy .
1. Open up a 100x100 image in GIMP. Open your chosen base as a layer. Scale and crop it so that it’s shorter than 100 pixels high.
2. Sharpen, etc. I sharpened mine to 25.
3. Duplicate it and use the flip tool to flip it once horizontally and once vertically. Position this layer below your original one. Merge your layers.
4. Duplicate your base and set the new layer to ‘Overlay’ at 40% opacity. Merge your layers.
5. Go Colours>Colour Balance. Use these settings:
Shadows: -10, 4, 13
Midtones: 35, -6, 35
Highlights: 0, 20, 0
Check ‘Preserve Luminosity’.
6. Create two new layers filled with 311c08. Set both to ‘Screen’ at 80%.
7. Duplicate your base and bring it to the top. Set this layer to ‘Darken Only’ at 100%. Your image will go back to looking exactly like your base for a minute here. Don’t worry - that’ll change in the next step.
8. Keep this layer selected and go to Colour Balance:
Shadows: 0, 6, 3
Midtones: -17, 11, -14
Highlights: -8, 0, 0
Check ‘Preserve Luminosity’.
This layer might not look like it makes a difference at all, but it almost always does, even if it’s hard to see.
9. Duplicate your base again and bring it to the top. Set this layer to ‘Hard Light’ at 40%.
10. Go to Colour Balance one more time:
Shadows: -17, 7, -15
Midtones: 39, 31, -29
Highlights: 13, 4, 0
Check ‘Preserve Luminosity’.
11. Create a new layer filled with 3086b3. Set it to ‘Lighten Only’ at 15%. Merge your layers.
12. Add a fuzzy red brush set to ‘Screen’ at 70%.
13. Insert this texture:
 by jordannamorgan . Set it to ‘Multiply’ at 100%. Flip it if necessary.
14. Insert this texture:
 also by jordannamorgan . Set it to ‘Screen’ at 80%. I used a black brush to get rid of the white spots on Peter’s face.
15. Add text if you like, merge your layers and save.
Variations on this tut: